BSD High Power Rocketry 38 Special
BSD High Power Rocketry - 38 Special {Kit}
Contributed by Scott Pearson
| Construction Rating: | starstarstarstarstar |
| Flight Rating: | starstarstarstarstar_border |
| Overall Rating: | starstarstarstarstar_border |
| Manufacturer: | BSD High Power Rocketry  |
Brief:
The 38 Special is labeled as a High performance 3 inch diameter rocket designed
for G through J motors. It includes double tubing (for added strength and
durability), 11 inch payload bay, a 38mm motor mount, vinyl decals, motor
retention, and rail buttons.
Construction:
I bought the kit directly from BSD, which came in the mail in a timely manner
and well packed in a sturdy box. All the parts were included and nothing
damaged. The kit has a large number of parts.
- 1 nose cone
- 1 34in booster airframe
- 1 11.25in payload section
- 4 coupler tubes
- 1 38mm motor mount tube
- 1 3/16in aircraft plywood fins
- 1 bulkhead plate
- 2 centering rings
- 1 nylon shock cord
- 1 30in parachute
- 1 eyebolt assembly
- 1 motor retention kit
- 10ft of elastic shock cord
- 2 fin alignment guide
- 1 set of vinyl decals
- 4 removable plastic rivets
- launch lug
- rail buttons
The instructions with this kit are the standard of what instructions should be. Even a beginner who has never made a HPR kit before could follow these instructions with minimal problems. The instructions are 10 pages in length and go very far into detail, I read through them and then added a few changes to fit my design needs.
The paper tubes and aircraft plywood make take glue and epoxy well offering many options for building other than the suggested epoxy.
 Nothing out of the
ordinary is needed to build this kit just a hobby knife, glues and epoxies,
sandpaper, and finishing materials.
Nothing out of the
ordinary is needed to build this kit just a hobby knife, glues and epoxies,
sandpaper, and finishing materials.
What was different in this kit from others that I built is the double wall tubing. The extra coupler tubes are used to create this double wall. I made the mistake while installing these BSD has you installing them with epoxy. I did not see the reason for epoxy and try to use it only where really needed for two reasons, one is cost and the second is exposure. So I decided to use Yellow Glue, bad choice as one of the couplers got stuck while I was inserting it. I had to cut one of the couplers and put it on either side to make it work. I still think that epoxy is overkill and if I were to build it again I would use White Glue, as it would not seize up like the yellow glue did.
The body tubes are marked well but not cut but this is not a big deal with paper tubes. The fins were all shaped well and pre-sanded. All the pieces for the motor mount and fins fit together nicely. This kit also comes with motor retention (Kaplow clips) as part of the kit and was installed. The kit also comes with a fin alignment guide for setting the fins, which comes in very handy.
As this rocket would be for my level two attempt and because I planned to use dual recovery for this rocket, I made a few changes to the design. I cut two and a half inches off of the payload bay and glued it onto a Giant Leap Avionics bay. The bay was set to go between the payload bay and the main bay for dual deployment.
This kit also offers both launch lugs and rail guides; I opted for the rail guides. It sure is nice to have the option.
Finishing:
Finishing on this rocket is as simple or as hard as you want to make it. I went
for fairly simple, I filled in the small grooves with Fill 'n' Finish, sanded,
primed and painted. I painted it all one color as the decals give it a very
nice detailing.
Vinyl decals are easy to put on and give the rocket nice crisp lines and design that would be time consuming to recreate with paint and the decals are applied in just a few minutes.
Construction Rating: 5 out of 5
Flight:
All of the recommended motors were Aerotech motors, but with the current issues
of availability with AT motors I was planning a Cesaroni Pro38. I used the
5-grain case and a J-285 motor. I left the delay at its full length as I was
planning on using my altimeter for deployment.
I left out the elastic shock cord and added Kevlar® heat shields and tubular nylon for the recovery and a second chute.
Good fast lift off, straight flights.
Recovery:
My first flight did not go as planned. The avionics deployed early, around 6
seconds into what should have been 14 second flight. It zippered the airframe
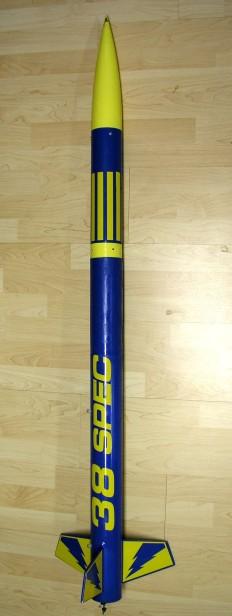
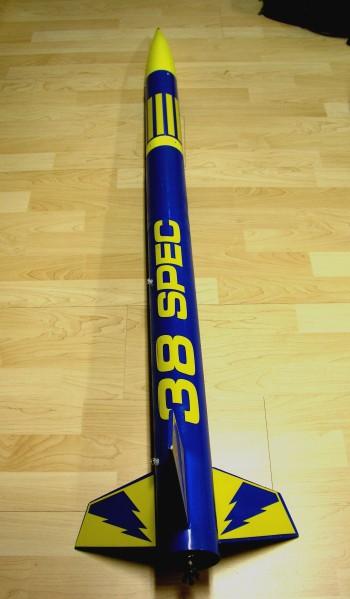
but only about 4 inches, not bad considering the deployment speed. [NOTE:
Pictures shown are post-zipper damage, thus the "38 Spec" decal
instead of "38 Special".]
The airframe was easily repaired and next mouth I was back to try again. Same motor and same rocket, double checking the electronics this time.
This time everything worked perfect. Great flight straight and true with a picture perfect recovery and the rocket came down without any damage.
Flight Rating: 4 out of 5
Summary:
PROs: Well designed kit, instructions that are very detailed and easy to
follow. Parts are all top quality with some nice extras like motor retention
and choice of launch lugs and or rail guides.
CONs: Well, hmmm...let's see...I do not really like elastic so I left it out but some people still like it so I guess its a matter of opinion on that.
Overall Rating: 4 out of 5
 |
 |
Flights
|
|
|
|
W.E. (May 10, 2004)