| Construction Rating: | starstarstarstarstar_border |
| Flight Rating: | starstarstarstarstar |
| Overall Rating: | starstarstarstarstar_border |
| Manufacturer: | BSD High Power Rocketry  |
 Brief:
The BSD Apache is a sleek, single stage high power sport rocket with boat tail
and elliptical fins designed for high performance flights. The description on
the BSD website includes, "this is a 'builder's kit' where previous (high
power) rocket building experience is highly recommended". The Apache would
also be a good candidate to be modified for hybrid use.
Construction:
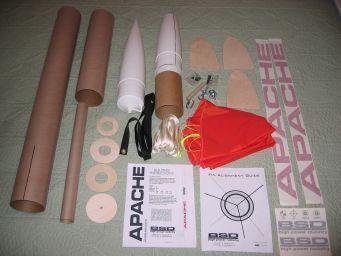
The kit has the following parts:
- 1 16.75" x 4" plastic nose cone
- 1 10.5" long plastic boat tail that reduces from 4" to 2.5" (a modified nose cone with some of the tip and shoulder cut off from both ends)
- 1 34" x 4" airframe body tube
- 1 17" x 4" payload body tube
- 1 17" x 38mm motor tube
- 3 match sanded 3/16" birch plywood elliptical shaped fins
- 2 4" x 38mm centering rings
- 1 3" x 38mm centering ring
- 1 4" coupler and bulkhead plate
- 2 eye bolt assemblies
- 1 15' x 9/16" tubular nylon
- 1 36" x 1" nylon shock cord strap
- 1 45" parachute
- 1 3/16" quicklink
- 1 1/2" launch lug
- 1 pair of rail buttons
- 1 motor retention system (blind nuts, bolts, and clips)
- High quality vinyl decals
- Instruction manual
- Fin alignment guide
This is my third HPR kit I've built and the first one with a boat tail. I had been looking for new challenges and the Apache did not disappoint...in fact, I was quite impressed! I inspected all parts (including all small parts were packaged separately in plastic bags) and read through the instructions before starting. And speaking of instructions, BSD sets the standard by including thorough documentation with extremely useful pictures and diagrams to walk you through the installation. Just because the Apache is a builder's kit doesn't mean that you should be left in the dark on how to build it! I also have to admit that I was tempted to "reverse engineer" the motor mount construction so that I could foam the boat tail with PML's expanding foam, however I built it stock, using 30-minute epoxy for the entire build, along with BSD's milled fiber added to the mix for the fin fillets.
 The build starts with
putting the motor mount into the boat tail. I started by thoroughly washing and
sanding the outside *and inside* of the boat tail before epoxying anything so
that the epoxy could get maximum bite. There also is a LOT of sanding for the
3" CR and one of the 4" CRs because their outer diameters need to fit
flush against the aft end and inside the boat tail, respectively. A belt sander
(or at the very least an orbital sander) is a MUST, otherwise it would take
forever to do this by hand! And to speed up the process of reducing the aft
(3") centering ring outer diameter, I used a jigsaw to eliminate the bulk
of the excess wood, then a combination of orbital sander and hand block sander
to bring it into the desired shape (2.5" diameter). Care must also be
taken when epoxying the aft centering ring to the boat tail if you install the
included blind nuts in the motor retention system, as epoxy can run into the
threads and close the holes. Foreseeing that as a potential problem, I CA'ed a
couple short 3/16" launch lugs on the back of blind nuts to ensure a clear
opening for the hex bolts yet allow the epoxy to flow around for maximum
adhesion to the boat tail. Small notches were cut into the boat tail to allow
the aft centering ring with the blind nuts to fit flush against the boat tail
as well.
The build starts with
putting the motor mount into the boat tail. I started by thoroughly washing and
sanding the outside *and inside* of the boat tail before epoxying anything so
that the epoxy could get maximum bite. There also is a LOT of sanding for the
3" CR and one of the 4" CRs because their outer diameters need to fit
flush against the aft end and inside the boat tail, respectively. A belt sander
(or at the very least an orbital sander) is a MUST, otherwise it would take
forever to do this by hand! And to speed up the process of reducing the aft
(3") centering ring outer diameter, I used a jigsaw to eliminate the bulk
of the excess wood, then a combination of orbital sander and hand block sander
to bring it into the desired shape (2.5" diameter). Care must also be
taken when epoxying the aft centering ring to the boat tail if you install the
included blind nuts in the motor retention system, as epoxy can run into the
threads and close the holes. Foreseeing that as a potential problem, I CA'ed a
couple short 3/16" launch lugs on the back of blind nuts to ensure a clear
opening for the hex bolts yet allow the epoxy to flow around for maximum
adhesion to the boat tail. Small notches were cut into the boat tail to allow
the aft centering ring with the blind nuts to fit flush against the boat tail
as well.
The fin slots are marked on the boat tail but you are left to cut the slots yourself, which is standard for all BSD kits. A Dremel or sharp X-Acto knife is suggested for cutting the slots, however, I found that a standard razor blade utility knife easily cut through the plastic boat tail in only 3 or 4 passes. Just as easy as cutting slots in kraft paper tubes! The shock cord is attached to the eyebolt in the upper CR and the main airframe tube is epoxied onto the boat tail. Once the tubing is attached, the remainder of the build is pretty much like any other HPR...attaching and filleting the fins followed by attaching the coupler, bulkhead, eyebolt, and nose cone. The nose cone has a bit of a loose fit too but I happened to have a couple of plastic rivets left over from my BSD Thor to secure it from accidental separation. You also don't want to forget to drill 1/16" vent holes in both the main airframe and payload tubes--that step isn't mentioned in the instructions but anyone building a kit this advanced would know to drill them!
BSD kits comes with both launch lug and rail buttons. I only installed the rail buttons, mounting one where the boat tail attaches to the main airframe and the other a couple inches forward of the CG.
If I had any complaints about the Apache construction is that it's not ready for dual deployment out of the box. BSD does have additional documentation available (not included with the instruction manual) on how to convert the Apache but it requires the purchase of an additional 10" airframe tubing, coupler, and bulkhead plus epoxying the payload coupler and bulkhead differently than in the kit's instructions, effectively lengthening the rocket by that additional 10". I however, think with such a long main airframe (34" tubing plus the 10.5" boat tail), I'd prefer have to--and still might sometime in the future--cut a 10" piece off the existing airframe and adding the coupler and bulkhead so that the Apache remains the same length. The Apache is a very (over)stable design so this additional equipment would require little adjustment to keep it that way. Also by shortening that main airframe, it would be easier to paint--handling an almost 4 foot long section of rocket can be challenging to get an even finish on!
Finishing:
This is where BSD kits shine, and I mean that in both the literal and
figurative sense! The glassine coated tubes are ready for paint and have
negligible spirals to fill. I prepped the fins with slightly diluted Elmer's
Fill 'n' Finish and then sanded them smooth. A couple of coats of primer with
sanding in between has these tubes looking near perfect before spraying Krylon
Gloss White on the tubes, Cherry Red on the nose cone, and a few stripes plus a
single fin with True Blue. Lastly, I provided a little accent to the blue
stripes with 1/8" metallic silver automotive pinstriping.
But what really defines a BSD kit as being different from others though is the high quality vinyl decals included. The Apache comes with 2 large red "APACHE", 2 small black BSD logos, 2 vent, 1 CG, and 1 CP decals. All of which isn't a third as many decals that come with the BSD Thor kit, but this design doesn't need that many decals to make a similar visual impact! Applying the decals is easy although you only get one chance to get it right. Simply peel off the thick backing paper and then lay the decal with the translucent adhesive paper onto the tubing. Gently smooth out the decal so to avoid any air bubbles and then slowly peel off the adhesive paper. The high quality vinyl does not need clear coating for any (additional) protection. I also had a custom vinyl decal made locally because I wanted to dedicate this rocket to someone who was largely responsible for my interest in rocketry.
Construction Rating: 4 out of 5
Flight:
BSD recommends a H128 for the first flight and says that the Apache loves
I211s. I however am partial to the easy prep of the Pro38 motors so I went with
the H153 for its first flight. Liftoff was perfect with plenty of oomph to get
it airborne yet have a majestic quality about it. The sleek (although
overstable) design prevented it from weathercocking significantly as it
continued upward to a guesstimate of 1400 feet.
Also, I've read a while back that the Pro38 motors are known for generating a lot of heat. I can now confirm that as the paint was blackened, bubbled, & even peeled off in spots on the aft end during post-flight inspection. Wow!
Recovery:
A big handful of dog barf (cellulose wadding) was loaded between the motor and
the nylon strap/tubular nylon with a 45" parachute attached. (All of the
kit documentation and information on BSD's website indicate that the Apache
comes with a 36" parachute.) Considering that my Thor recovers comfortably
using the very same 45" parachute yet weighs more than a full pound more
than the Apache, I reefed the shroud lines by tying them about 10" from
where the lines attach to the shock cord.
That was a smart decision for such a windy day. Ejection was at apogee but the chute took an extra second or two to open. The reefed lines brought it down comfortably yet quickly. It certainly would have drifted a lot further if I hadn't tied the lines!
Flight Rating: 5 out of 5
Summary:
The Apache has a beautifully simple shape that hides a challenging HPR build.
It requires more effort to build than most HPR kits out there but you are
rewarded for that effort. This is definitely NOT a kit for anyone just getting
into HPR but it has great flexibility in that it can be flown on H motors with
motor ejection or converted to dual deployment for Js (or Ks with the 54mm
option!) I would consider the Apache a good choice for a Level 2 certification
as long as the person signing off on your certification doesn't have a problem
with high altitude flights.
Overall Rating: 4 out of 5
 |
 |
Flights
|
|