Scratch Centuri Magnum D Hornet Clone
Scratch Centuri Magnum D Hornet
Contributed by Bill Eichelberger
| Construction Rating: | starstarstarstarstar |
| Flight Rating: | starstarstarstarstar_border |
| Overall Rating: | starstarstarstarstar_border |
| Manufacturer: | Scratch |
Brief:
The Centuri Magnum D Hornet was one of a handful of new kits produced under the Centuri name during the post-merger period of 1980-83. While few of these kits are as interesting or as highly regarded as the pre-1980 Centuri product line, they do have one big advantage over the "classics": Of the twenty or so kits introduced over this period, eleven of them were kitted using existing Estes parts. While this may not have seemed like a big deal in 1983--and may have seemed downright treasonous to many a Centuri purist--twenty-plus years later it makes it a lot easier for your average BAR with a taste for the Centuri nameplate to scrounge up parts. Let's face it, would you rather track down some existing Estes pieces or vintage Centuri components? Once again, the cheap thrills reverberate throughout the monkey house.
Parts list:
- BT-55 main body tube 14.425" length
- PNC-55AC nose cone (currently available in the Meteor Masher and Bullpup kits)
- 3/32" basswood fin stock
- 30" plastic streamer
- BT-50 engine tube
- Estes "E" engine hook
- CR-5055 centering rings
- 2050 engine block
- 24" length of 1/8" sewing elastic shock cord
- 24" Kevlar shock cord
- Medium snap swivel
The nicest thing about this piece of Centuri history is the ease with which it goes together. A classic 4FNC rocket by design, it is suitable for the whole range of skill levels, although those with more advanced skills might find it a little like taking tricycle lessons after mastering a unicycle. Instructions are adequate considering the simplicity of the design and hide only one thing resembling a "gotcha": they don't use part numbers that can be looked up anywhere. I solved this mystery via a posting on Yahoo Old Rockets where I was told the correct part number for the nose cone, an Estes PNC-55AC. (I was lucky enough to have several laying around in my parts box thanks to a large purchase from HobbyLinc some years earlier.) Once I was armed with this info, I looked up the nose cone's length in one of the old Estes catalogs on the Ninfinger site. It turns out that the exposed length of the cone is 5 3/8" long, which makes the length of the body tube 14.425". Mystery solved. I did make some changes during the construction. I glued a 24" length of Kevlar behind one of the centering rings when I installed the engine mount, and switched from balsa to basswood for the fin stock for both the added strength and ease of finishing.
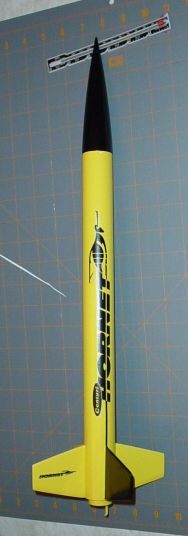
Finishing:
It's hard not to like a rocket with a paint job as simple as the Magnum Hornet. I started the finishing process by applying a coat of primer to the bare body tube to toughen it up a little, then began with the requisite thinned Elmer's Fill 'n' Finish. After two coats and copious sanding the tube spirals were gone and the fins were ready to be attached. The basswood fins needed far less attention than the balsa ones would have, so I was able to get by with only one coat of Fill 'n' Finish to them. After this, the body was ready to be re-primered. After another light sanding to take the dust particles off the primered hulk, I sprayed the body with several coats of Valspar Bumble Bee gloss, then masked off all but one fin and the nose cone, both of which were sprayed with Valspar gloss black. Once the minimal painting was finished, all that was left was the application of the decal, which I had printed on my inkjet printer using Bel Decal paper. The end result was one of my better efforts. Unfortunately those good looks wouldn't last long.
Construction Rating: 5 out of 5
Flight:
Launch day started off rough and just got worse. I overslept and rushed to put my launch gear in the back of the van. When we arrived at the launch site, one of my son's friends decided to help me unload and opened the back without checking to see if the load was stable. It wasn't. I wound up with a total of eleven rockets with some form of damage, from loosened fins to crushed body tubes. Luckily most of the damage was confined to the minor type and thanks to the wonders of CA, only one of the eleven failed to fly that day. The skies were clear and quiet when I finally found the time to launch the Magnum Hornet on a D12-7. It screamed off the pad, weathercocking somewhat in the slight breeze, just enough to make a gentle curve in the smoke trail, but overall it was a nice, stable flight. At ejection the quiet skies made for a perfectly audible thud as the nose cone rebounded back into the top of the body tube. The entire flight line flinched at the sound, and everyone looked at me with identical looks of "been there, done that, glad it's someone else for a change" on their faces.
Recovery:
The streamer made for a quick recovery in an adjoining field, and as soon as I reached the landing site I found what I had been expecting; a large gash in the top of the body tube and a yellow smear on the black nose cone. So much for the finish I had been so proud of. The dent was easily fixed with a flick of the thumb and some CA, but it still took away some of the enthusiasm that I had for the rocket. To date I've brought it along several times for launches, but I have yet to make a second flight with it.
Flight Rating: 4 out of 5
Summary:
For those who consider themselves either Centuri fans or just fans of simple rockets, the Centuri Magnum Hornet is a great project. Nothing fancy here, but the 24mm engine guarantees great performance while the simple two color paint scheme easily holds it's own in the looks department.
PROs:
- Ease of gathering Estes parts for a Centuri kit.
- Great looks and performance.
CONs:
- None, except for my occasional dismal luck.
Overall Rating: 4 out of 5
Related Products
 |
 |