| Construction Rating: | starstarstarstarstar |
| Flight Rating: | starstarstarstarstar |
| Overall Rating: | starstarstarstarstar |
Brief:
As model rocketry crept into the 1970s, Centuri developed a knack for producing
great looking kits with a sci-fi flair. One of the better looking kits of this
ilk produced during this time was the Orion, a rocket that many still consider
one of their all-time favorites. Large and nicely detailed, the Orion
inexplicably left production in 1977 but cloning it recently became easier with
the availability of reproduction parts from Moldin' Oldies and Semroc.
Construction:
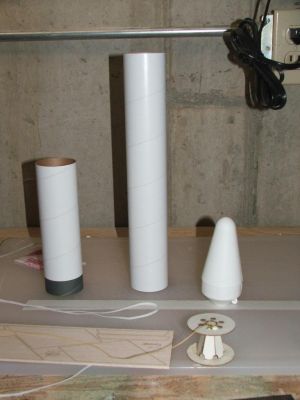
The parts list:
- 1 Nose Cone (Moldin' Oldies)
- 6 Pod Cones (Moldin' Oldies)
- 1 ST-20 Body Tube (Canister) 6" (Semroc)
- 1 ST-20 Body Tube (Main) 12" (Semroc)
- 3 ST-7 Body Tubes (Pod) 3" (Semroc)
- 1 ST-20 Baffle (Semroc)
- 1 Ejection Baffle (Semroc)
- 1 Balsa Strip
- 1 Balsa Sheet (Semroc - same die-cut as Centuri Taurus)
- 2 Centering Rings ST-9 to ST-20
Okay, so this isn't truly a clone of the Orion because I didn't build it with the Saturn wraps. I admit that freely and of my own will. Truth is, I didn't feel like messing with an undoubtedly complicated and expensive procedure for obtaining and applying a set of wraps. I just wanted something that would fly and suggest an Orion. There. I feel better now.
 Since I
eschewed the wraps for this "cloning" project, it would make sense
that I'd also not bother with the internal ejection baffles that the original
made use of, right? Wrong. I had seen some of the Semroc baffles at NARAM 47
and was intrigued enough with the idea of them that I wanted to include them in
this project. I'd previously included a FlisKits baffle in a Centuri Taurus
upscale that I did earlier in the year and this seemed like a perfect
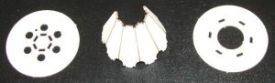
opportunity to compare the two. The skinny on the two: they're completely
different from each other in form, but not in function. The FlisKits baffle
makes use of a tube connector and two fiber circles with laser cut holes like
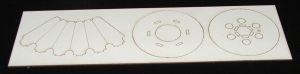
your standard Centuri-style baffle. The Semroc baffle is almost as much
sculpture as it is a rocketry component with three pieces of laser cut paper
that are constructed to form the baffle. It is very cool going together and
very functional. In short, they both work as advertised and either will make a
worthwhile addition to your next project.
Since I
eschewed the wraps for this "cloning" project, it would make sense
that I'd also not bother with the internal ejection baffles that the original
made use of, right? Wrong. I had seen some of the Semroc baffles at NARAM 47
and was intrigued enough with the idea of them that I wanted to include them in
this project. I'd previously included a FlisKits baffle in a Centuri Taurus
upscale that I did earlier in the year and this seemed like a perfect
opportunity to compare the two. The skinny on the two: they're completely
different from each other in form, but not in function. The FlisKits baffle
makes use of a tube connector and two fiber circles with laser cut holes like
your standard Centuri-style baffle. The Semroc baffle is almost as much
sculpture as it is a rocketry component with three pieces of laser cut paper
that are constructed to form the baffle. It is very cool going together and
very functional. In short, they both work as advertised and either will make a
worthwhile addition to your next project.

Finishing:
After ridding myself and the world of balsa grain and tube spirals, I sprayed
the entire Orion structure with Valspar primer. Once this arduous task was
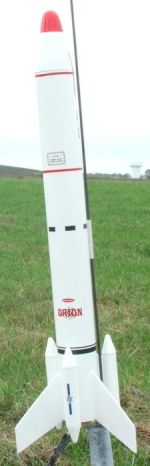
completed I tackled the incredibly detailed paint scheme, which is gloss white
all over except for a red spot of the tip of the main nose cone. In order to
get this spot sized correctly I sprayed the tip of the nose cone with Valspar
Cherry Red Gloss, then masked it off with a piece of scrap BT-55 tubing before
spraying the rest of the rocket with Valspar Gloss White. (If you aren't a big
fan of masking, this could be the project for you.) It took several coats to
get everything covered, but it looked great even before the decals were
applied. (Yeah, it would have looked better with the wraps, but we might never
know because it would have taken me a trip to the wizard for the courage to try
applying them.)
As for the decals, there are two different scans on the JimZ site. One appears to be an original, while the other looks to be someone's nicely redrawn and slightly modified version. Since my clone wasn't exact anyway, I printed out a set of the modified decals and used them. The differences are subtle with some blue "ORION" lettering where it looks like it might once have been black and a slightly larger type. Unless you're an absolute purist, you might not even notice it. The final product is great looking, especially if you like your rockets a bit beefier than most. This is a great looking design anyway, but the finished size definitely adds something to the project.
Construction Rating: 5 out of 5
Flight:
The Orion with its ST-20 main body tube is a fairly large kit anyway, so it
didn't take much for me to talk myself into giving it a little something extra
in the power department. I considered clustering it, but I'd already had a
summer full of that. I considered making it E-powered but didn't want to lose
it as I had with so many of my other E-powered birds in the not too distant
past. In the end, I settled for 24mm power because of the ease with which I
could switch between C and D power depending on the conditions. This turned out
to be a good decision.
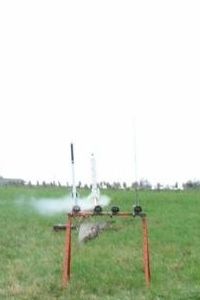
I chose a C11-3 for the first flight. It was a mildly windy day and the rocket cocked into the wind immediately upon leaving the pad. Ejection occurred just as the rocket reached apogee, if not a little before, and it recovered in the weeds behind the flight line, which cushioned the landing somewhat. I ran out of time that day and didn't get another flight in. I had no way to know that it would be three months before I was able to attend another launch.
The second flight was on a C11-5 in windy conditions. The Orion again cocked into the wind as it left the pad. Ejection occurred just as the rocket tipped over and it recovered in the same spot as the first flight had back in October. The only problem was that the field had been cut since then and the Orion bounced high in the air after hitting the ground. I fully expected at least some fin damage upon reaching the site, but the rocket was no worse for wear. Apparently I built this one tough.
The third flight was on a D12-5 and the altitude was noticeably higher. This flight also cocked into the wind, but ejection occurred before apogee. Recovery was fairly far downrange, but in a rare soft spot on the field. (The scalped field is great for finding rockets, but murder on the big ones during recovery. That Saturday was an exception.) For all around flight, the D motor is the hands down winner for use in the Orion. All I need is a field big enough.
Recovery:
All three flights were made using no wadding. Instead I employed a combination
of a Semroc ejection baffle and a large piece of perma-wadding. This
combination protected the chute well as it looked as good before the flight as
it did after.
Flight Rating: 5 out of 5
Summary:
PROs: How many Orions do you see at the pads these days? Overall classic looks.
24mm performance.
CONs: Epoxy curing caused the small nose cones to push out of the body tubes slightly. This could have been avoided by taping them in place but you live and learn.
Overall Rating: 5 out of 5
 |
 |
Flights
|
|