| Construction Rating: | starstarstarstarstar_border |
| Flight Rating: | starstarstarstarstar_border |
| Overall Rating: | starstarstarstarstar_border |
| Manufacturer: | Centuri |
Brief:
Another rocket that has been in my cloning cross hairs for a long time, the
Centuri Vector V always struck me as something of a complicated project despite
it's relatively small size. (Paper transitions have always given me fits.) This
changed when a fellow poster in the OldRockets Yahoo Group mentioned that he
had drawn up a plan to turn the currently available Estes Viking to a Centuri
Vector V. Not long after reading the post I found a Viking at one of Hobby
Lobby's famous 1/2 off sales and decided to sacrifice it (or so I thought,) in
order to add a real classic to my fleet.
Construction:
Parts list:
- Nose cone from Estes Viking kit
- 10" BT-20
- 2.25" length of BT-55
- 18mm engine block
- 18mm engine hook
- CR-2055 centering rings
- 1/16" basswood fin stock
- 36" Kevlar® shock cord
- Semroc 12" parachute kit
- File card for transition
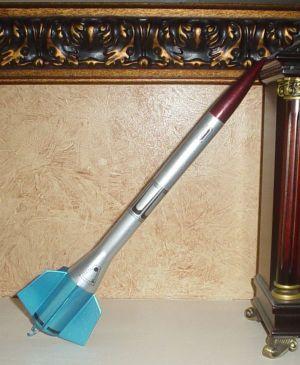
As it turns out, the only part I used from the Viking kit was the nose cone. Everything else came from my ever expanding parts stash. I decided to go with a single length of BT-20 with an engine block instead of joining two pieces together, but I can see the advantage to that method also. The most difficult part of the project I found was constructing the transition. Once I had cut it out from the file card, I curled it under a steel ruler and began trying to make it fit the BT-20 and BT-55 tubes as seamlessly as possible. One mistake I made in the construction was not leaving anything for the bottom of the transition to slip over when mating it to the BT-55. I used an old set of cardstock centering rings that had come with the Designer's Special (that I purchased in 2001 before I knew better). If I were to do it over again (and at this point it looks like I'll have to), I'd use the cardstock in conjunction with a CR-5055 to be glued in at the top of the BT-55, just peeking above the edge of the tube. This would have given the transition something to be glued to and made the whole area a little more stable. As it was, I counted on a thick layer of glue around the underside of the transition and on top of the BT-55 bulkhead. This seemed to work well enough but it would have been easier the other way.
 After attaching
the transition and allowing for drying time for the thick wad of glue, I coated
the whole transition with several coats of thin CA to stiffen it up for the
filling and finishing to come. This worked nicely as the rather thin transition
stood up to the punishment that followed. And while what resulted was not quite
up to Samsian standards, it easily passed muster with me. In retrospect, the
file card material was probably not stout enough for the project at hand.
Version two will undoubtedly be built using thicker stock in the area of the
transition.
After attaching
the transition and allowing for drying time for the thick wad of glue, I coated
the whole transition with several coats of thin CA to stiffen it up for the
filling and finishing to come. This worked nicely as the rather thin transition
stood up to the punishment that followed. And while what resulted was not quite
up to Samsian standards, it easily passed muster with me. In retrospect, the
file card material was probably not stout enough for the project at hand.
Version two will undoubtedly be built using thicker stock in the area of the
transition.
I was pleased with one construction change I made, which was the switch from the cardstock fins of the Viking to 1/16" basswood. I've had difficulties with cardstock in the past and avoid it whenever possible despite its ease of finishing. I've seen several reviews of Centuri clones that advocate the use of CA-soaked cardstock, but I've long been impressed with how well basswood cleans up with minimal effort. It also allowed me to better shape the leading and trailing edges of the fins and the fins stood up well to the landings (two of them anyway) as well as the rigors of storage and transportation. Aside from the switch to basswood, the switch to the single length of BT-20 body tube and adding a 36" length of Kevlar®, which was tied to and glued in with the engine block, construction held no more surprises than that of a Wizard or the Viking from whence it came.

Finishing:
Finishing turned out to be easier than I had thought it might be, but it could
have been easier still had I paid more than glancing attention to the
instructions. I began the finishing process immediately after mating the BT-55
to the BT-20 and securing the transition between the two. After coating the
transition with several coats of thin CA to stiffen it up, I sprayed the whole
structure with a coat of white Valspar primer, which helps to further toughen
things up for the sanding to come. The now recognizable rocket was then coated
with thinned Elmer's Fill 'n' Finish, sanded, recoated, and resanded. This was
sufficient for the body tubes themselves, but the transition section needed
extra special attention and was given several more coats and sandings until the
once obvious seams all but disappeared and left the structure looking almost
seamless. The fins can be attached in any one of four different ways, but I had
long since decided on the orientation that makes them look upside down compared
to the catalog bird. Once the fins were dry they were sanded, given a light
coat of Fill 'n' Finish, and sanded again. This was where reading and following
the instructions would have made things easier. The instructions suggest gluing
the lower body tube section on after construction on the BT-20 section and the
transition are together. This would have been the perfect opportunity to paint
the bottom section, which is to be painted a bright blue according to the
instructions. I missed out on that opportunity and instead had to suffer
through the masking process, which was made all that much more difficult by the
fact that the fins were in the way of a clean mask. Nevertheless, I pressed
onward, and somehow managed to obtain a decent mask with very little effort and
a boatload of dumb luck. The bottom section was sprayed with a bright blue
metallic paint that was left over from my car building days and whose label has
long since disappeared. The middle section, including the transition, was
painted a silver metallic, and the nose cone was painted with Testor's Metal
Flake Burgundy. I printed the all black decals on my home printer using Bel
Decal paper and they came out looking great. One odd feature of the Vector V is
that only a few of the decals have a set place to be applied on the rocket. The
bulk of them are apparently there to add as you choose, as few or as many suits
you. I chose to go with the "fewer" route, which left the rocket with
a cleaner, uncluttered look but feel free to crank on as many as you deem
necessary. Once the decals had been given a chance to dry, the entire model was
sprayed with a light coat of clear to protect the decals. From here it was on
to the pad.
Construction Rating: 4 out of 5
Flight:
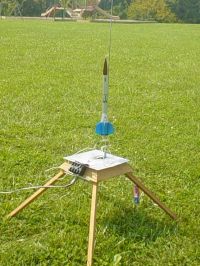
Since three flights is considered "nominal" when writing a review, I
chose to follow the A, B, C path to get an idea of how the rocket responded
under differing levels of power. The first flight at a small field flight on an
A8-3, was beautiful with only a painfully long drift during recovery to add
drama. The unreefed 12" Semroc parachute functioned perfectly, maybe too
much so as the Vector V drifted back across the field toward a small copse of
trees just over the hill from the ball field we launched from. It landed just a
few feet from the trees but in the end never really came close to the drama
that I feared. Since the A flight was fairly close to outflying our field, I
decided to wait until the following week to allow the rocket the chance to
stretch out on a B and C.
The second flight was on a B6-4 as planned and really got me fired up for the C6-5 flight to come. I had taken the precaution of cutting the center of the chute out to cut down on the drift I had experienced the previous week, and as a result, the flight was picture perfect in all respects. After arcing into the breeze slightly, ejection came just at apogee and the rocket recovered within 100 yards of the pads.
 At this point I
was really looking forward to flight #3 on a C6-7, but I waited until just
before the planned end to the launch before taking it to the pad again. I chose
this flight to try to capture a launch picture so I had one of my former Quark
members take care of the countdown and launch while I manned the camera. I
couldn't see much through the camera viewfinder but immediately looked up to
see if I could catch up to the rocket after the picture took. As it turns out,
I'd have had a better chance of seeing a part of the flight if I had just kept
looking toward the pad. The Vector V had taken a 90 degree turn as it left the
pad and continued on a westerly flight path that took it out over an unmowed
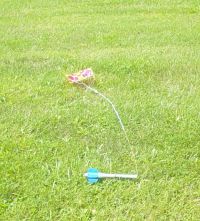
section of the VOA. Much laughter ensued, however none of it mine. I walked
along a line that I had been pointed toward, hacking my way deep into the
underbrush but found exactly what I expected. Maybe things might have turned
out differently if I had seen the flight path, but I seriously doubt it.
At this point I
was really looking forward to flight #3 on a C6-7, but I waited until just
before the planned end to the launch before taking it to the pad again. I chose
this flight to try to capture a launch picture so I had one of my former Quark
members take care of the countdown and launch while I manned the camera. I
couldn't see much through the camera viewfinder but immediately looked up to
see if I could catch up to the rocket after the picture took. As it turns out,
I'd have had a better chance of seeing a part of the flight if I had just kept
looking toward the pad. The Vector V had taken a 90 degree turn as it left the
pad and continued on a westerly flight path that took it out over an unmowed
section of the VOA. Much laughter ensued, however none of it mine. I walked
along a line that I had been pointed toward, hacking my way deep into the
underbrush but found exactly what I expected. Maybe things might have turned
out differently if I had seen the flight path, but I seriously doubt it.
Flight Rating: 4 out of 5
Summary:
While I wasn't as excited by the finished product as I anticipated being, I'd
still consider the Vector V to be a worthwhile project based on the uniqueness
of the design alone. It flew nicely if unspectacularly on 2/3 of it's flights,
but the paint scheme left a little to be desired in my opinion. Maybe it was
just the combination of paints that I chose but nothing about them suggested
anything remotely alien. I'd also prefer a little more guidance on the
placement of the decals. The way they did it was fine for someone with a shred
of imagination, but guys like me need a little more help.
PROs: Unique styling and the overall mystique of a seldom seen Centuri classic. Upscale potential?
CONs: Suggested paint scheme suggests that the Vectorians were a bland race. Guess your best decal placement. Uh, C6-7 flights?
Overall Rating: 4 out of 5
 |
 |
Flights
|
|