| Construction Rating: | starstarstarstarstar_border |
| Flight Rating: | starstarstarstar_borderstar_border |
| Overall Rating: | starstarstarstarstar_border |
| Manufacturer: | Contest Craft  |
Brief:
A "Contest Craft" Edmonds design manufactured by Balsa Machining
Service, this might very well be the smallest, lightest glider kit ever sold
commercially (although I believe it's no longer available--introduced for NARAM
45 in 2003 and I picked mine up from BMS's booth at NARAM 46).
Construction:
As with most Edmonds kits, there are very few parts to deal with--a couple of
laser-cut balsa sheets, a BT-5 tube, balsa nose cone/screw eye, Kevlar®,
streamer, and launch lug.
Edmonds instructions are excellent. They are well written, clearly illustrated, and simple enough for a beginner to follow without much trouble. This design is among his more complex, especially given the challenge of "microsizing" it.
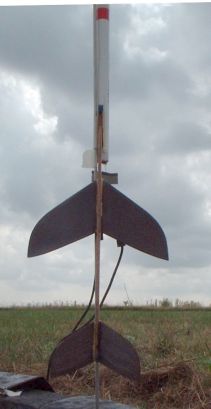
Construction starts like a typical glider: plenty of sanding and airfoiling of the wing. In this case the wing is two separate pieces which are later bonded together, so a balanced airfoil across the whole wing is not easily achieved. The airfoil is typical glider style, meaning on the top only with it rounded at the front and tapered towards the back.
The tail airfoil is a bit unusual. It is rounded at the front on top and tapered at the back on the bottom. I suspect this is because the tail pieces are mounted with an opposing dihedral (anhedral) and eliminate the need for a rudder, but I don't even pretend to understand the more complex aerodynamics of gliders...
After all the sanding, the wings and tail pieces are mounted to the fuselage. There are very specific angles that need to be met and very tight specifications for achieving this. The wings are at 1-1/16" dihedrals and tails at 11/16" anhedral. That's a pretty tricky job for naked eye construction, so there's an alignment jig (basically a triangle piece that fits into the wing joint) for assistance. For my kit I measured the dihedral and found it to be very close but could not fit the jig into the joint. It was notched to fit over the fuselage and the wings were mounted flush to the top of the fuselage.
Glider construction wraps up with the attachment of a couple of pieces to the side of the fuselage front, forming a slotted area for the pod hook.
The booster pod is a very straightforward build consisting of gluing 4 pre-cut hook pieces together and then bonding them to the tube along with a launch lug in the fillet.
Recovery attachment is external. The Kevlar® is pressed into the still-tacky fillet between the pod hook and the tube and a reinforcing strip of tape goes around the front of the tube to keep most of the stress away from the glue joint. The crepe paper streamer is attached via a tape disk.
Finishing:
This was destined for competition use, so I did not paint it.
Construction Rating: 4 out of 5
Flight:
The first 4 pages of the instructions are about the kit and construction. The
last 3 pages of the instructions talk about balancing the glider (adjusting the
CG) and trimming it for flight. I found the last 3 pages to be worth far more
than the price of the kit, as it was a great beginner's guide to hand-tossing
gliders for trimming.
Without getting into too much detail, the most eye opening thing I learned is that gliders have a predetermined speed that comes from the design and construction, so you have to match that speed when hand tossing. Tossing too fast will cause the glider to porpoise (swoop up, stall, and then dive) and tossing too slow will cause it to nose dive. I've frequently been stymied, trimming gliders on the ground only to watch them perform completely differently in the air and I now know that this is probably due to not finding the right speed for tossing.
The instructions were very clear that the CG must be precisely located (1/32" behind the trailing edge of the wing at the fuselage). I added a slight amount of clay to the nose to achieve this and then hand tossed it a few times. No matter how I tossed it, it went nose down. I then took the weight off and added a little to the tail. Hand tossing was fine. Now I had a dilemma: do I trust the don't-mess-with-the-CG instructions or my not-very-knowledgeable-or-experienced hand tossing? I put my faith in Rob Edmonds, put the clay back in the nose until the CG was just behind the wing, and loaded a 1/4A3-3.
The boost was outstanding for a BG. It rolled a bit on the way up but was fairly straight. Ejection was a little late but close enough (and there's no other choice for the delay) and I got a clean separation.
Recovery:
The glider didn't glide. The same nose-down dive performance I'd seen in
hand-tossing was what I got in the air. I obviously blew one of the critical
measurements by a millimeter or so, which could be enough to throw the whole
CP/CG relationship out of whack.
A second flight, with clay removed from the nose and a tiny amount of tail weight added resulted in a much better glide. This is still going to take a lot of tinkering to trim just right.
Flight Rating: 3 out of 5
Overall Rating: 4 out of 5
 |
 |
Flights
|
|