| Construction Rating: | starstarstarstarstar |
| Flight Rating: | starstarstarstarstar |
| Overall Rating: | starstarstarstarstar |
| Manufacturer: | Clone |
Brief:
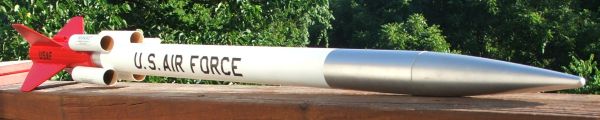
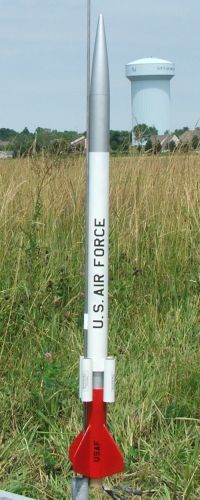
While a trip to the Custom Rockets website might do little to fire the soul of a BAR today, there was actually a time in the not too distant past when the company produced some sharp looking, imaginative kits. I've owned several of the 1994-95 era kits, namely the Dynamic Carrier and Satellite Drone in "almost ready to fly" condition and the Stealth Interceptor in "flown to death" shape, but I was surprised to find that there were several other birds that I'd never seen reviewed. One of these was the unimaginatively named Bullet. The pseudo-missile styling and simple red/white/silver paint scheme appealed to me as did several others so I decided to order some still available nose cones from Custom, print off the instructions and scans from Ye Olde Rocket Plans and start breathing life into some seldom seen fourteen year old designs.
Construction:
The parts list:
- PC-55 nose cone
- 18" BT-55 main section body tube
- 6" BT-55 lower section body tube
- 6" BT-50 motor tube
- 2.75" BT-20 decoration tubes (4)
- CR-5055 centering rings (5)
- EC-2 engine clip
- Engine block
- 36" Kevlar shock cord
- 36" sewing elastic shock cord (1/8")
- 3/32" fin stock
- 18" parachute
- 3/16" launch lug
For those of you used to Estes instructions, the Custom instructions might cause a raised eyebrow or two. "Spartan" might be a good way to describe them or possibly "functional". They get the job done, but some of the construction details are left for the builder/painter to figure out on their own. The drawings in these early kits are fairly primitive and things are rarely shown at a consistent scale, but they work so I'll stop ragging on them.
Aside from these quibbles, the construction of the Bullet went very smoothly for me. For the most part it's just a 4FNC rocket with some decorative touches that give it character. I swapped out the suggested shock cord attachment method, the tried-and-true tri-fold paper anchor of Estes design. Instead I used a total of 6' of Kevlar and sewing elastic for my shock cord tied behind the forward-most centering ring and glued into place with wood glue. Fins were attached with Loc-Tite gel CA and filleted with Elmer's Wood Glue. Except to tell you that the "decoration tubes" should not be glued on until some point after the painting process, the rest of the build was as standard as it could be.
Finishing:
As per usual, tube spirals and balsa grain were eliminated using thinned Elmer's Fill 'n' Finish with minimal sanding. (Sanding the section of BT-50 that is sandwiched between the BT-55 fin can and main body tube did NOT meet my personal standard for a "fun" rating.) The entire rocket was then sprayed with white Valspar primer. One of the things about the Bullet that attracted me was the relatively simple red/white/silver paint scheme and black decals. Don't get me wrong, I enjoy complicated paint schemes like the Admiralty scheme for the Centuri Taurus and kits with tons of decals like the Interceptor, but sometimes the extra details just serve to muddy the waters of what could be a clean design. Custom did right by this one. With the exception of the white "decoration tubes", masking is a very simple matter of straight lines separating colors. The catalog paint scheme shows the fin can in red, the bulk of the main body tube in white and the upper portion of the main tube in silver. The section of motor tube that is exposed under the white "decoration tubes" is shown as silver. This is where the masking got interesting. I decided to paint the BT-50 section, let it dry, then mask it off under a paper mask cut just for the process. I then masked off and sprayed the fin can including the exposed end of the 5055 centering ring with Valspar Cherry Red gloss. When that had dried, I masked it off and sprayed the main body tube with Valspar gloss white then masked and sprayed the upper part of the main tube and nose cone with Valspar silver metallic. The "decoration tubes" were also painted gloss white then attached with several dabs of epoxy after the parts had dried sufficiently. I printed off the simple black decals using Bel Decal ink jet paper which I coated with Testor's decal protector on the advice of someone at NSL.
Construction Rating: 5 out of 5
Flight and Recovery:
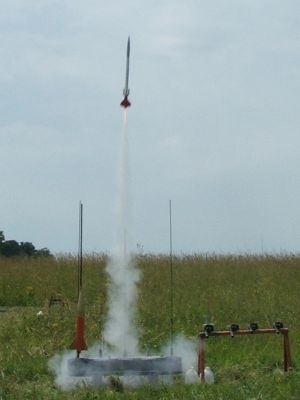
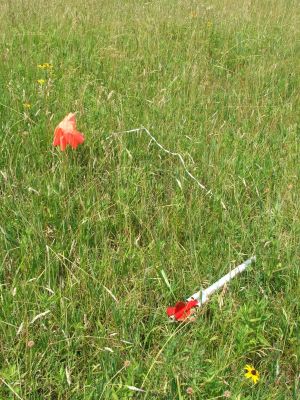
Unlike a lot of the rockets that I eventually review, the Bullet went from the build queue to the flight line fairly rapidly. To date, all three flights have taken place at the same Quark section launch. The first two flights were both flown on C11-5s. Even though this isn't a recommended motor, I felt that it still had enough punch to get the relatively light Bullet off the pad. I felt right. The first flight lifted off into a calm sky and appeared to never waver from an arrow-straight path. Ejection occurred just as forward motion stopped and the rocket landed 50' to the right of the launch pad. The second flight was in slightly windier conditions and was still an impressive flight even with the windcocking. After another textbook ejection the Bullet rode the breeze back and looked to be on a collision course with the access road but avoided it at the last moment.
The third flight was on a D12-5 and took place in the windiest part of the afternoon, hence the rather bow-like flight path. Ejection again came just as forward motion stopped and this time there was no close call with the path as the rocket recovered deep in the weeds although within ten feet of a mowed path. Righteous.
Flight Rating: 5 out of 5
Summary:
PROs: Simple construction and good looks. One color decal. Availability of the original nose cones from Custom. When was the last time you saw one of these on the pad?
CONs: Hasn't been produced in a long time.
Overall Rating: 5 out of 5
Related Products
 |
 |