Nano Rocketry Interdimensional Transfer Ship
Nano Rocketry Interdimensional Transfer Ship
Contributed by Daniel Kirk
| Overall Rating: | starstarstarstarstar_border |
 Nano Rocketry has produced a line of model rocket kits to take advantage of Quest's Micro-Maxx engines. The Quest Micro-Maxx rockets are all RTF and don't really fly all that well. They claim a maximum altitude of 200 feet, but with such heavy plastic rockets, the best I could get was less than 20 feet.
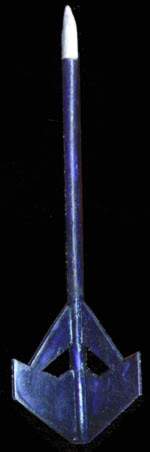
My kit arrived in a 6x9 envelope with a picture of the completed model on the back. Because of such simple packaging, I was afraid it might have been damaged in transit. I opened the kit and inspected all the pieces, and found everything in perfect condition.
I checked the contents against the parts list, (which included handy diagrams for identification) found all the parts were there, and collected the tools recommended in the tools list. The instructions offered 3 possible ways to shape the nose cone, depending on your skill, the shape you wanted, and your available tools, but my kit came with the nose already shaped, so I didn't have to worry about it.
Assembly of the nose cone, shoulder, and shock cord was straightforward, and the instructions were very clear. Next I cut out the fins, which were preprinted on balsa sheet. The instructions said to use a ruler to align the 2 pieces of each fin, but I found it worked better to align them on the body tube itself. The instructions simply said to attach the fins 120 degrees apart. I made my own fin alignment guide, but it would have been nice to have one preprinted in the instructions.
The instructions said that attaching the shock cord would be tricky, but after reading their clear explanation of how to do it, I had no trouble. I chose to use the included paper cutouts to finish the fins. It said to use a Permanent Glue Stick, but I used a regular Glue Stick because I already happened to have one. I couldn't get the edges of the fin covering to match up perfectly with the edges of the fins, but the bigger problem was getting the edges of the fin covering to stay glued. Next time, I'll try a Permanent Glue Stick, like they said.
I was afraid of loosing sight of such a small model, so I posted a question on rec.models.rockets about highly visible paint schemes. The suggestions I got were black, fluorescent, chrome, or some combination. I painted it with Wal-Mart Gloss black, because that was what I had on hand. I made a stand from a coat hanger for painting it on. It doubles as a display stand.
The instructions also showed how to fashion a tool from a paper clip for stuffing the shock cord into the body tube. It was easy to make and very helpful. It was nearly impossible to insert the shock cord without it! The kit did not include a launch lug, but included suggestions for a tower. I was in a hurry to launch, so I made a pair of removable lugs from the wire stripped out of a twist-tie. They worked pretty well.
I took my new model out to the back yard for a test launch. First I launched a couple of Micro-Maxx RTF's for comparison. They went higher than my head, but not above the first story of my building. Then I launched my ITS. Though bigger and easier to see than the Quest rockets, it was lighter, and flew 2-3 times as high-- almost to the second story roof. Overall, I was quite pleased with my Nano Rocketry Interdimensional Transport Ship. It was fun and easy to build, and cheaper, larger, better looking, and better flying than Micro-Maxx. One thing I miss about the Centuri and older Estes Science Fiction kits was the stories behind them. This is a cool looking kit, and it has a neat story behind it, too.
Overall Rating: 4 out of 5
 |
 |