Descon 3ncf - Memory - The Second Thing to Go
Scratch - 3ncf - Memory - The Second Thing to Go {Scratch}
Contributed by Bob Chmara
| Manufacturer: | Scratch |
3ncf
or Memory - The Second Thing To Go
by Bob Chmara
 Purpose
I've been thinking about this rocket for a while. I needed to free some space within my brain's limited capacity for important stuff. The only way to do that was to build the rocket.
Background
Shortly after getting back into the hobby, I was at my favorite rocketry store depositing part of my paycheck. I made the comment that I was looking for something different. The proprietor said, "there are only so many variations on 3fnc". Digging deep into that even more limited part of my brain called wit, I said, "Hunh?" I followed that up with, "What's 3ncf?" He gave me one of those "Boy, are you a newbie" smirks and said, "3fnc. Three fins and a nose cone". I thought about this for a moment, replied with, "Oh", and then I left. 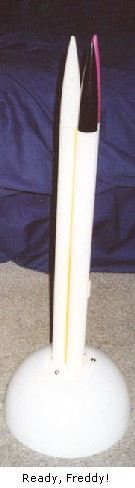 Anyway, later that evening while entertaining my friends with rocketry stories, I explained that one of the limits of the hobby was that there are only so many variations on 3ncf. No one responded. I knew that they were at a loss for words so I defined 3ncf. Or at least I tried...
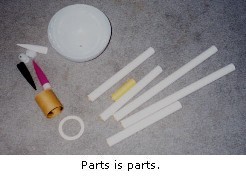 I mean, have you ever had that feeling that you were on the verge of something big? One more little "Ah Ha! light-bulb-floating-next-to-your-head" kind of thought and that jumble of things in your head would congeal into a new approach to an old problem? The kind of thing that would someday cause someone to say, "He was thinking out of the box!" Well the feeling I was having was just like that. I was missing one important morsel of information. In my case, it wasn't a new idea I needed, the piece I needed was...was...well, I couldn't remember what I needed. That's why I was having that feeling. Anyway, that's how 3ncf was born.
Materials
I wanted to make this out of scrap rocketry materials I had laying around, the only exception being the fin. I found a bunch of sections of 24mm LOC motor mount and three Estes NC-50 nose cones. 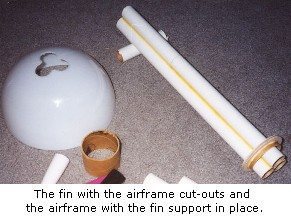 A fuchsia one from a Mongoose, a black one from the "Flight Probe" from a Darth Vader Tie-Fighter (best thing that rocket ever did was crash), and a white one that came from an Estes I-can't-remember-what. Also thrown in the mix is a short section of PML 54mm motor mount, a PML 54mm-2.6" centering ring, two 1/4" launch lugs, some Kevlar thread, some lightweight Bungee, a couple pieces of underpants elastic that never made it their respective Estes kits and two Estes 24" chutes.
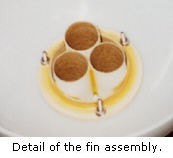 Construction
I had two good lengths of 24mm motor mount so had to make the third one from two shorter pieces. I had a yellow Estes engine block locating tube that I used as the coupler. Then I glued that and the two longer motor mounts together in a triangular configuration to make the body of the rocket. The motors will be installed with masking tape thrust rings and motor retention will be via friction fit. The primary adhesive used in the construction of the rocket was yellow glue.
My first thought for a fin was to use a funnel. But I wanted the fin to conform to the "three leaf clover" shape of the airframe and cutting the funnel proved to be a headache. So I went shopping and that's when I found this hemispherical piece of plastic at the hardware store that I later found out was a lampshade. I centered the airframe on the lampshade and traced the pattern for the opening that I needed to cut. I cut the opening by making three holes using a 1" wood bit. While cutting those holes, the lampshade plastic cracked in two spots. Well, that sent me on a search for an appropriate adhesive to repair the cracks. I ended up using Loctite Plastix. It was the only adhesive I used besides yellow glue.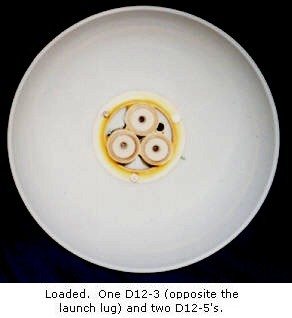 Next, I needed a way to adhere the fin to the airframe. Rather than use an adhesive, I decided to use a mechanical connection. I cut a slice from the 54mm motor mount to which I glued the centering ring. Together, they formed a support for the lampshade. That assembly was then glued to the 3x24mm motor mount tubes.
At this point I realized that I had forgotten about launch lugs, something I've never done before.* 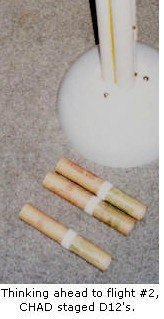 So I found some 1/4" launch lugs and glued them on. I then traced the cut I would need to make on the lampshade to accommodate the launch lugs. I used wire cutters to snip away small sections of the plastic. Finally, I drilled three holes through the centering ring and the lampshade and used three #4 screws to hold the lampshade in place.
The next challenge was recovery. To avoid tangles, I wanted the recovery system to be deployed from one tube. But I also needed a large enough chute given the rocket's weight. Further, I wanted a soft landing to prevent fin damage. 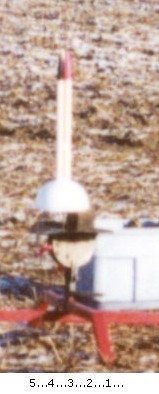 So after playing with the chute calculators available via ROL, I decided to use two 24" Estes chutes. I prefer nylon chutes but given the space restrictions for packing the chutes, the Estes chutes were a better choice. The chutes are attached via a long Kevlar/Bungee bridle. The other two nose cones are attached via underpants elastic. I used Estes style paper tabs to anchor the shock cords in the tubes. To keep the three nose cones from bashing each other at ejection and possibly tangling up the chutes, I'll use a short delay in the tube with the chutes and a longer delay in the other two tubes.
Flights
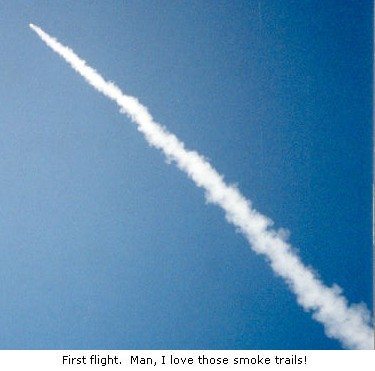
The first flight was on three Estes D12's. A three second delay was used in the tube with the chutes and a five second delay in each of the other two tubes. I found the three best Solar igniters I had, installed them and set the rocket on the pad. The LCO gave it a five count and away it went! It was a great ascent, perfectly straight and not too much altitude. The D12-3 fired its ejection charge spitting out the two chutes and a moment later the two D12-5's fired theirs. Unfortunately, only one of the chutes opened so the landing was a bit harder than I would have liked. The two cracks in the fin not only re-opened, they extended as well. But I figured I'd fly it a second time anyway.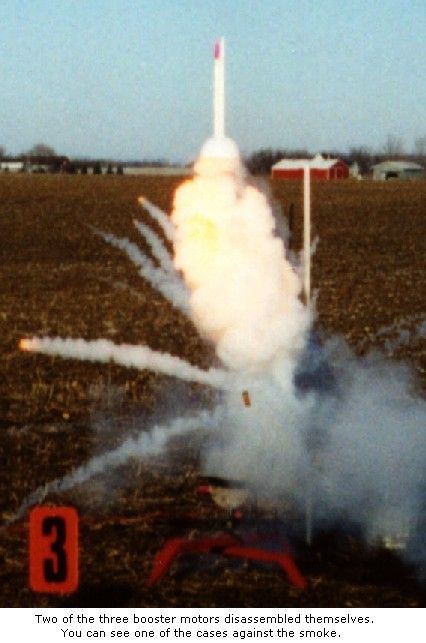 For the second flight, I CHAD staged three D12-0's to a D12-3 and two D12-5's. I installed the igniters and set it up on the pad. Again the LCO gave it a five count and pushed the launch button. This flight proved to be far more exciting than the first. The rocket hadn't cleared the rod when I heard a loud bang. The rocket kept ascending but clearly, it was not under full thrust. It appeared to stage but then seemed to be under even less thrust, and it started canting to one side. Fortunately, the D12-3 fired its ejection charge and both chutes deployed properly. One of the engines appeared to make a hasty exit from the back of the rocket at that moment too. With both chutes out, the rocket made a nice soft landing.
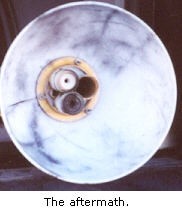
I found two of the D12-0's at the pad, and they had obviously CATO'd. One had no remnants of the nozzle or ejection charge cap. The other had no nozzle left but did still have traces of the ejection charge cap. Both cases were also slightly smashed at one end, probably from hitting the blast plate on the launch pad. I retrieved the rocket and inspected the business end. To my surprise, the motor that ejected from the back of the rocket was the D12-3. The back end of that motor tube was flared, probably from the force of a CATO. Fortunately, enough of the energy from the ejection charge did what it was supposed to do. One of the D12-5's had fired but the other had not. Curiously, all three nose cones had ejected. Based on observation, I believe the sequence of events to have been: 
- All three boosters lit.
- Before it left the rod, two of the boosters CATO'd. The CATO of the booster attached to the D12-3 jammed the D12-3 forward, flaring the end of the motor tube.
- One of the CATO's ignited a sustainer, I believe it was the D12-3. At this point it would have been flying on one booster and one sustainer.
- The remaining booster finished burning and lit a second sustainer motor. Now the rocket was flying on only one motor.
- The D12-3 fired its ejection charge, causing the chutes to deploy but also using some of the energy to disengage itself from the rocket.
- The rocket returned to earth.
 Conclusion
The rocket is repairable. There's enough motor tube at the back end that I can cut about 1/4" from all three tubes and still have plenty of tube to work with. The bigger issue is the lamp shade. The hardware store has more, but the material is too brittle for this purpose. Unless I can find a new fin that will use the existing fin mount, I probably won't repair it.
The design itself may warrant further development. Stability was excellent. The first flight was arrow straight. Even the ascent of the second flight was relatively straight considering the rocket was flying with asymmetric thrust. I'm considering building a three sided pyramid shaped fin from dowel rods and cardstock. That way, the problem of fitting the fin to the 3x24 airframe is simplified. Once the cut for a single piece of cardstock is determined, it can be duplicated for the other two.
*Hah!
 |
 |