| Manufacturer: | Scratch |
(Contributed - by Dave Lee)
 As
I start writing this page the Boxer is little more than an idea, which I hope
to have ready to test at tomorrow's meeting. In fact it's only got this far.
As
I start writing this page the Boxer is little more than an idea, which I hope
to have ready to test at tomorrow's meeting. In fact it's only got this far.

Well actually I have four of these, which I am about to join together to form a box kite, hence the name "Boxer" (not much originality so far). Probably you will have guessed that this will form the fin section. The designers amongst you will also be wondering if the kite can be used as the recovery method, that is the plan, I just hope it comes together.
Post build note. Mask off the edges of the fin sheets that will need gluing and paint at least the inner surface before assembly.
OK while the glue dries on the box lets take a look at the rest. The body is
2 x18" lengths of BT? (18 mm) chop off 6" from one length of
BT, around this mark a ring about 1/2" from each end, and then at
this point form a lattice with four 5 1/2" strips of 3/32" bass wood
to look like this
When this is dry fit a motor stop (I used a 1/4" length of spent motor
case) and hook, allowing for about 3/8" of motor to clear the end of the
tube. Estes hooks will need a little bend to clear the cross bracing and can be
secured with tree or four turns of masking tape at the forward end. Trim and
fit a couple of off cuts into a corner of each lattice to form launch lugs,
then trim the ends of the lattice to fit the box and assemble thus.
 |
+ | |
= |  |
With a spent motor in the mount, adjust so that this section balances as close to the center as you can get, and also make sure that the motor tube is correctly aligned.
Remove motor mount assembly after test fit, and paint before gluing in position.
Join the remaining lengths of BT with a standard coupler or rolled card, make up a coupler two or three inches long (I've used a yellow motor stop aligner for this), and fit to the base leaving 11/2" protruding do not be tempted to shorten this or you will end up with excessive play and the possibility of an unplanned flight path. The CP is somewhere around the rear edge of the front box so the stability may be fine as is, but I wanted to be sure that the body pulled the kite down rather than have the whole thing tumble so I glued a spent motor minus the clay, into the body just below the nose to give the body some weight.
The shock cord consists of a harness attached to the kite at the center of
each box as shown in the diagram. A 6 foot cord runs forward to the base of the
body section, where it is attached to the outside of the tube via a 12"
piece of elastic taped to the outside of the tube an inch above the
coupler.
To stow the cord for flight, lay a finger along the rear of the body and wind the cord around the body and finger, push the coupler into motor mount and remove your finger allowing the loosely coiled cord to drop down onto the forward cross braces.
So there you have it. No chute, no streamer, no wadding (yes, you can keep your Lettuce for the salad), just prep a C6-3 and launch.
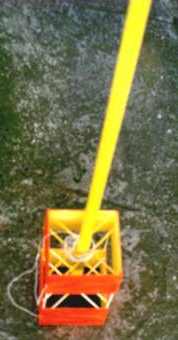
But you're still wondering if it will work and how well. The answers are YES, and VERY. Four flights today on C6-3's and one on a C5-3, no chance of an altitude record but stable flights both vertical, and angled into a stiff breeze. Recovery worked perfectly, a fast but controlled descent with very little drift, an ideal rocket for a small field.

The first and so far only Boxer was built in rather a hurry using the LAR system (Looks About Right). The nose weight is well over the top for flight stability, and may not be need to be so heavy as I first thought for recovery, some experimentation here could give more altitude or allow the use of a less powerful motor.
If built as described use C6-3 or C5-3 only, anything less could be prone to weather cocking into horizontal flight.
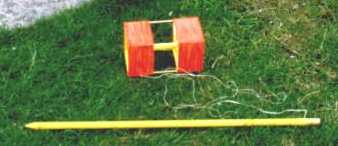
OK so the photos look pretty lousy when reduced for the web, and in my haste to have something to show, I forgot to adjust the depth of field for the close up. Anyway they show the finished rocket and hopefully give a better idea of the box construction and shock cord stowage than my text or plans.
Shopping list:
- 1 sheet 36" x 3" x 1/16" Balsa wood
- 4 x 24" lengths 3/32" square bass wood
- 2 x BT 20
- Appropriate BT joiners (see text)
- 1 x Nose cone
- 1 x motor clip
- Masking tape
- White glue
- Thread
- Elastic
- 2 x spent 18 mm motors (or if you prefer, engines)
Skill level:
Minimal
Recovery method:
Controlled
 |
 |