Descon Flight Registration Form
Scratch - Flight Registration Form {Scratch}
Contributed by Adrian Hurt
| Manufacturer: | Scratch |
Flight
Registration Form
by Adrian Hurt
Background
Near the end of this year's International Rocket Week,
various odd, not to say silly, rockets were built. After pondering for a while
on how to contribute to the silliness, I decided to act on something I'd
overheard earlier in the week. I'd make a rocket out of a flight registration
form.
Construction
Each rocket flight at the event had to be accompanied by a form which was
filled in and handed to the range safety officer (RSO) prior to launch. There
were plenty of spare forms, so I took one and filled it in.
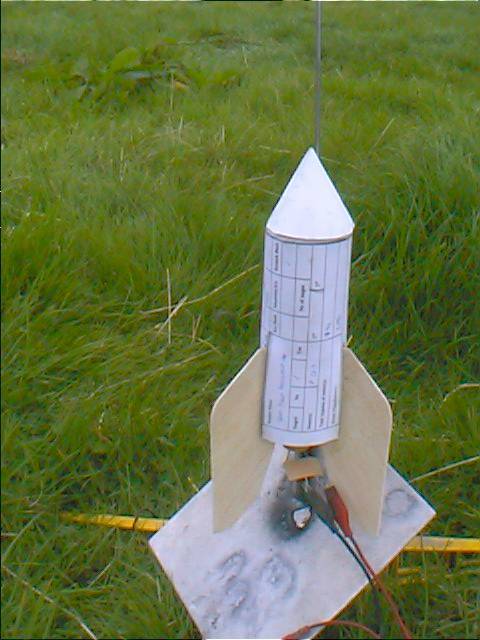
A large area at the bottom of the form is intentionally left blank, as the saying goes. This was cut off. A half circle cut and rolled from this piece became the nose-cone; another piece, formed into a cylinder, became the cone's shoulder.
The rest of the form became the body tube. The left side of the form was the tail end. Three equidistant lines were marked, then cut out as fin location slots. The top margin, being blank, became an overlap for glue.
Three fins were cut from a piece of suitable size balsa that happened to be available. A motor mount was made from a spare piece of BT-20, with a thrust ring made from about 1/2" cut from a spent 18mm motor casing. Centering rings were cut from cardboard, but these were only for centering and sealing; the fins had tabs extending the whole way to the motor mount tube. The fins, rings and tube therefore became a complete fin can which was glued into the rear of the body tube.
A fabric elastic shock cord was attached to the body and nose-cone using two Estes-style folded paper mounts. A launch lug made from a piece of drinking straw was glued to the body, aligned along and attached to the seam where the form had been glued to make the tube. A good dollop (real precision measurement here - not!) of plasticene in the nose-cone put the CG safely forward, and with a C class motor installed, the rocket passed a swing test. (Bear in mind that this was at a rocketry event, so I did not have access to my computer. In the absence of VCP, I had to resort to the old way of checking stability!)
Flight
Before putting the rocket on the pad, I had to show it to the RSO, of course. This was part of the fun; when he asked for the rocket's flight registration form, I pointed out that it was the flight registration form! (Of course, for formality and for the records, I also had a duplicate, more conventional form!)
It was after the rocket was on the pad that I finally decided that the balsa used for the fins was too thin and flexible. So to prevent the fins from flexing or shredding in flight, I cut broad reinforcement strips from the same balsa and glued them to the port, or anticlockwise, side of each fin. This final construction detail was actually carried out on the launch field! The reinforcement strips were aligned so that their grain ran across that of the main fins, thus creating a cheap'n'dirty plywood.
The rocket carried an Estes C6-3 to send it up, and a big mylar streamer to
bring it down. It flew well enough and landed safely back in the launch field.
Unfortunately, I had filled in the form using a ball-point pen, so I can't
change the details for the next flight. (Unless I use Tipp-Ex...)
 |
 |