| Manufacturer: | Scratch |
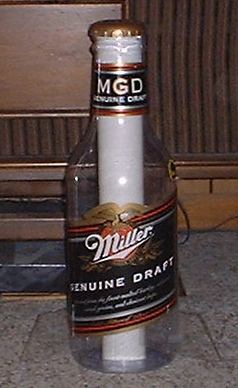 I saw this bottle at the store
where I work and just knew it had "rocket" written all over it!
I saw this bottle at the store
where I work and just knew it had "rocket" written all over it!
Parts List:
- one plastic beer bottle bank with lid
- two BT80 tubes from an Estes Phoenix "parts" kit
- one coupler from the same kit
- two 1/4" launch lugs
- two 1/8" birch plywood cr's
- four 24mm motor mount tubes
- stiff, clear flat plastic for the fins
- Kevlar® string
- elastic shock cord
- 18" plastic parachute from above kit
- epoxy
I cut the coupler into two parts: a 2-inch piece to assemble the body tubes together and a 1-inch piece to attach to the bottle "cap" nose. Then I cut the bottom of the bottle to accommodate the cardboard tube. The motor tubes were inserted into the centering rings and left to dry.
The short coupler was epoxied into the bottom of the bottle cap and the coin slot sealed with epoxy. A short length of Kevlar® string formed into a loop to hold the shock cord was added at this time. A similar loop was epoxied into the top of the body tube.
When the motor assembly was dry, I fit it inside the body tube and let it dry. This whole assembly was then inserted into the plastic bottle and epoxied at the bottem and neck areas.
 Slots for the fins
were carefully cut into the plastic bottle to accommodate the thru the wall to
motor mount fins. The fins were then epoxied into place, making sure two of the
fins 'framed' the front label. The shock cord and parachute were installed. Two
1/2" long 1/4" lugs were added between to fins toward the back of the
bottle.
Slots for the fins
were carefully cut into the plastic bottle to accommodate the thru the wall to
motor mount fins. The fins were then epoxied into place, making sure two of the
fins 'framed' the front label. The shock cord and parachute were installed. Two
1/2" long 1/4" lugs were added between to fins toward the back of the
bottle.
A flight on four D12's indicated the rocket is stable, even though only two motors lit.
 |
 |