| Manufacturer: | Scratch |
(Contributed - by Ed Pattison-Gordon)
 |
Lego-13 Sources:
 |
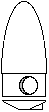
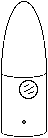
Engineering Diagrams
Estes is sub for most parts; part numbers are Estes'. Sketches are approximately 1/4 scale.
| Parts | Assembly | Notes |
|---|---|---|
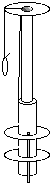
| NC-80B nose cone | Cut off rear end of nose cone, leaving the shoulder 1 1/4 inches long. Sand the cut edge smooth. Cut out two circular holes of 1 inch diameter into the nose cone's shoulder with their centers located 5/8 inch from the top of the shoulder and laterally 3 1/2 inches apart. | |
| thin rigid clear plastic sheeting |  |
Cut two rectangular pieces, 1 1/4 X 1 1/2 inches. (We have this in stock, check recycling bin.) |
| 1 10/24 1 inch steel machine screw | Not a part! Steel machine screw will be used as a tool. | |
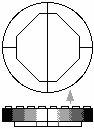
| 3 1/4 inches BT-80 body tube |  |
Cut two holes 1 inch diameter with centers located 5/8 inch
from one end and 3 9/16 inches apart (they should align with the holes in the
nose cone when the shoulder of the nose cone is fully inserted). Cut four holes 1/8 inch in diameter, aligned 90 degrees apart, 3/4 inch from the aft end. The holes should be just large enough to thread the steel machine screw into. Soak the edge of each hole with CA glue. When the glue is dry, thread the steel screw into each hole again to mold the hole into shape. Sand interior and exterior sufaces around holes flat. |
| Use cyanoacrylic (CA) to glue the rectangular pieces of clear
plastic over 1 inch holes in shoulder of nose cone. Use CA to glue the 3 1/4 inch length of BT-80 body tube to nose cone, Align the 1 inch holes in the tube with the 1 inch holes in the nose cone's shoulder. |
||
| capsule interior |  |
Slide capsule interior into capsule exterior until base rests against the bottom of nose cone shoulder. Twist capsule interior to align with windows. |
| BT-80 coupler |  |
Slide the BT-80 coupler into capsule until it rests against the capsule interior. Mark location of screw holes on coupler. Remove the coupler, cut screw holes into it where indicated, soak the hole edges with CA, shape holes by threading in the steel machine screw when the glue has dried, then sand the outside of the coupler smooth. |
| 3/16 inch foam core | Cut out two disks, 2 19/32 inches in diameter, from the foam core. | |
| 1 inch BT-80 body tube | Cut a 1/4 inch section from the tube. | |
| 6 inches braided Kevlar® line | Tie one end of line onto 1 inch length of BT-80 body tube, opposite the removed section. Tie a loop into the other end. | |
| 18 inches 1/4 inch elastic shock cord |  |
Glue one foam core disk inside the coupler 1/8 inch from the
end. Glue second foam core disk inside coupler 1 inch from the other end. Glue
1 inch split tube inside coupler against second disk. It should be flush with
end of coupler. Tie one end of shock cord to loop in Kevlar® line. |
| 4 10/24 1/2 inch nylon machine screws | Cut longer screws to fit, if necessary. | |
| 18 inch nylon parachute |  |
Slide capsule interior into capsule exterior, align interior with capsule windows. Insert coupler assembly into capsule, aligning screw holes. Thread nylon machine screws into screw holes. |
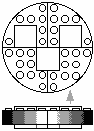
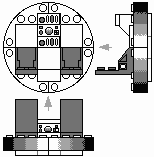
All parts are Lego® pieces, to be supplied by customer. Sketches are approximately 1/2 scale.
| Step | Parts | Assembly |
|---|---|---|
| 1 | 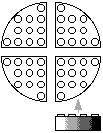 |
 |
 |
||
| 2 |  |
 |
| 3 | 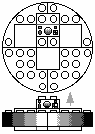 |
|
| 4 | 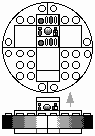 |
|
| 5 |  |
 |
| 6 |  |
 |
 |
||
| 7 |  |
|
| 8 |  |
|
| 9 | 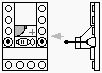 |
|
| 10 |  |
 |
| 11 | ||
| 12 | 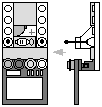 |
|
| 13 | 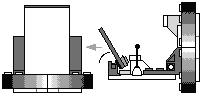 |
Estes is sub for most parts; part numbers are Estes'. Sketches are approximately 1/4 scale.
| Parts | Assembly | Notes |
|---|---|---|
|
 |
Motor projects 1/2 inch from rear of motor mount tube. |
|
 |
Loop in line should reach just below fore end of body tube when stuffer tube has been installed. |
 |
||
|
 |
Cut slots in body for fin tabs. |
|
 |
|
|
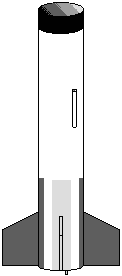 |
Mount launch lug 8 inches from aft end. |
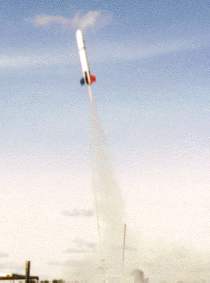
Lego-13 Launched
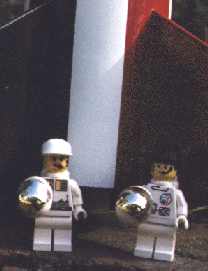 Astronauts John (left) and Emily (right) stand before their spacecraft prior to boarding. |
 Lego-13 carries astronauts John and Emily aloft on their historic flight. |
 On the lanchpad minutes before takeoff, John can be glimpsed through one of the capsule windows. |
Saturday, October 3, 1998; Amesbury, Massachusetts, USA. Lego-13 whooshed off the launch pad today, lofting astronauts Emily and John to an estimated altitude of some 80 meters. After six and half seconds of flight, the last in a heart stopping plunge back toward terra firma, the ejection charge fired, separating the astronaut's capsule from the rest of the rocket and freeing the recovery system. Floating gently under a bright red canopy, the two astronauts returned safely to earth and were soon recovered by ground personnel. The rocket body, it's decent slowed by a second parachute, was also safely retrieved. "Action figures have long played a substantial role in flights of imagination, not only in space but in underwater and other fantasy settings. Today we have demonstrated that the power of imagination can be the foundation for real life adventure, as well." said Emily in an interview shortly after her spacecraft had returned from its historic mission. "What a blast," added John. Although it was not the first flight for an action figure in a rocket, today's flight was significant because Lego-13 was designed from the start for the two astronauts. The rocket's space capsule contained seating and instrumentation designed specifically for its occupants. "In the past, action figures have been tossed into generic payload sections, often alongside insects, as just another kind of cargo. Either that, or they had to bring their own parachute and bail out at apogee," said Emily. "I could go for that," added John. It was the second launch, and the first manned flight, of the brightly colored rocket, following a successful unmanned test flight made earlier in the day. Initially, there had been some fears that the mission would be scrubbed due to concerns about the weather. "The Amesbury launch site is almost always breezey, but when we arrived this morning, the wind seemed too strong for a rocket with a slow liftoff, which is what we expected from this one." said Ed, a representative of Pattigorie Rocketworks, the prime contractor for Lego-13. "As the day wore on, however, we noticed periods of relative calm and that's when we decided to go for it." Although the motors used in both of today's flights performed flawlessly, there had been some concern about whether they would release the rocket's parachutes. "Estes was our sub[contractor] for the motors," said Ed. "We chose their D12 [one of the most poweful rocket motors made by Estes] because of the rocket's weight, but all year there have been reports of D12's with weak ejection charges." [An engine with a weak ejection charge may fail to release the rocket's parachutes, causing the rocket to crash into the ground instead of landing gently.] "In fact, we had a rocket in a different project totally destroyed in August. But Estes was willing to work with us, they sent us a batch of new motors and we used two of them today." In addition to using new motors, Lego-13 was designed to minimize the volume of space the ejection charge would have to pressurize. A second manned flight is scheduled for later this month, again at the Amesbury launch site. Launch support at Amesbury is provided by Central Massachusetts Spacemodeling Society (www.cmass.org). |
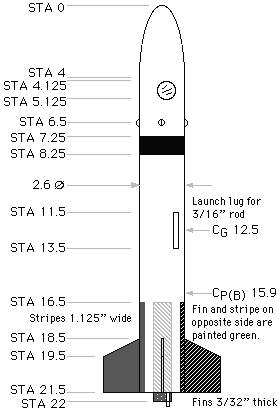
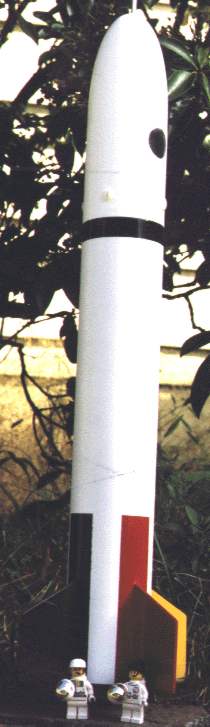 Astronauts Emily and John accept delivery of Lego-13. The rocket stands 21 1/2 inches tall and the body is 2.6 inches in diameter. The rocket is powered by a single Estest D12 motor; manned flights weigh 10 ounces at lift off. The red, yellow, green, blue, black, and white colors honor Lego blocks. |
Copyright © 1998, Edward Pattison-Gordon.
Estes® is a registered trademark of Centuri
Corporation.
Lego® is a registered trade mark of Interlego AG.


 |
 |