| Manufacturer: | Scratch |
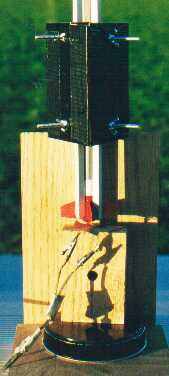
The Lilliput Spaceport
Tribox Tower and Poker Rocket For Quest MicroMaxx
 |
When I first flew a MicroMaxx scratchbuilt at one of our club's HPR
launches a year ago, the most-asked questions were about the launch lug, and
the "little tower" I launched it from. Well, it wasn't a tower; it
was a little x-shaped stand for a 3/64" rod. Now then: This IS a tower.
And, with this tower, "We don't need no stinking launch lug."
While this tower launcher is sized for MicroMaxx, it will also adjust to Apogee's 10.5mm tube and even to BT-5. Only a very light, quick rocket will be up to speed in 12", however, so optional 24" rails will be used for "larger" rockets. The rails can be changed out in fifteen minutes, or adjusted in a minute or less. I don't see any reason this tower couldn't be scaled up substantially, especially if better tools make it practical to fit metal rails. I chose to work with parts and materials I could manipulate on my workbench with simple hand tools. The shorter rails are basswood, which tends to be cut straighter; the longer rails are spruce, which is more resilient, but required me to pick through the bin at the hobby shop for straight ones. |
 |
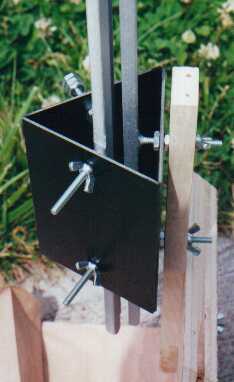
The walls of the box were originally to be plywood, but at the key moment I
was handed a stack of identical pieces of scrap G10, which resulted in a
stronger, straighter, better-looking structure. I still feel that plywood would
be adequate; try it if you prefer. The three sides of the tribox are cut to exactly the same size, and each gets two holes, 1/2" from top and bottom, on the vertical centerline. The holes, 3/16" dia in the prototype, are large enough to give the screws described below a little adjusting room. After the holes are drilled, the three sides are taped together in their triangle formation with masking tape, using enough tape to firmly hold them once they are in position. Then I poured a liberal fillet of epoxy into each corner, one at a time, leaving enough time between pours for the epoxy to set to firm/flexible. When all three had cured hard, I removed the masking tape and applied an additional fillet to the outside of each corner in the same way. Finally, a layer of duct tape covers each corner, leaving plenty of uncovered space around the holes. |
 |
The rail mount system consists of two flathead machine screws
epoxied to each rail, which pass through holes centered in the sides of the
tribox, positioned there with nuts inside and outside the plate. The inner nuts
are hex nuts; on two sides the outer nuts are wing nuts, making it easy to
adjust the tower without tools. On the third side the outer nuts are hex nuts,
and the extension of the bolt is used to attach the tribox to its stand. The screws are spaced at 3" center to center, as are the holes. The first one is 3" from the bottom of a 12" rail and 6" from the bottom of the 24" rail. To solve a fit problem with the longer, thicker rails, I cut flat notches (dadoes) across the rails before anchoring the screws with epoxy. To epoxy them in place, I dipped the flat heads of the screws in freshly mixed 15-minute epoxy, pressed them to a standing position on the stick, and left them standing there to cure. Doing all six screws at one batch allowed me to line them up visually. |
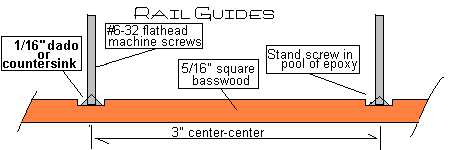 I sanded the rail guides
smooth, sealed them, and gave each a spray coat of aluminum silver for effect.
The inside corners of the rails were also radiused/rounded slightly. I sanded the rail guides
smooth, sealed them, and gave each a spray coat of aluminum silver for effect.
The inside corners of the rails were also radiused/rounded slightly. |
|
| The upper part of the stand is a hardwood stick, 3/8" x 3/4" by 14", with three holes drilled through the face, 2", 5", and 8" from the bottom; that is, 3" apart center to center. (You might like to have the option offered by a fourth hole at 11" from the bottom) The upper two holes fit on the extension of the 6-32 screws from the Tribox. The third hole is used to bolt the stick to the lower part of the stand, which is two pieces of scrap wood glued and nailed together into an "L" shape. In the top of the stick is a 1/16" hole to receive a MicroMaxx launch rod, and a small hole is drilled in from the side of the stick for a setscrew (in my case, the setscrew is a screw eye). This way you can launch rockets with and without launch lugs from the same system. I use the rod and the top end of the stick to launch the MicroSoar boost-gliders. | |
  |
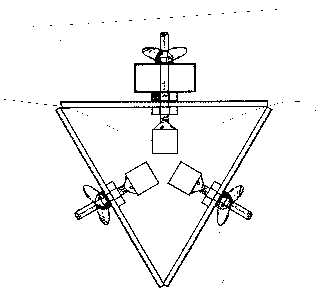
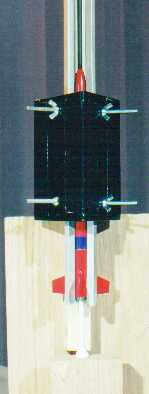
When all epoxy is fully cured, place a hex nut on each of the six screws and thread it up close to but not tight on the head. Insert all three rails before cinching any down. A short piece of body tube at the bottom and top ends of the rails will help you to align the rails as you position them by the use of hex nuts inside and wingnuts outside the tribox (except that hex nuts are also used on one outside surface, to facilitate bolting that side to the upright stand). When adjusted, the rocket should fit loosely but smoothly as shown in the sketch at left. Caution: if it fits too loosely, the nose cone can become wedged between two rails. |
Ignitor Setup: I tape my launch system's micro-clip leads to a small block of wood, pointing straight up. The Micro-Maxx ignitor, removed from its black plastic shell, is gripped in the two micro-clips, positioned just under the base of the tower rails, and inserted into the nozzle as the rocket is lowered out of the base of the tower. The rocket rests on the ignitor. It must be positioned so that at least part of the fins are between the rails. If a conventional Estes or Apogee ignitor is used, the rocket must be propped up to the base of the rails; again, I used a block of wood to hold it up.
Flight Tests: The first rocket out of this tower was a copy of my original Fwit, a bit less than 4" long. The three Poker prototypes have flown a total of seven times, including one flight at our club launch in Sheridan in Sept. 2000. Just to be sure it could be done, I also flew a 10.5mm ExCentrix (sans lug) on an Apogee 1/4A2-2, and my little Asterix on a 1/2A2-4. All of these flights used the 12" rails; as I write this the 24" rails are ready and waiting for a good flight opportunity, but have presented some additional design problems.
None of these flights have been tracked for altitude, and I don't notice any difference in performance from the tower as compared to launch lug flights. I do believe the wooden rails create more friction than necessary, but not enough to be a problem for sport flying. If you want a competitive edge from the tower, I suggest you try metal rails.
I've also flown the Energette 4FNC and a couple of MicroSoar gliders from a rod fitted to the top of the upright.
 |
 |