| Manufacturer: | Scratch |
(Contributed
- by Greg Burke)
Project
LRD-D-1
Everyone knows how things get started, search through books, magazines, and
online sources just to find that perfect prototype for a new project. I was
faced with this same dilemma. Even with the vast amount of different
prototypes, most are still just a basic fins, tube and nose cone rockets. I
wanted something that was different and a challenge to design and build.
Then I saw it... The LRD-D-1. I know what your thinking, "what's so different about the LRD other than the fact that it just looks different?" Yes, it is just a basic rocket, but with a new "spin" on propulsion. The LRD was supposed to have a liquid fueled motor that had two nozzles that would literally spin around the axis of the rocket.
The rusty gears in my mind started to come to life. Just because the Russian's couldn't figure it out doesn't mean that I can't, right?
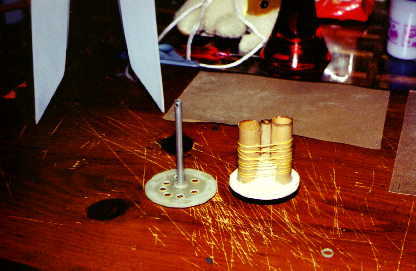
Here is a picture of the basic components of the spinning motor mount.One G10 forward bulkhead, one 1/4"od aluminum tube, one 1/4"id launch lug, two pieces of BT20, two nylon washers, and some Kevlar® thread.
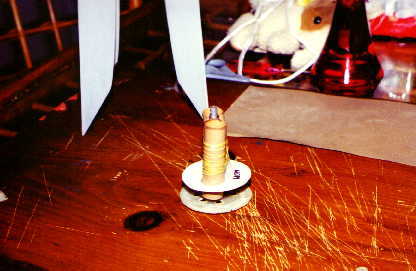
Here's the motor mount assembled. Note the slight cant of the motor tubes...

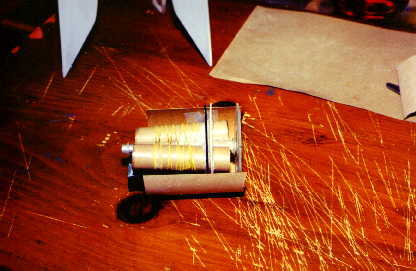
Here's a view of the bulkhead, and the ejection containment ring. Please note the edge of the ring colored black. An eyebolt is epoxied into the center hole for shock cord attachment.
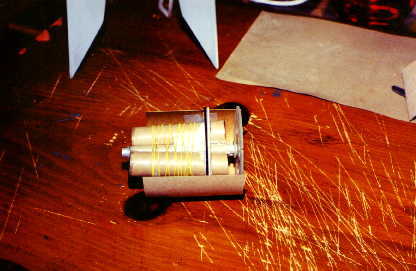
During thrust, the centering ring on the motor tubes,(white ring), and the ejection containment ring, (black ring), do not touch. The centering ring that's connected to the motor tubes spins with the motors.
At ejection, the entire motor mount slides backwards. This pushes the centering ring and the ejection containment ring together. This action forces the ejection gases to be pushed forward, thereby pushing off the nose cone and, hopefully, deploying the recovery system.
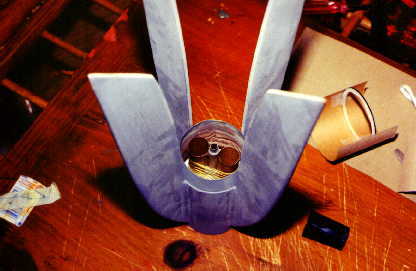
Here is a shot of the motor mount installed in the model. It's a bit tricky to get all of the parts lined up right. The bulkhead goes in first from the front of the model.Then, after I removed the motor tubes, the ejection containment ring was slip fitted into place. Then the bulkhead was removed, the motor mount re-installed, then the whole assembly was put back into the model. After this is done, I had to do a little fiddling to get the containment ring into the proper location so that it let the motor mount assembly turn freely during boost phase, and would seal up the two rings during ejection.
After all of this was done, epoxy was applied to the containment ring ad forward bulkhead.
On a side note, the tail cone was made using super thin G10 that I picked up from Aerospace Specialty Products. The cone was CA'd onto a short piece of tube coupler and then epoxied into the airframe.
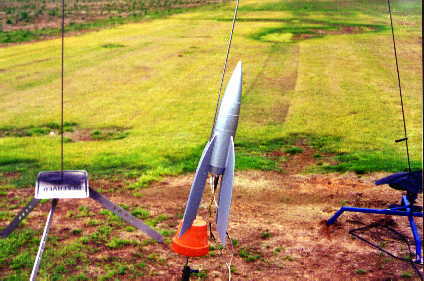
Here's the finished model on the pad. Two C5-3's were used for the test flight.
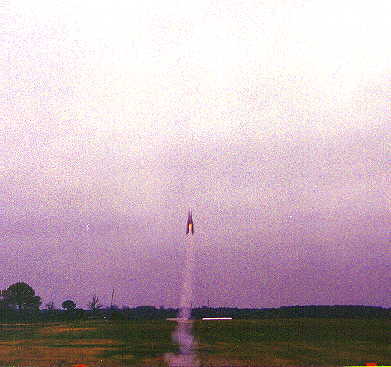
This liftoff photo does not do justice. It was very overcast on the day of the launch. The wind at time of launch was about 10 - 15 mph. The rod was aimed with the wind. Check out that straight up flight! You can't really tell from the picture but yes, the motors are spinning. The LRD only made it up to about 500' agl. The landing was a bit hard due to me using a small chute.
The project was a success! The LRD even took first place
in F/F Scale at the Mick Meet where it's debut flight took place. There was
only one mishap, probably due to the small chute, the motor mount would not
spin after landing. The aluminum tube in the center was slightly bent. To
remedy this, I am building the next motor mount using 1/4" stainless rod,
and using a bigger chute. 8^)I also plan on building a 4" version that
will use F-20 Econojets for propulsion, that I could use for Giant Sport
Scale.
The Parts
List
For the model
BT-80 nose cone ( NC-80b)
4.25 inches of BT-80 body tube
1/8" balsa
The Motor Mount
Two - 2.25 inch pieces of BT-20 (for the motor mounts)
3.5 inches of 1/4 inch OD aluminum tubing
Two - BT-80 centering rings
1/4 inch launch lug
For the Tailcone
BT-80 tube coupler ( about 1/2 inch)
Waferglass or cardstock (for the tailcone)
I used waferglass because it's easier to work with and the radiant heat of two recessed motors gets a little too hot for cardstock IMHO.
VCP or any shroud making program can be used to make the tailcone. The parameters are - 65.7mm at the coupler, 59mm at the aft end, and 23mm in length.
Plans and Scale Data, (including fin template) are in Retro Rockets (Saturn Press). Page 89 for the plans, (just upscale them 145%) and pages 74 - 75 for the Scale Data and picture.
***A special thanks to*****
Andy Jackson at Aerospace Specialty Products
For all of their awesome and unique building materials
Peter Alway at Saturn Press
For all of his Scale Data books.
And my wonderful wife.
For letting me partake in this sometimes time consuming hobby.
Then I saw it... The LRD-D-1. I know what your thinking, "what's so different about the LRD other than the fact that it just looks different?" Yes, it is just a basic rocket, but with a new "spin" on propulsion. The LRD was supposed to have a liquid fueled motor that had two nozzles that would literally spin around the axis of the rocket.
The rusty gears in my mind started to come to life. Just because the Russian's couldn't figure it out doesn't mean that I can't, right?
Here is a picture of the basic components of the spinning motor mount.One G10 forward bulkhead, one 1/4"od aluminum tube, one 1/4"id launch lug, two pieces of BT20, two nylon washers, and some Kevlar® thread.
Here's the motor mount assembled. Note the slight cant of the motor tubes...
Here's a view of the bulkhead, and the ejection containment ring. Please note the edge of the ring colored black. An eyebolt is epoxied into the center hole for shock cord attachment.
During thrust, the centering ring on the motor tubes,(white ring), and the ejection containment ring, (black ring), do not touch. The centering ring that's connected to the motor tubes spins with the motors.
At ejection, the entire motor mount slides backwards. This pushes the centering ring and the ejection containment ring together. This action forces the ejection gases to be pushed forward, thereby pushing off the nose cone and, hopefully, deploying the recovery system.
Here is a shot of the motor mount installed in the model. It's a bit tricky to get all of the parts lined up right. The bulkhead goes in first from the front of the model.Then, after I removed the motor tubes, the ejection containment ring was slip fitted into place. Then the bulkhead was removed, the motor mount re-installed, then the whole assembly was put back into the model. After this is done, I had to do a little fiddling to get the containment ring into the proper location so that it let the motor mount assembly turn freely during boost phase, and would seal up the two rings during ejection.
After all of this was done, epoxy was applied to the containment ring ad forward bulkhead.
On a side note, the tail cone was made using super thin G10 that I picked up from Aerospace Specialty Products. The cone was CA'd onto a short piece of tube coupler and then epoxied into the airframe.
Here's the finished model on the pad. Two C5-3's were used for the test flight.
This liftoff photo does not do justice. It was very overcast on the day of the launch. The wind at time of launch was about 10 - 15 mph. The rod was aimed with the wind. Check out that straight up flight! You can't really tell from the picture but yes, the motors are spinning. The LRD only made it up to about 500' agl. The landing was a bit hard due to me using a small chute.
For the model
BT-80 nose cone ( NC-80b)
4.25 inches of BT-80 body tube
1/8" balsa
The Motor Mount
Two - 2.25 inch pieces of BT-20 (for the motor mounts)
3.5 inches of 1/4 inch OD aluminum tubing
Two - BT-80 centering rings
1/4 inch launch lug
For the Tailcone
BT-80 tube coupler ( about 1/2 inch)
Waferglass or cardstock (for the tailcone)
I used waferglass because it's easier to work with and the radiant heat of two recessed motors gets a little too hot for cardstock IMHO.
VCP or any shroud making program can be used to make the tailcone. The parameters are - 65.7mm at the coupler, 59mm at the aft end, and 23mm in length.
Plans and Scale Data, (including fin template) are in Retro Rockets (Saturn Press). Page 89 for the plans, (just upscale them 145%) and pages 74 - 75 for the Scale Data and picture.
Andy Jackson at Aerospace Specialty Products
For all of their awesome and unique building materials
Peter Alway at Saturn Press
For all of his Scale Data books.
And my wonderful wife.
For letting me partake in this sometimes time consuming hobby.
 |
 |