| Manufacturer: | Scratch |
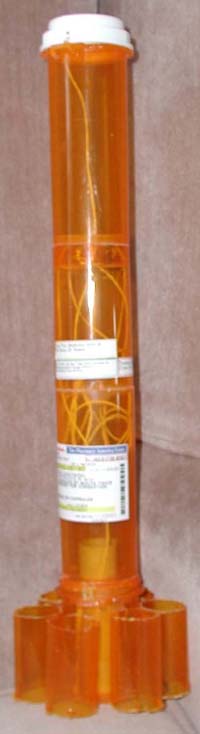
The Medical Missile
The Lightbulb Goes OnEver since I heard about the RMR DESCON, I've been contemplating entering. Unfortunately, I've only been able to come up with a decent concept once, and I haven't yet had a chance to build it. This time, I was determined to enter, so I spent a couple of weeks trying to think of something creative to use as parts. After seeing the first two entries appear, I was sitting at my desk trying to think of what I could use. I happened to look up at the shelf above the monitor, and the lightbulb finally clicked on! There, right in front of my face, sat the pill bottles for my allergy medication. They're round. They're tube shaped. They're durable. Why won't THOSE work??? A bit more checking around the house I had my hands on a sufficient quantity of parts for this little creation. Next, I had to figure out how to build a motor mount. A check of the bottom of the bottle revealed that the dimpled inner ring in the center of the bottom oft the bottle is close to a perfect fit for a 24mm motor mount. Who needs centering rings when the bottles come with them? Parts ListI'm not certain if all pharmacies label their pill bottles in the same fashion, so I will include not only the size markings from the bottle, but also the approximate measurements.
Pill bottles should readily be available from your local pharmacy at a minimal cost, if you don't have enough family members on medication. |
 |
Preparing The BottlesCut the bottoms off all of the smaller (PM-10) bottles. Also cut the lip and threads for the lid off of all six of these bottles. This will provide the tube fins. Take one of the PM-30 bottles and remove a section from the middle of the bottom large enough to allow the motor mount to fit snugly. Set this bottle aside; it will become the bottom section of the body tube. Cut the lip and threads from two of the PM-30 bottles. Remove the bottom of one of the bottles. Cut a 3/4" ring from the top of one bottle and discard the rest. Make a vertical cut in the ring, then remove enough material to allow the piece to fit inside the top of the other bottle. This will become the tube coupler. Cut the bottom out of one of the PM-60 bottles. This is the top of the body tube. Cut the lip and threads from the top of the other PM-60. Cut a hole in the center of the bottom, large enough for the motor mount to fit in. |
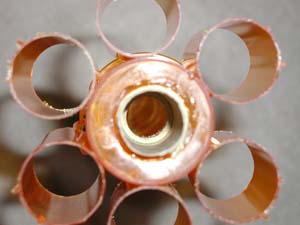 |
ConstructionThe first problem I encountered was figuring out how to glue the bottles together -- a check of the bottom revealed a recycling code of 5 (polypropylene). Not much adheres to this stuff. Fortunately, the local hardware store had a Loctite product called Plastix. Plastix consists of a small tube of what appears to be regular gel CA and another bottle of "surface activator". Brush the activator on, let it dry, and the CA will adhere to the plastic. Assembling The Body TubeTake the PM-30 with the partial bottom and the PM-60 with the partial bottom and test fit the bottom of the PM-60 into the top of the PM-30. The bottom should fit a short way into the top of the PM-30. Test the motor mount to make sure it fits; sand the openings as necessary to allow the mount to fit without binding. With the motor mount in place, remove the PM-30, leaving it attached to the PM-60. Mark the motor mount where it touches the bottom of the bottle, and remove. Push 12" of kevlar through the motor mount opening, from the top of the PM-60, then insert and glue the motor mount in place. The motor mount will be holding the kevlar in the opening. Next, run the kevlar through the top of the PM-30 with the partial bottom, and through the motor mount opening. Glue the PM-30 in place, with the kevlar coming out the bottom next to the motor mount. Wrap the kevlar around the bottom of the motor mount, against the bottle bottom and glue in place with CA. This will form the firmly anchor the shock cord in place. Invert the PM-30 which is missing its top and bottom onto the top of the PM-60 with the motor mount. Sand as necessary to match the two surfaces and glue into place. Center the coupler ring vertically in the end (now the top of the body tube) of the PM-30 and glue into place. Test fit the bottom of the remaining PM-60 over this ring. The bottle bottom should slide relatively smoothly over the coupler. Some sanding of the coupler may be necessary to allow the motor ejection charge to separate the rocket at this point. Attaching The Nose ConeThe nose section of the rocket is the remaining PM-60, with a cap attached. Use an X-Acto knife or a small drill bit to make a hole just above the bottle lip. The hole should be large enough to allow the kevlar to be pushed throw. Pull enough kevlar through to wrap once around the top of the bottle. Use the surface activator to prepare the thread area on the bottle, then wrap the kevlar around the bottle above the lip and glue it into place. Screw the cap down onto the top of the bottle. Attaching The FinsEvenly glue the six PM-10 bottles around the bottom bottle of the rocket, to create tube fins. |
|
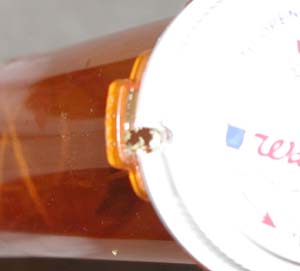
Launch LugWalgreen's pill bottles have a tab on the side, as part of the child-safety cap, which must be pushed down to allow the cap to be removed. I left this tab on the top (nose cone) and bottom bottles, as it is part of the lip of the bottles. I decided to use this tab as a launch lug. On the nose cone, I used a drill to make a hole through the rim of the lid, down through the lid release tab. The hole is large enough to allow a launch rod to pass easily through. I then used the same drill bit to slightly enlarge the opening through the tab in the bottom bottle, in the same fashion. The nose cone is slide onto the coupler and turned such that the launch rod easily slides through the two tabs. |
 |
Flight Report03/04/2001 I'll be doing proper repairs at home as well as replacing the parachute, so I can bring 'er to the first club launch of the year. |
|
2nd AttemptApril, 20001 First club launch of the year, and I break out the Medical Missile. It receives many strange looks, and at least two club members claim it won't fly very well, and won't go very high. Time to load this baby up and show 'em how much they know. A PERFECT flight and recovery, followed by many members eating their words and admitting that it does indeed fly quite well. 8-} Now if only the Cornmaiden recovered that well... |
 |
 |
 |