| Manufacturer: | Scratch |
MIRV Gatling
Adrian Hurt's Descon-14 Entry
 There used to be a wonderful kit called the
MIRV Gryphon. Originally made by Seattle Rocket Works, and subsequently taken
over for a while by Lawndart Rockets, this featured a booster with a quad
mini-motor cluster and four separate sustainers. Unfortunately, it's not much
use nowadays because Estes stopped making the A10-0T booster.
There used to be a wonderful kit called the
MIRV Gryphon. Originally made by Seattle Rocket Works, and subsequently taken
over for a while by Lawndart Rockets, this featured a booster with a quad
mini-motor cluster and four separate sustainers. Unfortunately, it's not much
use nowadays because Estes stopped making the A10-0T booster.
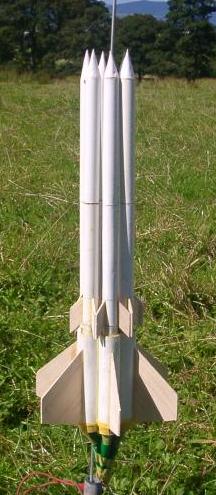
So I decided to build something similar, only instead of four, I'd use six. Since there was no 13mm booster available, I'd use 18mm booster motors instead.
I'd already built a single sustainer and single-motor booster as a prototype before I went to International Rocket Week 2004. This flew well, although - as expected for such a small rocket - the sustainer got lost. It did prove that the sustainer would fly properly, and that staging from 18mm to 13mm would work.
Over the course of the week, I built six "replacement" sustainers, and nobody asked any awkward questions about the six bits of BT-20 which would form the booster.
Booster:
Cut 100mm of BT-20. Cut 5mm off the front of an expended 18mm casing to use as a thrust block; spread glue about 60mm up the inside of the BT-20 and use another expended 18mm casing to push the thrust ring up inside the BT-20 so that about 7mm of the casing remains outside the BT-20.
Bore two vent holes about 3mm diameter, 25mm down from the front end of the BT-20, spaced 90 degrees apart.
Cut 20mm of BT-5. Alternatively, roll and glue a paper tube 20mm long, of sufficient diameter to allow a 13mm motor to fit easily. (Actual BT-5 is a tight fit on a 13mm motor, so rolling your own tube may work better.) Make two centring rings to fit this tube into BT-20. Glue one ring at the read end of the tube and one 9mm from the rear end. Glue the tube into the front end of the BT-20 so that the inner tube extends past the end of the BT-20 by 10mm.
Make six booster tubes of this type.
Make six fins, root chord 75mm, span 40mm, tip chord 25mm, leading edge sweep 40mm.
Glue the six booster tubes together so that they are parallel and form a regular hexagon when viewed end on. The vent holes must all be outside the hexagon. Glue one fin to each booster so that the rear tip of the fin is level with the rear end of the booster.
Glue a launch lug inside the booster along one of the joints between two tubes.
Sustainer:
Cut 220mm of BT-5. Make a paper cone about 25mm long and glue it to the front end. Make three parallelogram shaped balsa fins, root 22mm, span 11mm, leading edge sweep 11mm, and glue them to the body tube so that the inner end of the trailing edge is level with the end of the tube.
Cut the body tube in half. Cut two pieces off a spent 13mm motor, one 20mm and one 10mm long. Glue the 20mm piece into the rear end of the forward tube to make a coupler. Glue the 10mm piece into the tail end of the aft tube to make a thrust ring; use another spent 13mm motor to push it into place so that about 10mm of the motor protrudes from the tail end.
Fix a kevlar shock cord to the coupler and to the aft body tube; Estes-style folded paper mounts work for both ends of the cord.
Flight Report:
By Monday 30th August, the whole thing was complete. Each sustainer was loaded with a 1/2A3-4T, and each booster tube was loaded with a B6-0. My control box can't fire six igniters at once, so I taped a piece of Quickmatch into each booster motor, taped them together and taped a single igniter at the common end. I was able to truthfully tell both the RSO and the event organiser that the rocket had been swing-tested and had "flown" the right way, so I was allowed to launch it. All booster motors lit and the booster flew straight up, then all six sustainers ignited and went their separate ways. The booster tumbled down - in fact, it rotated quite rapidly about its centre axis, true to its name, and almost a heliroc! The booster was recovered, with minor damage to one fin. None of the sustainers were found, which was hardly a surprise.
 |
 |