| Manufacturer: | Scratch |
 Oatlander background history:
The Oatlander was inspired by the Oat cereal box rockets and
strongly influenced by the original Marz Lander, thus the name.
Oat - Lander
The rocket was built almost entirely from recycled or found parts with the exception of the core body tubes and the fin material. A great amount of design emphasis was placed on saving weight. Some of the other oat box rockets have been on the heavy side, for rockets. The single most significant weight savings was in my selection of the oat box its self. Instead of the conventional wound construction I was able to find a box that was single layer of fiber board. Carefully selecting material can make a difference. Even though it's a fatroc, it doesn't have to be heavy.
As I said with the exception of the core body tubes and the fin material all other materials were salvaged. The Oatlander could be built using purchased materials of course.
Other Sources:
- The Wonderful Flight To The Mushroom Planet
- My Doctor, for putting me on a cholesterol reduction diet.
 Parts List:
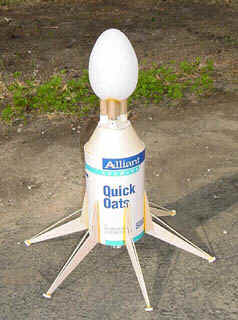
- 1 - 9" x 5"dia. oatmeal box
- 1 - BT-50 x 12"
- 3 - BT-20 x 12"
- 1 - BT-50 coupler
- 3 - BT-20 couplers
- 1 - foam ostrich egg
- 1 - 20-50 thrust ring
- 3 - 5-20 thrust rings
- 4 - engine retainer hooks (windshield wiper blade refills)
- 1/8" foam core board or 3/32" aircraft plywood or 3/32" balsa
- 1/8" balsa
- 6 - drinking straws from the school cafeteria lunch line
- 6 - shish kabob skewers
- 1 - discarded file folder
 Construction:
All construction was done using basic
construction techniques. This is really not an advanced rocket, it just
took some time to build.
The design uses a core structure of three BT-20 tubes around a central BT-50 tube. This gives structural integrity and allows flexibility in engine use. The core structure is then attached to three bulk heads cut from 1/8" foam board to fit the inside diameter of the oat meal box. Positioned one each at the top and bottom and one approximately 3" from the bottom to add support where the fins will anchor. The foam board was salvaged from an old poster.
The oat meal box is then attached to the bulk heads. Double check alignment before applying glue. Locate the launch lug holes adjacent to the core structure tubes.
A transition adaptor was cut from a discarded file folder. This sits on the top of the sustainer and matches a circle cut from 3/32" balsa that is glued in place on the core structure. Insert the launch lugs and trim off excess.
The capsule is made from a foam ostrich egg. A staging coupler is glued into the base of the egg to fit into the BT-50 and one for each of the surrounding tubes. Be certain to align the tubes so that it will be easier to fit everything together, especially the couplers and the capsule.
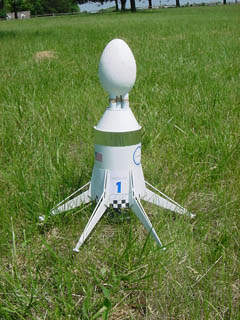
Use the fin alignment wrap and index the sustainer body with six equally spaced marks that run at least 4" up from the bottom.
The landing gear, that is the longest fin, is glued first and touches the bottom of the sustainer. Once the landing gear/fins have dried add the buttresses, on each side of the landing gear. The buttresses are glued along the root edge to the sustainer and to the side of the landing gear. Glue the landing gear feet to the ends of each landing gear leg. The shish kabob skewers that represent hydraulics are next. Each of the landing gear feet gets one that goes up to the
sustainer body. You can try to measure out and cut the correct miter on the body end of the skewers, but what I did was to make a small hole in the sustainer body and stick in the skewer with the application of a little glue. No measuring. The skewers attach (enter) the sustainer at 3" above the bottom. They are positioned in between the paired buttresses above each of the landing gear legs.
Finishing:
Seal. Sand. Paint and finish to taste. I like cinnamon and brown sugar on my oat meal.
 Flight Notes:
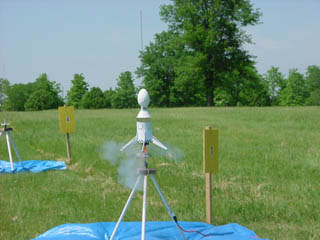
05/12/01: KCAR May launch at Shawnee Mission Park. D12-3. Weather was perfect.
No clouds, little wind. The club had a record number of launches.
The Oatlander was prepared and inspected. I was using a borrowed nylon
chute which fit very snug in the tube. The launch went perfect. Straight
up, no wobble. Arced over at apogee and the ejection charge blew the motor
out the back. No chute deployment. The Oatlander took a core
sample. The damage was surprisingly slight. The outer body detached from
the bulkheads and some damage to the nose capsule. Good flight, bad
landing. I was advised that the engine hook may have been too loose.
A single wrap of tape would have made the engine secure and might have prevented
this.
05/13/01: D12-3. After making quick repairs, we decided to try again. This time I made the engine secure and used a plastic parachute. The fit was better in the tube. Most of the damage had been repaired with the exception of the circle at the top of the transition section being broken. The wind was higher than the previous day, but it was just as hot. We launched a sounding rocket to test the wind. Good flight and recovery.
We gave a countdown and launched the Oatlander for the second time. No hesitation from the launch pad. She started to arc slightly into the wind but achieved about the same altitude as the day before. This time the ejection charge blew the chute out and we had good deployment. She came down a little hot. Hit the ground on one side and cracked a landing gear leg. Nothing that a little glue won't fix.
Because of its size, the flight is really exciting to watch and easy to track.
 |
 |