Scratch Pokeman 3 Original Design / Scratch Built
Scratch - Pokeman 3 {Scratch}
Contributed by Stuart Lenz
| Manufacturer: | Scratch |
Modeled by: Stuart Lenz DESCON 13Pokeman 3
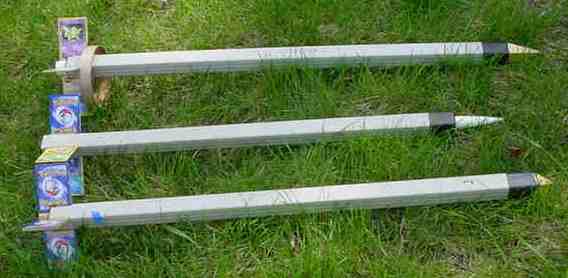
 This design is an evolution of the Pokeman series of rockets that uses a square plastic tube that welding rods are sometimes shipped in. This one has a 29mm engine tube and an offset ring fin. The first 2 Pokeman rockets had 24mm engine tubes that were underpowered on Estes D and E engines and fly well on Aerotech F21s. This series of rockets also creates a needed use for Pokeman cards. An additional challenge in this series is the used in the outer square tube and end caps that are made of a plastic that is resistant to most adhesives including the mechanical bond of epoxies.
I fitted the engine tube through the lower square tube cap. Once if fitted through the lower tube cap, the 3 centering rings were space out along the tube and glued on. The centering rings were then trimmed to fit inside the square tube. A piece of braided Kevlar was tied around the tube near the top centering ring and through a small hole drilled through the centering ring. The engine tube was then glued into the square tube, inserted from the top end and extending 1 inch through the lower tube cap, using a generous amount of 5 minute epoxy.
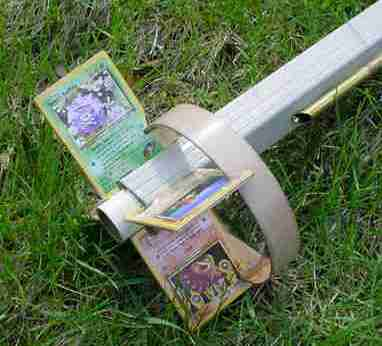
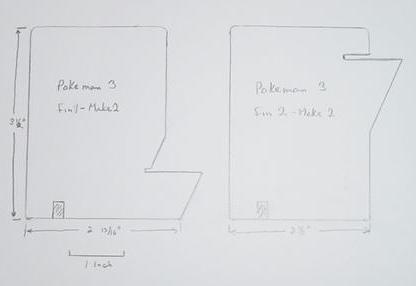
Once the engine mount was dry, the square body tube was marked and cut for the fin slots. The fins themselves were cut from 1/8" plywood and bonded on both sides with the Pokeman cards also using epoxy. When these were dry the edges of the cards and plywood was sealed with additional epoxy. The fins were then glued to the engine tube through the outer square tube and to the outer square tube using a generous amount of 5 minute epoxy. Fin filets to the square tube were also made at this time using the epoxy. I then cut a 1" piece from a LOC 5.5" tube for the Ring fin and attached it to the other fins. It was then strengthened with a coating of epoxy on the edges and inside surface and filets were also added at the ring and flat fin connection points.
The upper tube cap was sanded to slide in and out of the square tube without binding and a pointed plywood nose cap was built. The second piece of braided Kevlar was then attached to the upper tube cap through two holes in the end and the plywood nose cap was also glued on. Several additional holes were drilled into the upper tube cap alone the edges where the plywood cap fit to provide additional bonding for the epoxy. The elastic shock cord was then attached to loops tied in the ends of both pieces of braided Kevlar and the parachute attached.
The launch lug was attached to the square tube by drilling a series of holes through the tube from 6" to 10.5" from the bottom end of the rocket, using care not to damage the engine tube inside and epoxy to glue the launch lug to both the outer square tube and the inner engine tube.
The CP/CG stability was verified with a swing test and the model was launch at one of the MASA April TARC launches in Apple Valley, Minnesota. After some pre flight negative comments by other MASA members, the rocket had a straight boost and recovery on the field, good flight, apologies accepted.
Parts
- Square Welding Rod Tube 34.0"
- Square Welding Rod Tube Cap 2.0"
- 29 mm Engine Tube 36.0"
- 29mm*38mm Centering Rings 3
- 1000 lb Kevlar String 2 * 10"
- 3/8" Launch Lug Brass 5 ¼" long
- 1/8" Plywood As Required
- 3/8 " Elastic Shockcord 36"
- Parachute or Streamer As Desired
 |
 |