| Manufacturer: | Scratch |
Push-Me, Pull-Me
A DesconX Entry
(Contributed - by Nick
Esselman)
 Wow, did time sneak up
on me or what? I wanted to design and build a rocket for this Descon but kept
putting it off. Then it was May and I hadn't started. So it was time to get
busy. I have a great design and unique from all the other entries. Not
extremely sophisticated but definitely functional. And, I was finally able to
fly it this weekend. So here goes......
Wow, did time sneak up
on me or what? I wanted to design and build a rocket for this Descon but kept
putting it off. Then it was May and I hadn't started. So it was time to get
busy. I have a great design and unique from all the other entries. Not
extremely sophisticated but definitely functional. And, I was finally able to
fly it this weekend. So here goes......
My design is a two-stager. It has a cluster-motor booster to a single-motor sustainer. I'm always afraid of staged-rockets because of the potential altitude (and my relatively small field), so I decided to add a feature to create more drag. I named the rocket Push-me, Pull-me. The motors "push" while the big cone-fin increase the drag "pull".
Get the RockSim file here.
As with the other entries, I have started with the Estes Gemini DC. The following steps are what I used to build the rocket:
SUSTAINER:
- Assemble the 18mm Motor Mount but do not install the motor hook and install the upper centering ring flush with the top of the motor tube and the lower flush with the bottom of the motor tube
- Install the Motor Mount into the main body tube until the mount is recessed 1/4" into the body tube
- Tie the two elastics together and attach inside the upper open of the body tube using Estes 3-fold method
- Assemble the nose cone and tie the other end of the elastic to the nose cone
- Attach 1 of the two parachutes
- Remove the fins and install into the fin slots (cut as needed to miss the Motor Mount centering rings)
- Cut the launch lug in half and install one 1/2" from bottom and the other 3" from top on the body tube

BOOSTER:
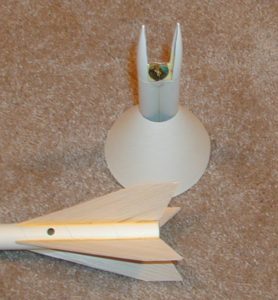
- Glue the two 18mm side-pod tubes together side-by-side and equal in length, holes facing out
- Cut each of the side-pod nose cones in half (actually it is a bit more than 1/2, but you can trim as you go)
- Cut 1/2" tabs that overlap and are glue together at the top of the side-pod tubes (see picture)
- Glue the 1/2's of the side-pod nose cones into the side-pod tubes so that they are aligned exactly to the outer edge
 Trim both
NC's down until the unit slides onto the Sustainer and between two fins easily
(my guess is that there is about 40% of the nose cone remaining
Trim both
NC's down until the unit slides onto the Sustainer and between two fins easily
(my guess is that there is about 40% of the nose cone remaining- From the Estes Insert Card, cut out a transition that will be used as a fin-cone. The transition has an upper diameter of 1.473" and a lower diameter of 4.375" and a length of 3.75"
- Attach the fin-cone to the two pod-tubes ensuring good glue joints where the fin-cone touches the pod-tubes (only the outside edges). The cone bottom should be flush with the bottom of the pod-tubes
- Using some of the remaining Estes Insert Card, cut two pieces that will be glued into the tops of the pod-tubes to "funnel" the exhaust gases toward the center of the Sustainer. This is to help ensure the upper motor lights
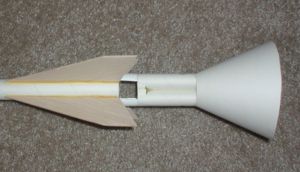
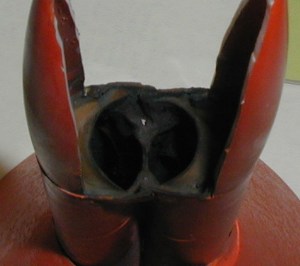
- Epoxy the inside of the booster's top section to protect it from the sustainer motor.
- NOTE: Don't do anything with the holes that are in the sides of the pod-tubes, these are necessary for good gap-staging
For finishing, I went with the quick-and-ready approach so that I could get the rocket flown before the deadline. I painted the sustained Navy blue. I could/should have applied some of the decals but didn't. I painted the booster orange.
FLIGHT:
I used friction-fit on all the motors. The sustainer was loaded with an A8-3.
This is pushed in until it is even with the sustainer tubing. The booster was
loaded with two B6-0's. These are also friction-fit until they are sticking out
about 1/2".
The launch rod fits in the gap between the pod-tubes and the cone-fin and then through the two launch lugs.
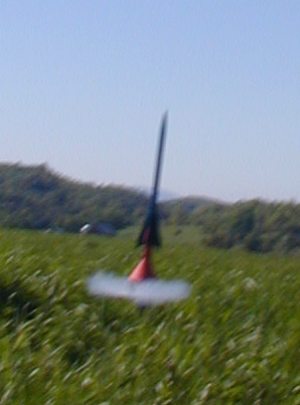 Upon pushing the launch
button both B6's lit and off she flew. It was stable and straight up until the
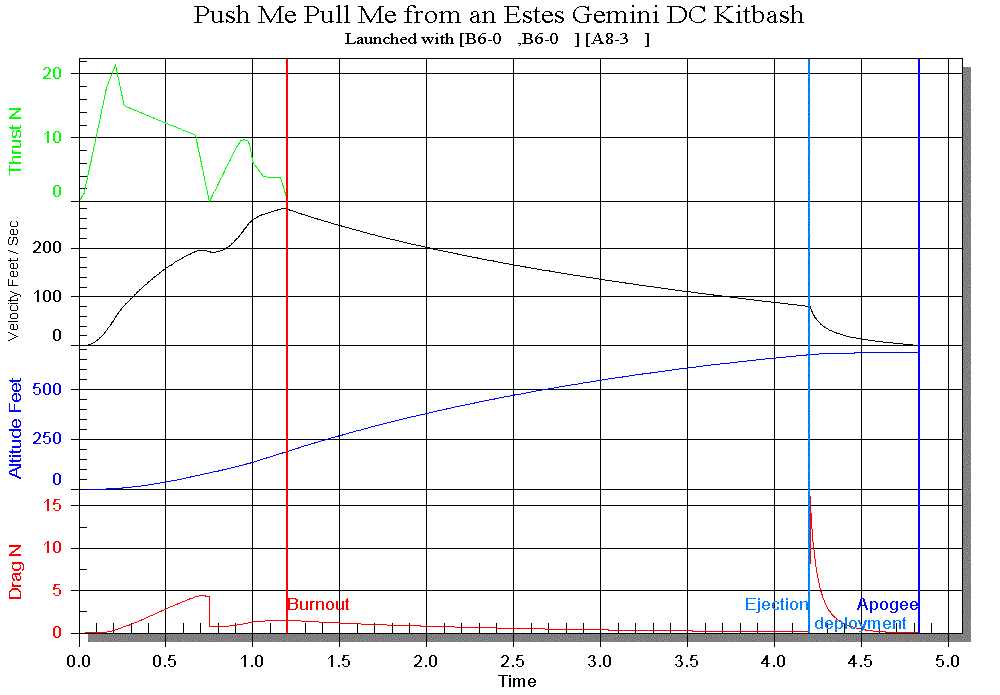
B6 thrust stopped. RockSim suggests the booster carried it to ~80 feet and I
would agree by sight. It seemed to slow fast (see the graph below and look at
the change in Drag).
Upon pushing the launch
button both B6's lit and off she flew. It was stable and straight up until the
B6 thrust stopped. RockSim suggests the booster carried it to ~80 feet and I
would agree by sight. It seemed to slow fast (see the graph below and look at
the change in Drag).
Then the A8 lit and the rocket was off. Direction changed slightly (5 degrees?) but it was still straight.
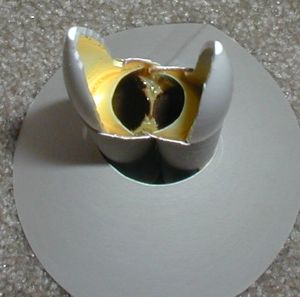
I saw the ejection pop of smoke but noticed the nose cone did not come out and therefore no parachute. It came in ballistic and thumped into the soft ground.
Conclusion, the pre-cut exhaust ports reduced the exhaust pressure too fast and therefore the nose cone was not pushed out. That is the only explanation! I should have covered those with some of the scraps from the Estes Insert card.
BEFORE and AFTER:
These pictures show how I used epoxy to protect the booster from the
sustainer's motor. You can see that it held up. Yes, it got black, but it did
hold up.
NEXT STEPS:
I'm going to repair this rocket, because it was a nice performer without too
much altitude. It also demonstrates several rocketry techniques, including
cluster, gap-staging, and the use of a fin-cone. Not bad from a kitbash!
These are some things that I will now do to improve the design (going outside of the strictness of this contest):
- Glue a thrust ring into each of the two 18mm side-pod tubes so that the motor sticks out by 1/2"
- Glue a thrust ring into the sustainer motor tube so that the motor is flush with the bottom of the body tube
- Cover the two exhaust ports in the sustainer body tube.
 |
 |