Descon RAP(N) Original Design / Scratch Built
Scratch - RAP(N) {Scratch}
Contributed by Scott Oliver
| Manufacturer: | Scratch |
RAP(N)
Rocket Assisted Projectile (Nerf)
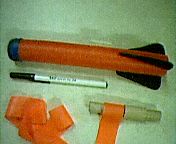
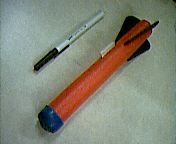
The RAP(N) is a 9" Nerf whistling foam dart, modified for "more power!". It flies on 13mm engines to about 100’ and is a real crowd-pleaser.
History
Several years ago I read a book titled "Microserfs" by Douglas Coupland, a fictional tale of a band of Microsoft employees. One of the scenes from the book that intrigued me tells about how some of the workers would arm themselves with Nerf weaponry and go on "hunting parties", tracking down or ambushing other employees and bombarding them with a fusillade of foam darts then dashing off in search of another victim.
I tried without success to interest my co-workers in having Nerf wars to blow off some steam. Without success, that is, until I took my current job. Here I found some kindred spirits and soon almost everyone in the office had armed themselves and the darts were flying. Great fun!
One of the types of weaponry in use is called the Triple Shot. It fires 9 inch foam darts. Each dart is 237 mm (9") long by 30 mm (1.25") wide. Made of a red foam material, the ones that come with the Triple Shot have a blue rubber nose cap that makes them whistle as they fly. The darts have 3 foam fins, canted to induce spin in flight. The darts are fired by sliding the hollow base of the dart over a spigot on the launcher; pulling the trigger releases a burst of air which propels the dart on its way.
Shortly after we acquired the Triple Shot, I noticed the hole in the base of the dart looked remarkably close to the size of an 18mm motor and commented that perhaps I should make a rocket from one of the darts. Some time later I put on a demonstration launch for my friends from work, after which they started urging me to work on a dart-to-rocket conversion. I took one of the darts home and sure enough, a BT-20 tube fit into the rear of the dart; a snug fit, but definitely do-able! The project was on!
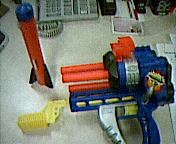 RAP(N) with original launcher, the Nerf Triple Shot.
Design
The RAP(N) is a single stage, tumble/streamer recovery rocket. It flies on 13mm motors; either A3-4T or A10-0/3T. It consists of a Nerf foam dart body and a detachable engine pod. The dart body is made of soft foam and falls fairly slow and soft; the engine pod is ejected and is recovered by streamer.
Length: ~ 9"
Diameter: ~ 1"
Weight: 1 oz.
Components/materials
9" Nerf dart, with whistling cap
2 #8 lead sinkers
approx. 4.25" piece of BT-20 body tube
approx. 4" piece of BT-5 body tube
1 used 18mm motor
2 BT-5 engine block (may be made from slices of a used 13mm motor)
Streamer material
Launch lug
Small piece of scrap balsa
Small section of cardboard
White/yellow glue
Hot melt glue
Construction
- Dart body assembly
- Build the forward body tube plug.
The body tube plug provides a thrusting surface for the engine pod and protects the foam dart from the hot ejection gases.
- Trim a small section from the expended 18mm motor, about .25" in length.
- Cut a circle from the cardboard, sized to just fit into the BT-20 body tube.
- Glue the cardboard circle to the motor section to form a plug for the forward end of the body tube. Let dry.
- Sand the plug assembly so it fits inside the BT-20 tube.
- Insert the BT-20 body tube into the Nerf dart.
This will be a snug fit, so to avoid crimping the tube I didn’t cut the tube before inserting it into the dart and I reinforced the tube by (temporarily) putting several 18mm motors inside the tube. Once the tube is in place, trim it off flush with the end of the dart. - Install the forward body tube plug.
The plug was not installed in the body tube before it was inserted into the dart to avoid sealing the body tube and trapping air inside the dart. The foam material of the dart is not porous, so air trapped between the dart walls and a plugged body tube insert would prevent the plugged tube from going all the way into the dart. - Holding the Nerf dart vertically, with the rear of the dart up, carefully dribble some glue into the body tube so that it falls all the way to the front of the tube. Make sure not to drip any onto the sides of the tube walls! The only place you want glue is on the walls at the very bottom!
- Slid the forward plug into the tube so that the cardboard disk is to the rear. Push it into place at the very front end of the body tube. Allow the glue to dry.
- Engine pod assembly
- Measure the length available inside the plugged BT-20 tube insert and cut a section of the BT-5 body tube to that length plus about .25". On my rocket, it ended up being about 4".
- Glue a BT-5 motor block 1.5" from one end of the engine pod. Remember which end is the rear.
- Cut a 1.25" long section of the expended 18mm motor for a spacer. Ream out the inside so that the BT-5 tube can slide into it. The spacer must slide into the BT-20 tube easily, so carefully peal off layers from the outside of the spacer if necessary until you get a loose fit into the BT-20 tube.
- Mark the engine pod tube 1" from the rear end. Glue the spacer onto the engine pod tube so that the rear of the spacer is even with the mark.
- Reinforce the front of the engine pod tube by gluing the other BT-5 motor block at the very front end of the tube. I also lightly sanded the outside of the tube to break the glassine coating and soaked in some thin CA. The entire thrust of the motor is transmitted to the rocket where the front of the engine pod tube meets the forward plug, so these areas need to be strong.
- Cut a length of streamer material; mine is just over an inch wide and 2 feet long. Glue one end of the streamer to the engine pod tube just in front of the spacer. The streamer should be attached perpendicular to the long axis of the engine pod tube; it should stick straight out from the tube like a flag in a strong wind.
- Set the engine pod assembly aside for the glue to dry.
- Balancing.
- Prepare the engine pod by inserting a motor and wrapping the streamer around the forward part of the engine pod. Insert the engine pod into the dart.
- Test the stability of the rocket via the swing test or simply by going to the back yard and giving it a toss. It will probably be very unstable. Slip a #8 sinker inside the blue rubber tip and try it again; repeat until stable. Mine needed 2 #8 sinkers. Remove the sinkers from the tip.
- Carefully pry the blue rubber tip from the dart body. It appears to be held on with some kind of hot glue. Don’t accidentally tear up the foam! (we tear it up on purpose in the next step)
- Gouge out a cavity inside the front of the foam to accept the sinkers. Make sure there is enough foam left on the sides to cushion them. Insert the sinkers deep enough into the foam that you can put a good dollop of hot glue over them.
- Using the hot glue, reattach the rubber tip.
- Final construction
- Locate the CG; mine is about 4" from the rear of the rear of the dart.
- Draw a line parallel with the long axis of the rocket at the CG, centered between 2 fins. Make the line the same length as your launch lug (mine is 1.25" long).
- Cut a slit in the foam body of the dart along the line down to the BT-20 tube insert.
- Cut a piece of scrap balsa the length of your launch lug and deep enough to fit into the slot in the dart for a launch lug standoff. Notice that the blue rubber tip is wider than the foam dart body, so you’ll need to make the standoff tall enough to clear the tip, too.
- Glue the launch lug to the standoff.
- Glue the launch lug assembly into slit in the foam dart body.
Flight logs
I’ve flown the RAP(N) three times, all successfully. The first two flights were on A3-4T’s. Boost was straight as an arrow with no weather cocking at all. Apogee was about 100 feet (I think; I’m not too good at altitude estimation). Ejection occurred well after apogee and gave the rocket an interesting kick toward the ground as the engine pod ejected from the rear. The streamer on the engine pod unfurled nicely and recovery of the two pieces was very easy. The third flight was on an A10-0T. The flight profile was quite different, as the back pressure of the booster engine popped the engine pod out as the rocket was still climbing. The separation of the dart and engine pod occurred at a fairly low altitude and were quite visible. Again, the streamer unfurled perfectly and both parts were easy to find. When using booster motors, I would recommend wrapping the streamer with a square of recovery wadding, as it got scorched a bit.
Several of my co-workers were anticipating a loud whistling sound, both at launch and on recovery; however, we were all somewhat disappointed when we were unable to hear any whistling at all.
BTW, I was somewhat surprised to discover that the completed conversion, without engine pod, can still be used in the Nerf Triple Shot!
 |
 |