| Manufacturer: | Scratch |
Ring Snooper G
by Bob Ellis
Thirty-five years after the original Mars Snooper made the first interplanetary flights
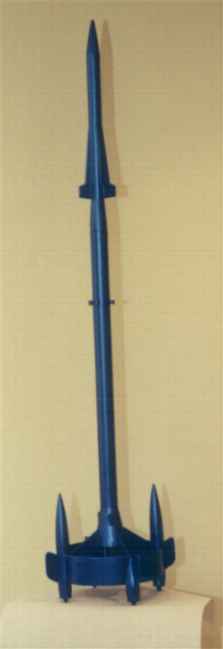
a new Snooper is ready to make the trip to Saturn. Designated the Ring Snooper G, the new exploration ship bears
some resemblance to it's namesake, with the Ion Drive Pods held out on extended fins, the cooling radiators around the
main engine and the detachable crew module at the top, but it adds something new. The Ring Snooper is the first
ship designed to fully use the newly developed Bussard Ring Collector, not directly as a Hydrogen Ram Drive, but rather
as compressor stage or super-charger for the proven Ion Drive. This mating of the two technologies has had many
benefits. The greatly increased thrust has allowed the designers to cut back from three Ion Drive Pods to two,
the resulting savings in weight has allowed more fuel for the main engine. The increased thrust has resulted in a
time saving on the Saturn trip that has allowed both a greater payload and an increase in the crew complement.
|
|
| When I first started Model Rockets in '66 I always wanted to build a Mars Snooper, but my paper route money just wouldn't cover an expensive (at the time) kit like that, and the kit has not been available during any of my reincarnations. The kit bash of the Gemini DC was a good start, with two different sized body tubes and three of the required four nose cones, but it didn't have any of the tail cones or a transition between the body tubes. I also had never liked the easily broken fins on the original Mars Snooper and wanted to find a way to keep the look, but have a more robust model. | |
While looking at the parts after I took them out of the bag, I realized that the cardstock for the artwork was large enough to cut into three strips to make a large ring fin. That would allow me to make the two piece fin design much stronger and at the same time add a new look to balance the loss of one of the nose cones and the tail cones.
Construction:
The first piece to work on was the ring, since everything else had to be sized to fit. Since the cardstock measured about 17.5 inches long, some quick division said that I could make about a 5.5 inch ring, 1.5 inches high with a bit of overlap for the seams.
After wandering around the house, I found a pot in the kitchen that was a bit less than 5.5 inches outside diameter and covered it with cellophane for a release layer. I then cut the cardstock into three strips, roughened them up with sandpaper and smeared them with watered down wood glue. After wrapping the three strips around the pot, another layer of cellophane was stretched over the outside and it was set aside to dry in the oven with just the light on for low heat. Once it was dry, I sanded it, sealed some open edges with Fill-N-Finish and CA and had a surprisingly stiff, solid ring.
Once the ring was done, I had all the dimensions I needed, so I started laying out the Snooper fins and cones in Visio. RocSim wouldn't do it since I needed to be able to stretch and bend some pieces to get the fit right. The inside fins/struts were laid out so that they fit between the BT30 and the ring, and then the end pieces were added outside the ring. The templates from Visio were used to cut the balsa (fresh since my Gemini had damaged balsa and body tubes). The fins did require some sanding to get the fit right, due to irregularities in the ring fin.
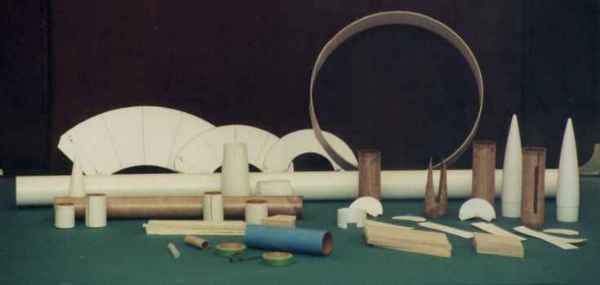
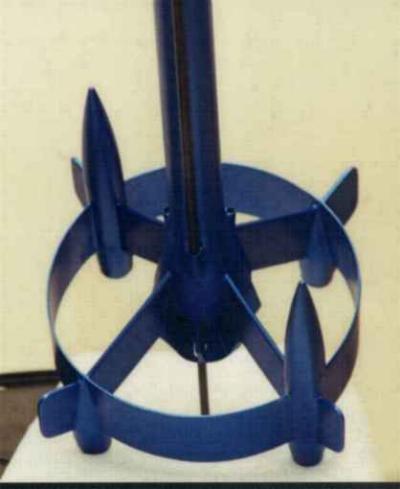
The pods were made from short pieces of the BT20 with slots cut in the sides to match the ring and the fins. The long pods, with the nose cones were cut at the top to allow them to slide over the ring and fins from the bottom after the fins were assembled. The short pods, without nose cones were cut to a taper, to allow them to be bent in to meet the ring to fin joint, they were also slipped on from the bottom. Tail cones, made of two staggered paper rings and a paper cone were added to each pod. The tail cones were filled inside with Fill-N-Finish, tamped down and then soaked with CA to harden it. |
I cut the BT30 Nose Cone into two pieces, one for the top of the crew section at the top of the Snooper, and the lower section was used for the transition between the BT20 and the BT30. The nose cone sections and the BT20 were joined using tubes rolled from the instructions. The crew section fins and strakes were then cut out of the balsa. |
|
The three engine/radiator cones were made using VCP to generate transition templates, which were then cut out of the instructions. It's a good thing the kit came with lots of instructions, since it required three layers of paper to make each of the transitions stiff enough to use. The radiator fins were cut out of some of the balsa scrap left from the fins. Measurements from Visio were used to rough cut the slots in the cones, with only minimal final fitting required. |
|
The motor mount and centering rings were used as is, except for filing a notch through the top centering to pass the shock cord, and filing down the motor clip to allow 18 mm RMS engines. The Estes shock cord and parachutes were thrown away. Instead, a Kevlar® loop was attached through the top centering ring and around the motor mount. The loop was made long enough to pull out the rear of the engine mount. A piece of 3/8 inch sewing elastic is attached to the Kevlar® while it is hanging out the rear, The combined Kevlar® and elastic shock cord was then pulled up thru the body, tied into another loop and cut off about six inches outside the body. This way the Kevlar® loop takes the brunt of the ejection charge and is permanent, but the elastic can be replaced if it gets charred. The thick elastic helps prevent zippering of the thin BT30. A three foot length of nylon cord is used to extend the elastic to the nose cone ring at the bottom of the crew compartment transition. A mylar parachute is attached to the top of the elastic. |
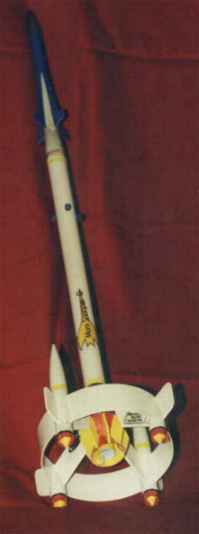
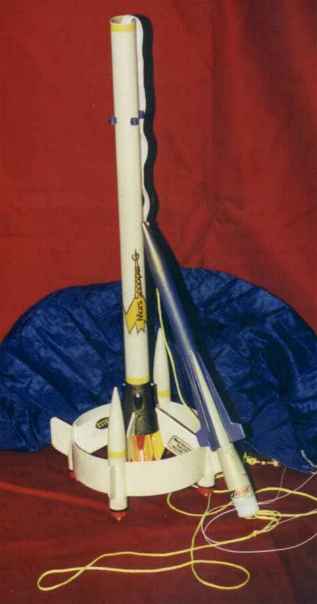
I originally painted the main body white with black and red for the radiator cones and fins, and a blue crown design for the crew compartment. I attempted to put a gold metal flake over the last coat with less than desirable results, the white areas just looked dirty, not shiny. Some of the construction pictures show this paint job and the original decals including the original (Mars Snooper G) name. |
Some of the stripes in the kit decals were used to detail the engine pods and the transition between the two body tubes. A new (Ring Snooper G) decal was made using a sticky label. The Estes logos were also cut out of the instructions and warranty sheet and used as decals.
I did consider putting in a 24 mm motor mount, but decided to stay with the original motor mount as I was running out of body tubes, and tired of rolling tubes from the instructions.
During construction, I realized that the extreme aft mounting of the launch lug inside the radiator cones allowed the model to sway and possibly bind on the launch rod. I used the piece of quarter inch tube (exhaust vent tubing) from the kit, cut into 4 pieces and attached two thirds of the way up the body tube to act as a stabilizer while looking like an antenna array.
Flight notes:
Ready to fly weight including a 1/2 ounce of nose weight, is 5 5/8 ounces, 160 grams ready to fly, except for the motor. It flys reasonably well on a C6-3 with no wind, and very well on a D13-4 or D24-4 reload. I have tried a swing test with a chad staged C11/C6-5 and D12/C6-5 and it seems stable, but haven't worked up the nerve to try it yet, maybe when the paint gets a bit chipped.
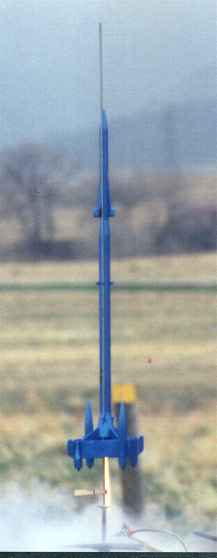
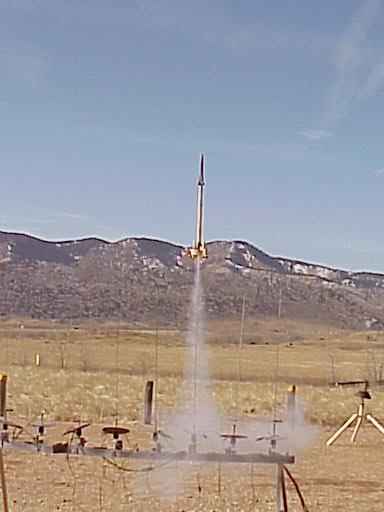
The first flight, on a C6-3 was low and slow, just like the old Mars Snooper, but no noticeable weathercocking. Recovery was good on a homemade 21 inch ripstop nylon tri-angle chute. Some minor melting was noticed on the edges of the chute.
The second flight, on a D13-4 reload started out excellent, good straight boost to about 600 feet. It went bad when it came to ejection time. Apparently, I left an air gap thru the wadding, because with the more energetic ejection charge of the RMS reload the parachute was melted together on the shroud end edges. The Snooper came down on a 10 inch streamer instead of a 21 inch chute. The fin and ring can held up surprisingly well, just some damage to one of the pods that took the brunt of the impact. The Fill-N-Finish and CA added to the tail cones seems to have worked, the damage was a dent in the BT20, above the tail cone, right below the fin joint. The BT30 however burst the spiral just above the first cone / top centering ring. I'm not sure if that was from the chute hanging in the tube and causing an overpressure, or if the Snooper landed at an angle and bent the tube. There was no visible dent or bend from an angled landing, but there also was no charring or powder residue from an overpressure.
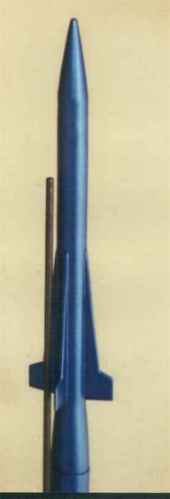
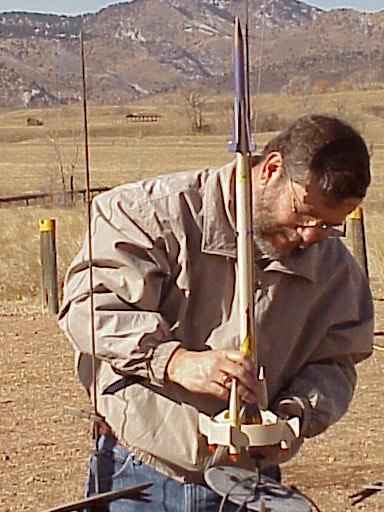
Since the repairs required sanding down the body and messed up the original decals, I decided to repaint the entire model a dark metal flake blue. I also switched from the tri-angle nylon chute to a mylar parasheet that takes up much less room, allowing for more wadding in the body tube. The mylar chute also brought the weight back to 160 grams even after the repairs and re-painting.
The next pair of flights, with the same two engines resulted in some more minor damage, caused by landing on a rock. One of the crew compartment fins was broken, and the same tail cone pod that was damaged on the second flight was broken completely off this time. Both have been repaired and are just waiting for the next club launch. The ring seems to have solved the fin damage that was a problem with the original Mars Snooper, but now has shifted the problem to the tail cones and pods.
Try building one, it both looks and flies great.
 |
 |