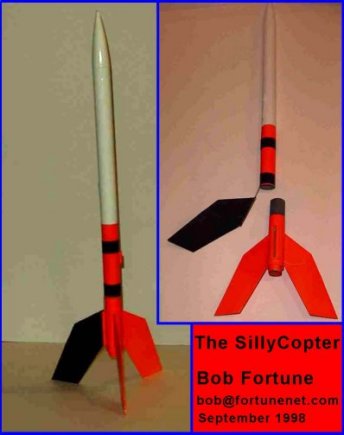
| Manufacturer: | Scratch |
(Contributed - by Bob Fortune)
I've enjoyed building and flying variations of the Estes Gyroc and Jonathan's Cyclone (Maple Seed Rocket) so much I decided to try a variant of my own.
The Gyroc pops an engine to deploy its flaps then spins to the ground. You can see a plan of this rocket at JimZ's place.
The Cyclone pops its booster and the upper body tube twirls to the ground in a flat spin like a maple seed. This rocket can be seen at:
http://www.cs.indiana.edu/hyplan/jwmills/EDUCATION.NOTEBOOK/rocket/rocket.html
There is another Estes rocket (the Tornado I think) that also uses a tumble-recovered booster and spinning upper BT in which one fin stays on the upper body tube whose name I can't recall similar in nature to the Maple Seed Rocket. Both the Cyclone and Tornado have solid mounted single fins that impart spin upon descent. You might be able to find this at Jimz's place also.
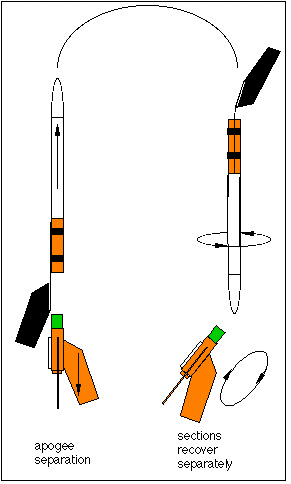
The SillyCopter recovers in a somewhat similar yet boingy manner. At apogee the upper BT and booster separate and the sustainer tips over as the springy music wire pulls the fin and holds it in an attitude like a flap or foil for a spinning descent. The booster tumbles to the ground in a disorderly manner like the first stage of a multistage rocket.
So you get to keep your eyes open for both rocket parts!
|
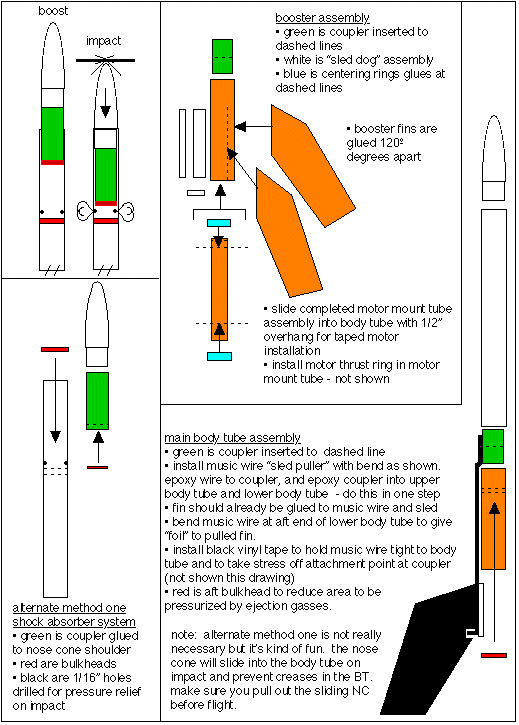
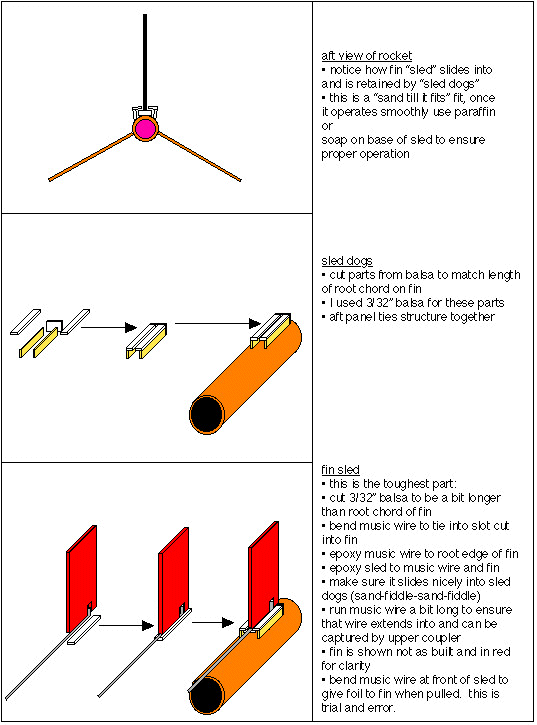
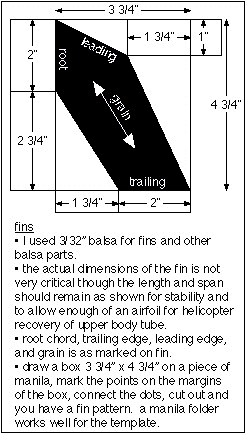
This rocket flies very well on A through C engines. It will need some tweaking of the music wire fin holders once it is assembled and additional tweaking after a couple of flights to get the sustainer to spin properly. Fly it on an Estes A8-3 or Quest A6-4 for the first flight. A C motor puts it up there pretty far, about 1000', and makes recovering the booster a challenge. For the upper portion to spin nicely the key is to imagine the foil of a helicopter blade and bend the wire accordingly. The design of the wire-to-fin junction is relatively robust but take care that you grasp the fin sled and wire firmly when bending to get the foil just right. Also take care that the coupler slides freely from the body tube on deployment and that the "fin sled" is waxed occasionally with paraffin to make sure it releases cleanly. This is very important! Also take care that the "sled dog" tabs don't snap off when the "fin sled" is inserted into place. Grasp the fin and upper body tube in one hand and guide the fin into the booster sled dog. A couple of flights, a bit of adjustment and the thing will spin nicely. Prep is easy because there is no parachute or wadding. Installation of the black vinyl tape to hold the music wire tight to the body tube is simple and location is not critical as long as it is on the lower portion of the upper body tube. Two wraps of tape spaced a couple of inches apart is all that is necessary. You might also try leaving it off completely but the fin really bounces around as it moves through the air. You might also try building it per alternate #1. This is a bit more work but it's interesting to see. Put some talc in this compartment and it will poof out when it impacts the ground. |
Parts List: |
| If you build this and fly it please let me know! : ) If
you need help with its construction please feel free to email me. Have
Fun! Bob |
 |
 |