| Manufacturer: | Scratch |
Contributed by - John M. Storey
37" x 4" - 14 oz
29mm
parachute
Brief: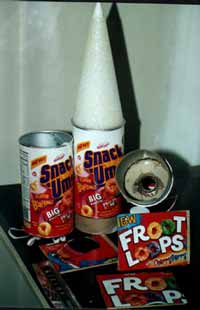
This is an Odd Roc built with found materials ($3.50 worth) It flies well on
F's and G's (Econojets, of course). It is actually quite rugged and a longer
version would stand up to bigger motors. It is a kid and crowd pleaser wherever
it flies.
Construction:
The body tube are Snack 'Ums cans with the steel bottoms removed via can
opener. The nosecone is a Styrofoam cone sold at craft stores for Christmas
crafts.($1.35). I made two centering rings using the Budget Rocketry circle
cutter and a wood bit for the center hole. They are made out of 1/8" balsa
and then circles of cereal box are laminated to each side of the balsa The fins
are rectangles of 1/8" balsa laminated with cereal box material (Froot
Loops, Of course. There is a cereal for every type of Snack'Um so you can go
crazy). Shock cord is 6' of 3/8" elastic from Wal-Mart. Shock cord
attachment is with a 12" 20 lb test wire fishing leader (3/99 cents).
Parachute was 20" or 30" from my range box depending on the weather.
This is an easy rocket to build and went together in about 2-3 hrs, not including drying time. I prepped the cans by removing the bottoms. I also peeled the metal ring off the top of each can. (It isn't hard to do) I used non-matching Snack 'Ums cans as tube couplers by cutting them in half (4.5") and slitting them lengthwise to make them smaller in diameter. Note that the colored material is removed from the outside of the "payload" coupler to enhance separation. Be sure to sand the inside of the body tubes and outside of the couplers thoroughly before gluing. There is a lot of wax on the paper.
 Slot the bottom tube with a ruler and an
Exacto for the number of fins you want. I laminated the CRs with cereal box
material using Z-poxy finishing resin, covered with wax paper and allowed to
dry under weight on a flat surface. Thin CA would work equally well, I think. I
also put two T-nuts in the back centering ring for motor retention. The 29 mm
motor tube was out of a crashed rocket. I used about 8" for this. Loop the
fishing leader over the motor tube and slide the front CR over it so the end is
sticking out the front. Glue the front CR to the motor tube with 5 minute epoxy
and then glue it into the lower tube with fishing leader sticking forward.
Slot the bottom tube with a ruler and an
Exacto for the number of fins you want. I laminated the CRs with cereal box
material using Z-poxy finishing resin, covered with wax paper and allowed to
dry under weight on a flat surface. Thin CA would work equally well, I think. I
also put two T-nuts in the back centering ring for motor retention. The 29 mm
motor tube was out of a crashed rocket. I used about 8" for this. Loop the
fishing leader over the motor tube and slide the front CR over it so the end is
sticking out the front. Glue the front CR to the motor tube with 5 minute epoxy
and then glue it into the lower tube with fishing leader sticking forward.
Put the back CR on to align it, but don't glue the back CR. After The front CR dries, glue the root edge of the fins to the motor tube. If you make your rectangles carefully, the amount sticking through the slot in the BT will leave a square fin. (Like the Vaughn Bros. Blobbo) Leave the unglued rear CR in place until the fins set up to keep things aligned. Then remove the rear CR. I filleted the fin attachments to the motor tube when I was filleting the outside. See Public Missiles Web Page for an exhaustive description of this technique. I used 30 min epoxy with enough Sig microballoons to get the consistency of chocolate syrup. After the fillets were dry, I put the back centering ring on with epoxy. The front CR ends up at the front of the slot, and the back CR at the back, so the motor thrust is distributed over the whole fin can. Important with sketchy materials such as these.
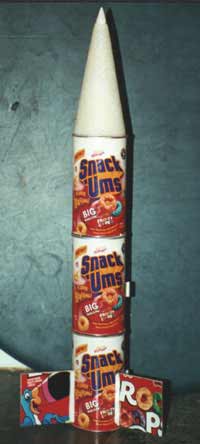
The next section of tube is attached to the bottom section with the homemade tube coupler. Additional sections could be added of course - just make your fishing leader longer, and use whole cans as couplers for extra strength. The 3/8" elastic is tied to the fishing leader.
The Styrofoam cone is epoxied to the top section of tube to form a nosecone/payload. It is a good idea to epoxy the 3/8" elastic to the bottom of the NC before gluing it to the "payload" section. I squashed an Estes BNC-20 on top for a point. I sealed the Styrofoam with Z-poxy finishing resin. Very necessary if you want to paint the NC. Most spray paint will eat Styrofoam. I don't have a bulkhead on the bottom of the NC - the chute is attached below the payload section and will deploy when the NC separates.
Now, it's ready to fly!
Flight: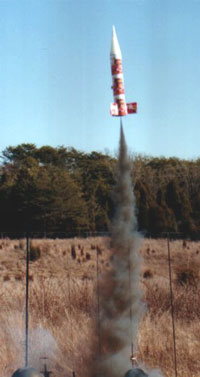
First flight: 12/26/2000, temp 30 F. It was clear with no wind - an
ideal time. I used an F-20-4 Econojet. The rocket went straight up to my
amazement, arced over and deployed right at apogee. Good recovery, although the
soft NC dented slightly.
Second flight: 1/13/2001 in Lucerne, CA. G-35-7 EJ. The bigger motor was
fun. Probably got about 1200' although it is hard to judge in the clear desert
air.
Third flight: 1/13/2001 G-38-7. Blackjack was nice touch and it really
went high. The tip of the NC broke on recovery.
Repair: I squashed another BNC20 onto the cone and gooped microballon
epoxy to enhance the joint. I also re-coated the entire NC with Z-poxy
finishing Resin thickened with microballoons.
Fourth flight (shown): 2/10/2001. F-22-5 Delay was too long, but
otherwise no problem. The NC held up much better this time.
Recovery:
Summary:
Pros - this started out as lark and wound up with a very satisfying
result. The rocket never fails to turn heads, and the kids can identify with
it. They will also enjoy eating the product to generate your building
materials. The VB Stretch Blobbo - inspired design is simple and makes a
straight flying rocket.
Cons - tube material is not phenolic (doh!) but if you are careful when
you slot it and use the fillet everywhere method, the thrust is well
distributed. Styrofoam is not a great NC material unless you resin it. I was
too lazy to glass it but that would have helped immensely.
 |
 |