Descon Super Magnetic Fin Alignment Jig
Scratch - Super Magnetic Fin Alignment Jig {Scratch}
Contributed by Bill Westfield
| Manufacturer: | Scratch |
Construction Details.
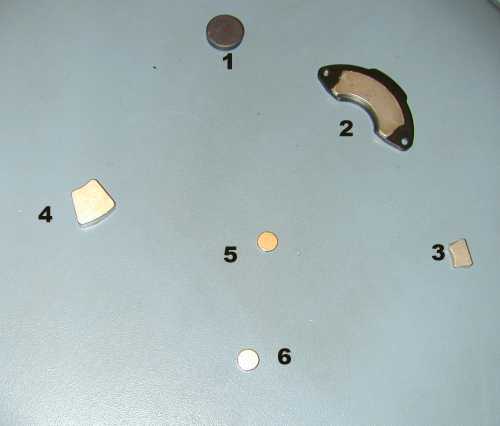
 Pictured here is an assortment of magnets
that you may be able to find. #1 is a conventional ceramic magnet of the sort
you can buy at radio shack or most craft stores. #2, #3, and #4 are "Super
Magnets" removed from defunct hard disk drives of assorted types (Note
that #2 is still affixed to a mounting plate. It can stay that way for the
purposes of this project. #5 and #6 are "new" super magnets purchased
from Force Field
magnets.
Pictured here is an assortment of magnets
that you may be able to find. #1 is a conventional ceramic magnet of the sort
you can buy at radio shack or most craft stores. #2, #3, and #4 are "Super
Magnets" removed from defunct hard disk drives of assorted types (Note
that #2 is still affixed to a mounting plate. It can stay that way for the
purposes of this project. #5 and #6 are "new" super magnets purchased
from Force Field
magnets.
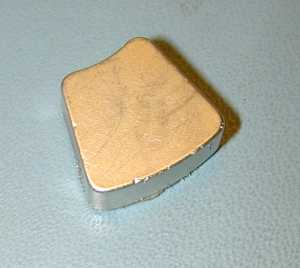
This is a close-up of magnet #4 (right). The irregular shape is typical of magnets removed from disk drives, but it won't me a problem here.
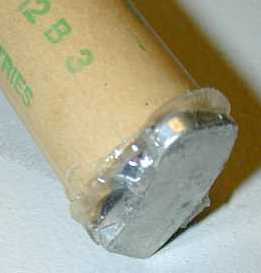
The magnet is glued to an expended motor casing (below left) to make the holder for the rocket body. A relatively "stronger" magnet is used here in order to be able to support the main body of the rocket.
I've used hot melt glue here because I was impatient to make a prototype, but epoxy would probably be a better choice, especially for larger rockets. Use a larger motor casing and a larger magnet for bigger rockets as well. Note that an 18mm casing (as shown here) can have a 13mm casing slipped inside, or a 24mm casing slipped over the outside. So assuming sufficient strength in magnet and glue, the 18mm casing provides a lot of flexibility.
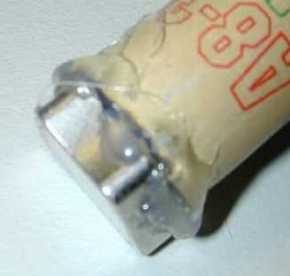
A smaller magnet is used for the fin supports (above right). Conventional ceramic magnets are probably sufficient for smaller rockets. (Handy things, expended motor casings....)
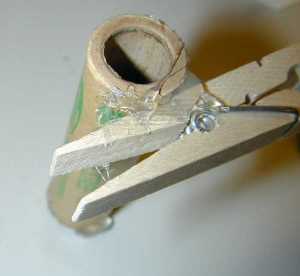 A "clamp" (in this case a
clothespin) is attached to the other end of the fin support assembly. There are
lots of ways you could attach this, but if the result is going to be rigid (as
in this case), you need to be careful that a fin "secured in the
clamp" is vertical and perpendicular to the "ground."
A "clamp" (in this case a
clothespin) is attached to the other end of the fin support assembly. There are
lots of ways you could attach this, but if the result is going to be rigid (as
in this case), you need to be careful that a fin "secured in the
clamp" is vertical and perpendicular to the "ground."
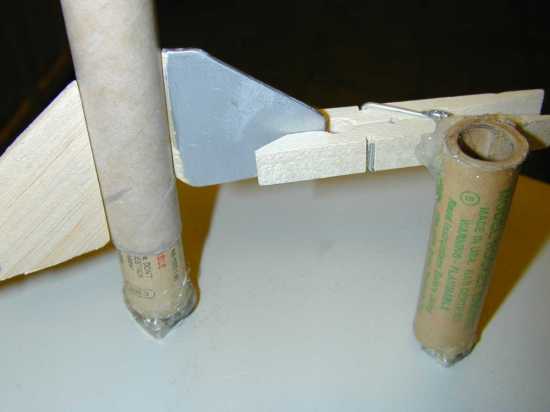
Clothespins are cheap and easy to find. They seem to have quite a variety of spring strengths, some of which may crush softer balsa without some sort of padding. HPR fins probably rate something that looks more like a "real" clamp.
You CAN print out a fin alignment template and place the paper in between the base and the magnets, although I have doubts about how well the randomly-shaped magnets and unsymetrical holders can be lined up with such a guide. It would work better if everything was done with concentric cylinders all perfectly lined up, but that would be a lot more difficult to put together, too.
Alternate Method
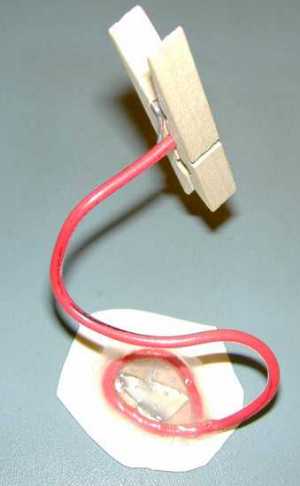 Here is another approach. The clothespin is
attached to a relative heavy wire. This can be bent to position the clamp and
fin as desired, but should be rigid enough to hold the fin in place when left
alone. The "bottom" here is just a piece of cardboard. The magnet is
strong enough to hold the clamp well even through quite thick cardboard. Note
that the magnet used here is a broken piece from a disk drive (they're not
always easy to extract!) (Caution: broken super-magnets are quite sharp!) It's
now safely encased in a thick layer of glue.
Here is another approach. The clothespin is
attached to a relative heavy wire. This can be bent to position the clamp and
fin as desired, but should be rigid enough to hold the fin in place when left
alone. The "bottom" here is just a piece of cardboard. The magnet is
strong enough to hold the clamp well even through quite thick cardboard. Note
that the magnet used here is a broken piece from a disk drive (they're not
always easy to extract!) (Caution: broken super-magnets are quite sharp!) It's
now safely encased in a thick layer of glue.
Now all you need is a steel base, and you can use the pieces to hold your fins in position while glue dries. Note that while the stronger magnets are prone to "snapping" to the base hard enough to pinch your fingers, the are quite easy to SLIDE around the base with a high degree of control.
Here, I'm using an old disk drive case as the base, but anything magnetic and flat should work fine (I wouldn't recommend using a computer case with anything in itthat you want to still work the next day. Strong magnets are not good for most things techie,in spite of the fact that there are probably some inside!)
 |
 |