Descon The Barbsari B-Prize
Scratch - The Barbsari B-Prize {Scratch}
Contributed by Dwayne Surdu-Miller
| Manufacturer: | Scratch |
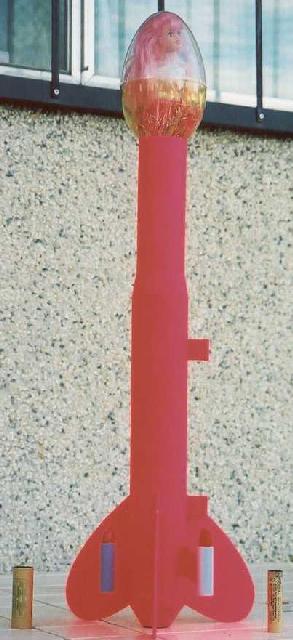
 The Barbsari B-Prize
by Dwayne Surdu-Miller
 I had promised my wife and my
seven-year-old daughter that I'd design something to loft a Mattel Barbie. For
the longest while I was trying to figure out how to artfully accomplish this
feat. There was a Ferrero Rocher egg sitting on my desk from Easter 2004. By
measuring and test fitting, I found that the egg would contain the doll quite
nicely if the cap of the egg's bottom stem were cut off to let the doll's legs
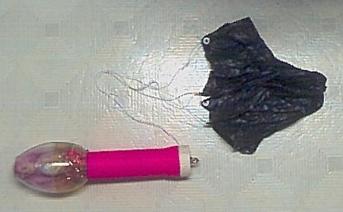
through. I had a vision of Barbie watching her descent, suspended upside-down
in a clear capsule that was drifting independently under a parachute. Imagine
the view!
I had promised my wife and my
seven-year-old daughter that I'd design something to loft a Mattel Barbie. For
the longest while I was trying to figure out how to artfully accomplish this
feat. There was a Ferrero Rocher egg sitting on my desk from Easter 2004. By
measuring and test fitting, I found that the egg would contain the doll quite
nicely if the cap of the egg's bottom stem were cut off to let the doll's legs
through. I had a vision of Barbie watching her descent, suspended upside-down
in a clear capsule that was drifting independently under a parachute. Imagine
the view!
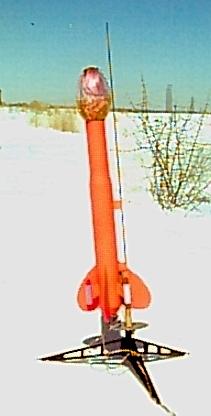
After that came a few other notions about designing a Barbie-themed rocket, like round fins that make the rear of the rocket look heart-shaped, and lipstick pods mounted on standoffs. My wife and daughter helped me with the colour scheme, with a violent shade of Flamingo pink over all, and Barbie-friendly colours for the lipsticks pods. I apologize for the quality of the photos of the painted model. The intensity of the flourescent flamingo paint job was not well-handled by the film or by the scanner in the high-resolution images, and the low-resolution digital camera images faired even more poorly.
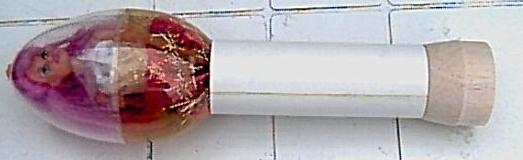
A little more on the serious and practical side, the Ferrero Rocher egg payload compartment offers some serious potential for housing electronic and optical payloads. The girth and length of the egg could house stacked circular circuit boards and the payload tube offers plenty of volume for a power supply.
Specifications:
- length: 73cm (28.75")
- calibre: 66mm (payload egg is 103mm)
- mass: 177g
- mass with D12-5 and Mattel Barbie: 264g
- recommended motors: D12-3, D12-5, E9-4, E9-6
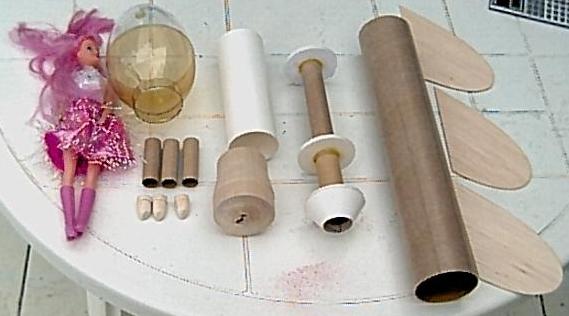
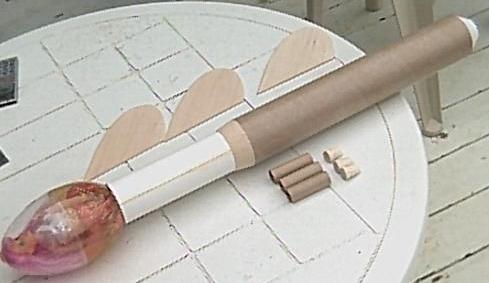
Parts:
- 1 - Ferrero Rocher Egg candy container
- 1 - BT-80 Body Tube, 14.2" long
- 1 - BT-50 Body Tube, 9" long
- 1 - 24mm Motor Block
- 1 - Balsa Reducer - BT-80 to custom
- 1 - Bristol Board (8.5" x 11")
- 1 - Length of stiff wire or D-size or E-size motor clip
- 1 - Foam Board, 3/32" thickness
- 3 - BT-20 Body Tubes, 2.25" long
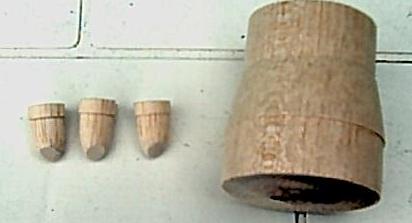
- 3 - Balsa Lipstick Nose Cones for BT-20 Body Tubes or BNC-20.
- 1 - Balsa Stock, 1/8" thick, 4" wide, 20" long
- 2 - launch lug, 3/16" diameter, 1" long
- 1 - screw hook, with a 3/4" ring
- 2 - snap swivels, big enough to fit the screw hook
- 1 - shock cord (1/4" cotton sewing elastic, 24" long)
- 2 - octogonal 22" parachutes (cut from black garbage bags)
- 8 - 44" lengths of shroud line (cotton crochet twine)
Parts Fabrication:
Balsa Reducer- I made the balsa reducer by turning a balsa block on a lathe. Here are the dimensions as a Balsa Machining Services custom part description:
Shape #4 (Transition)
- I = 2.560" (Large Tenon Diameter)
- Q = 2.600" (Large Shoulder Diameter)
- M = 0.75" (Tenon Length, Large and Small Diameter)
- L = 1.00" (Transition Length)
- T = 2.1875" (Small Tenon Diameter)
- U = 2.203" ( Small Shoulder Diameter)
Lipstick Nose Cones- I made the lipstick nose cones by turning balsa blocks on a lathe to get the approximate shape, then using files and sandpaper to get the lipstick shape. For an authentic lipstick appearance, the nose cone shoulder diameters should be less than their tenon diameters by about 1/16". The more work you put into these things, the more authentic they look. Without a lathe, BNC-20A-style nose cones could be shaped quite nicely.
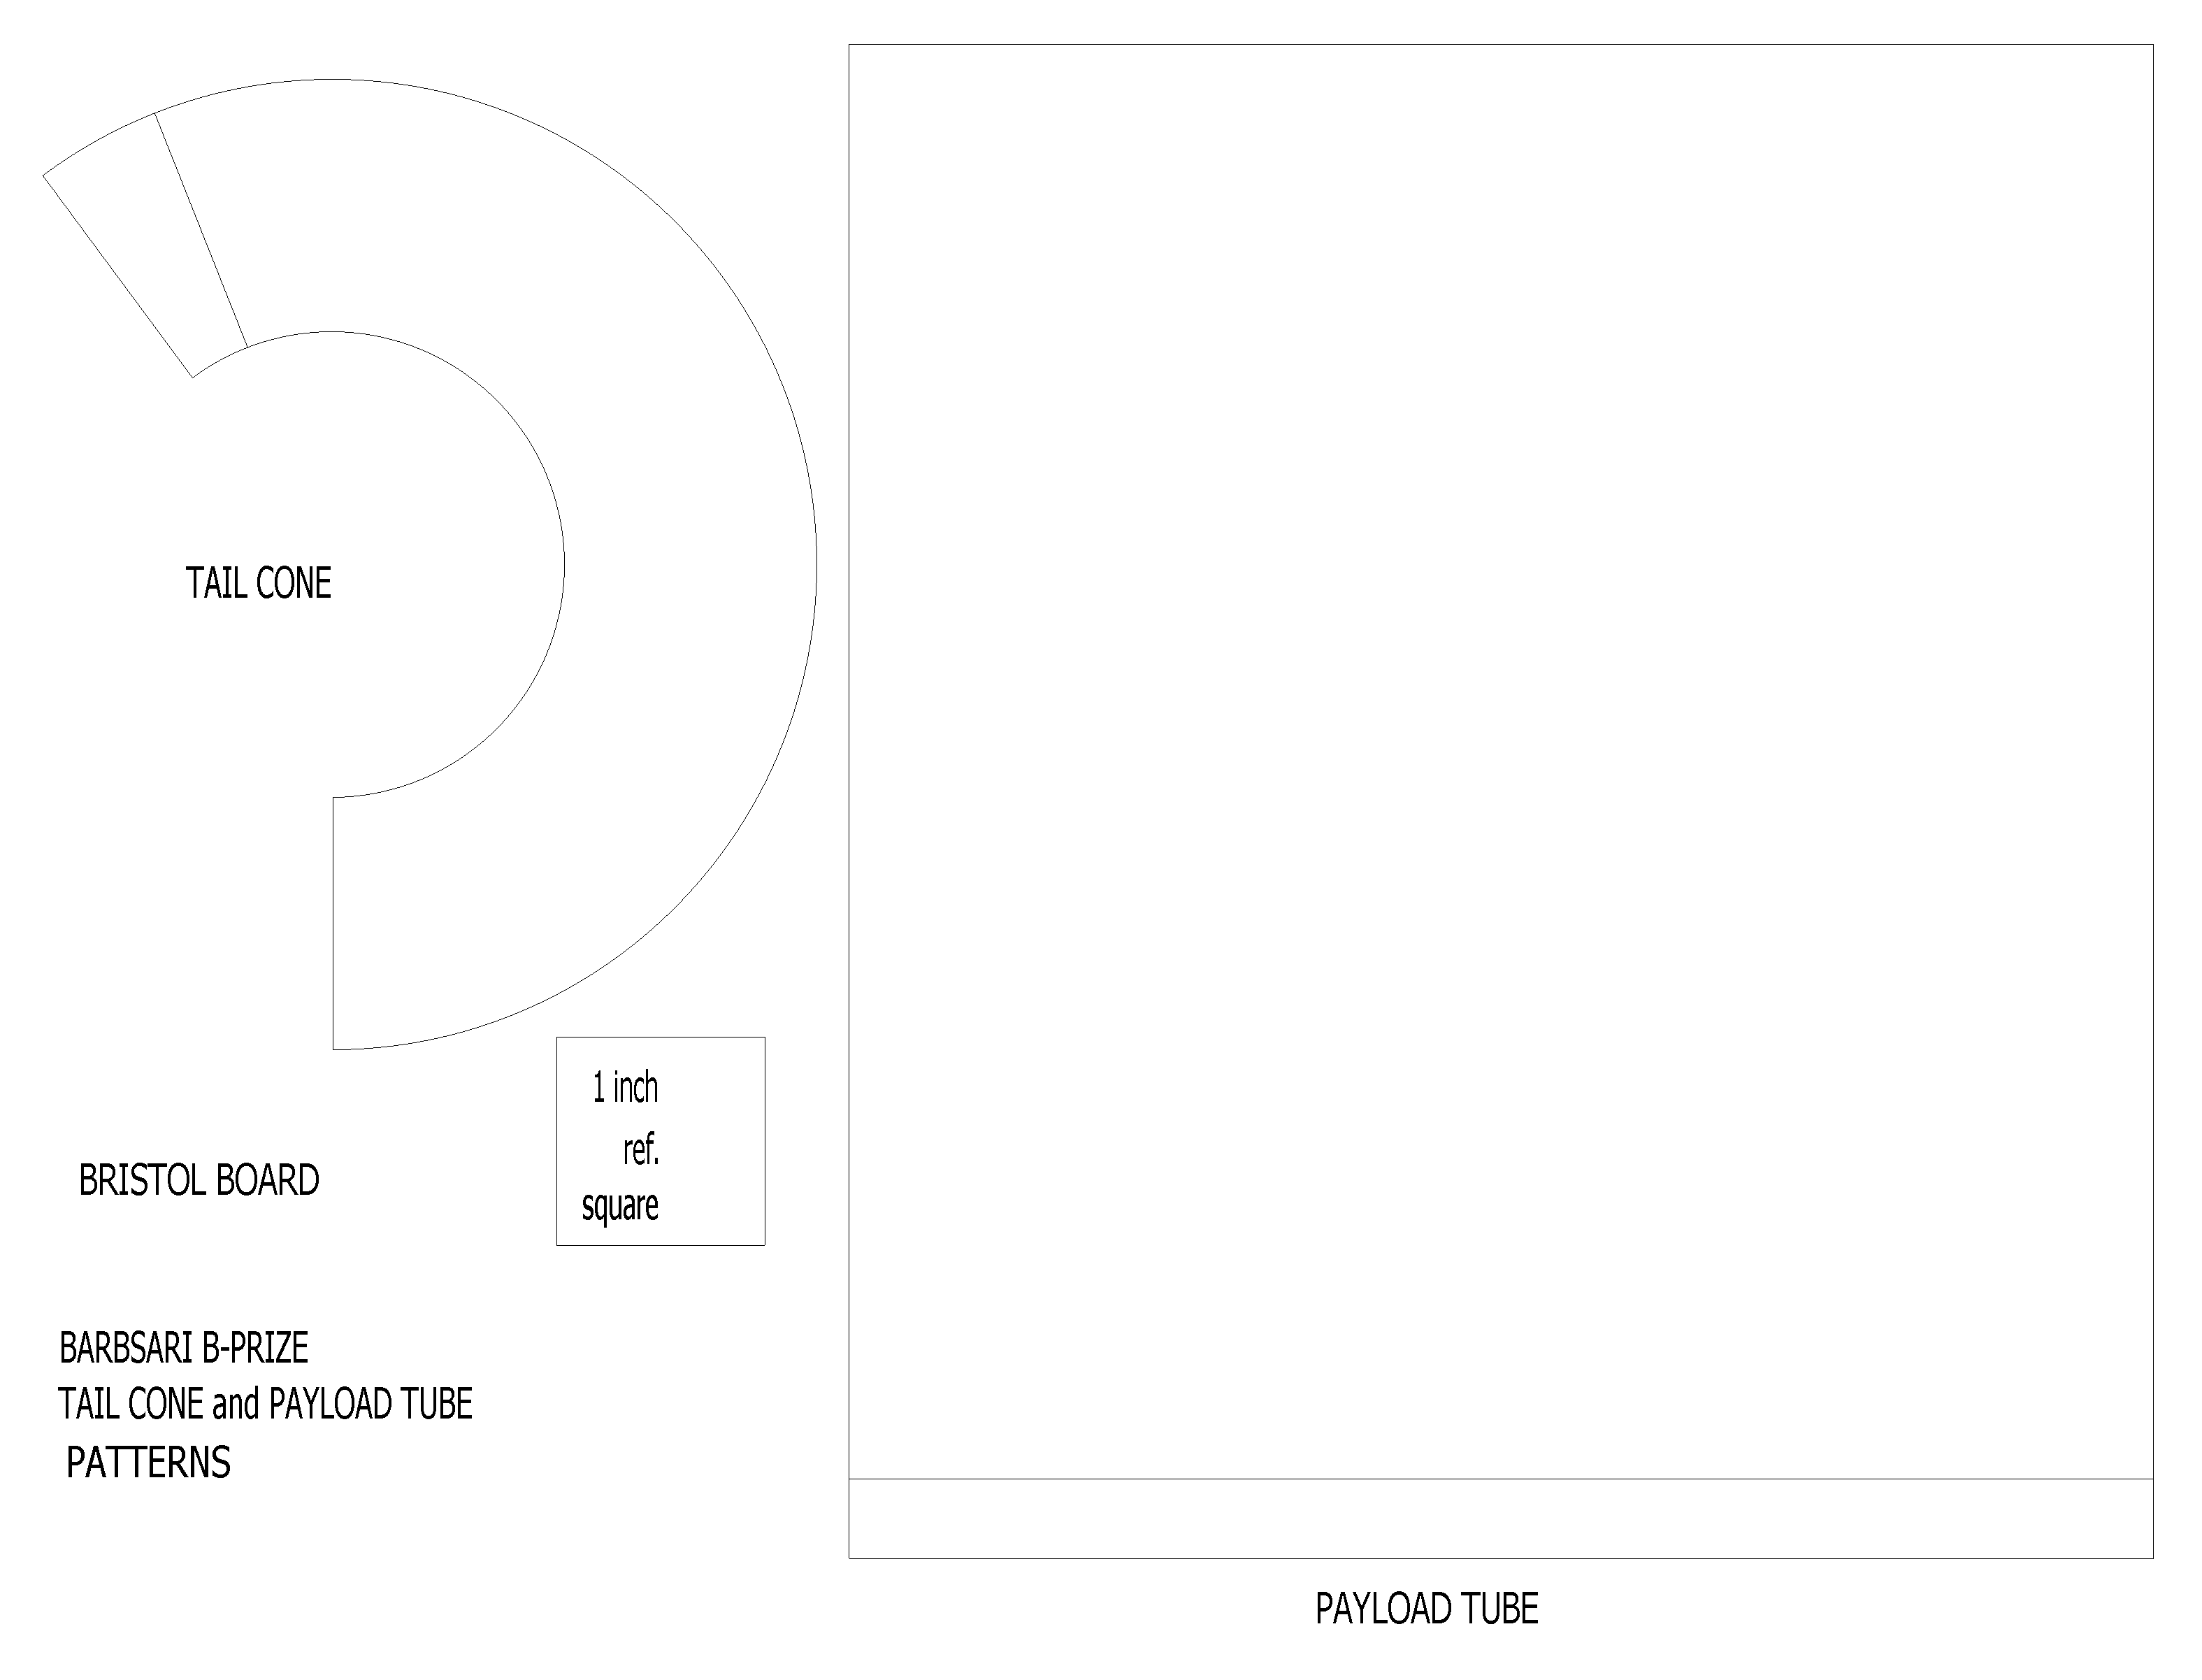
Payload Tube and Tail Cone- These parts are made by printing a pattern onto Bristol board, cutting them out, curling them, and gluing them into their final shapes. Be very careful to test fit the payload tube onto the Ferrero Rocher egg and the balsa reducer as you are working.
Construction Diagrams:
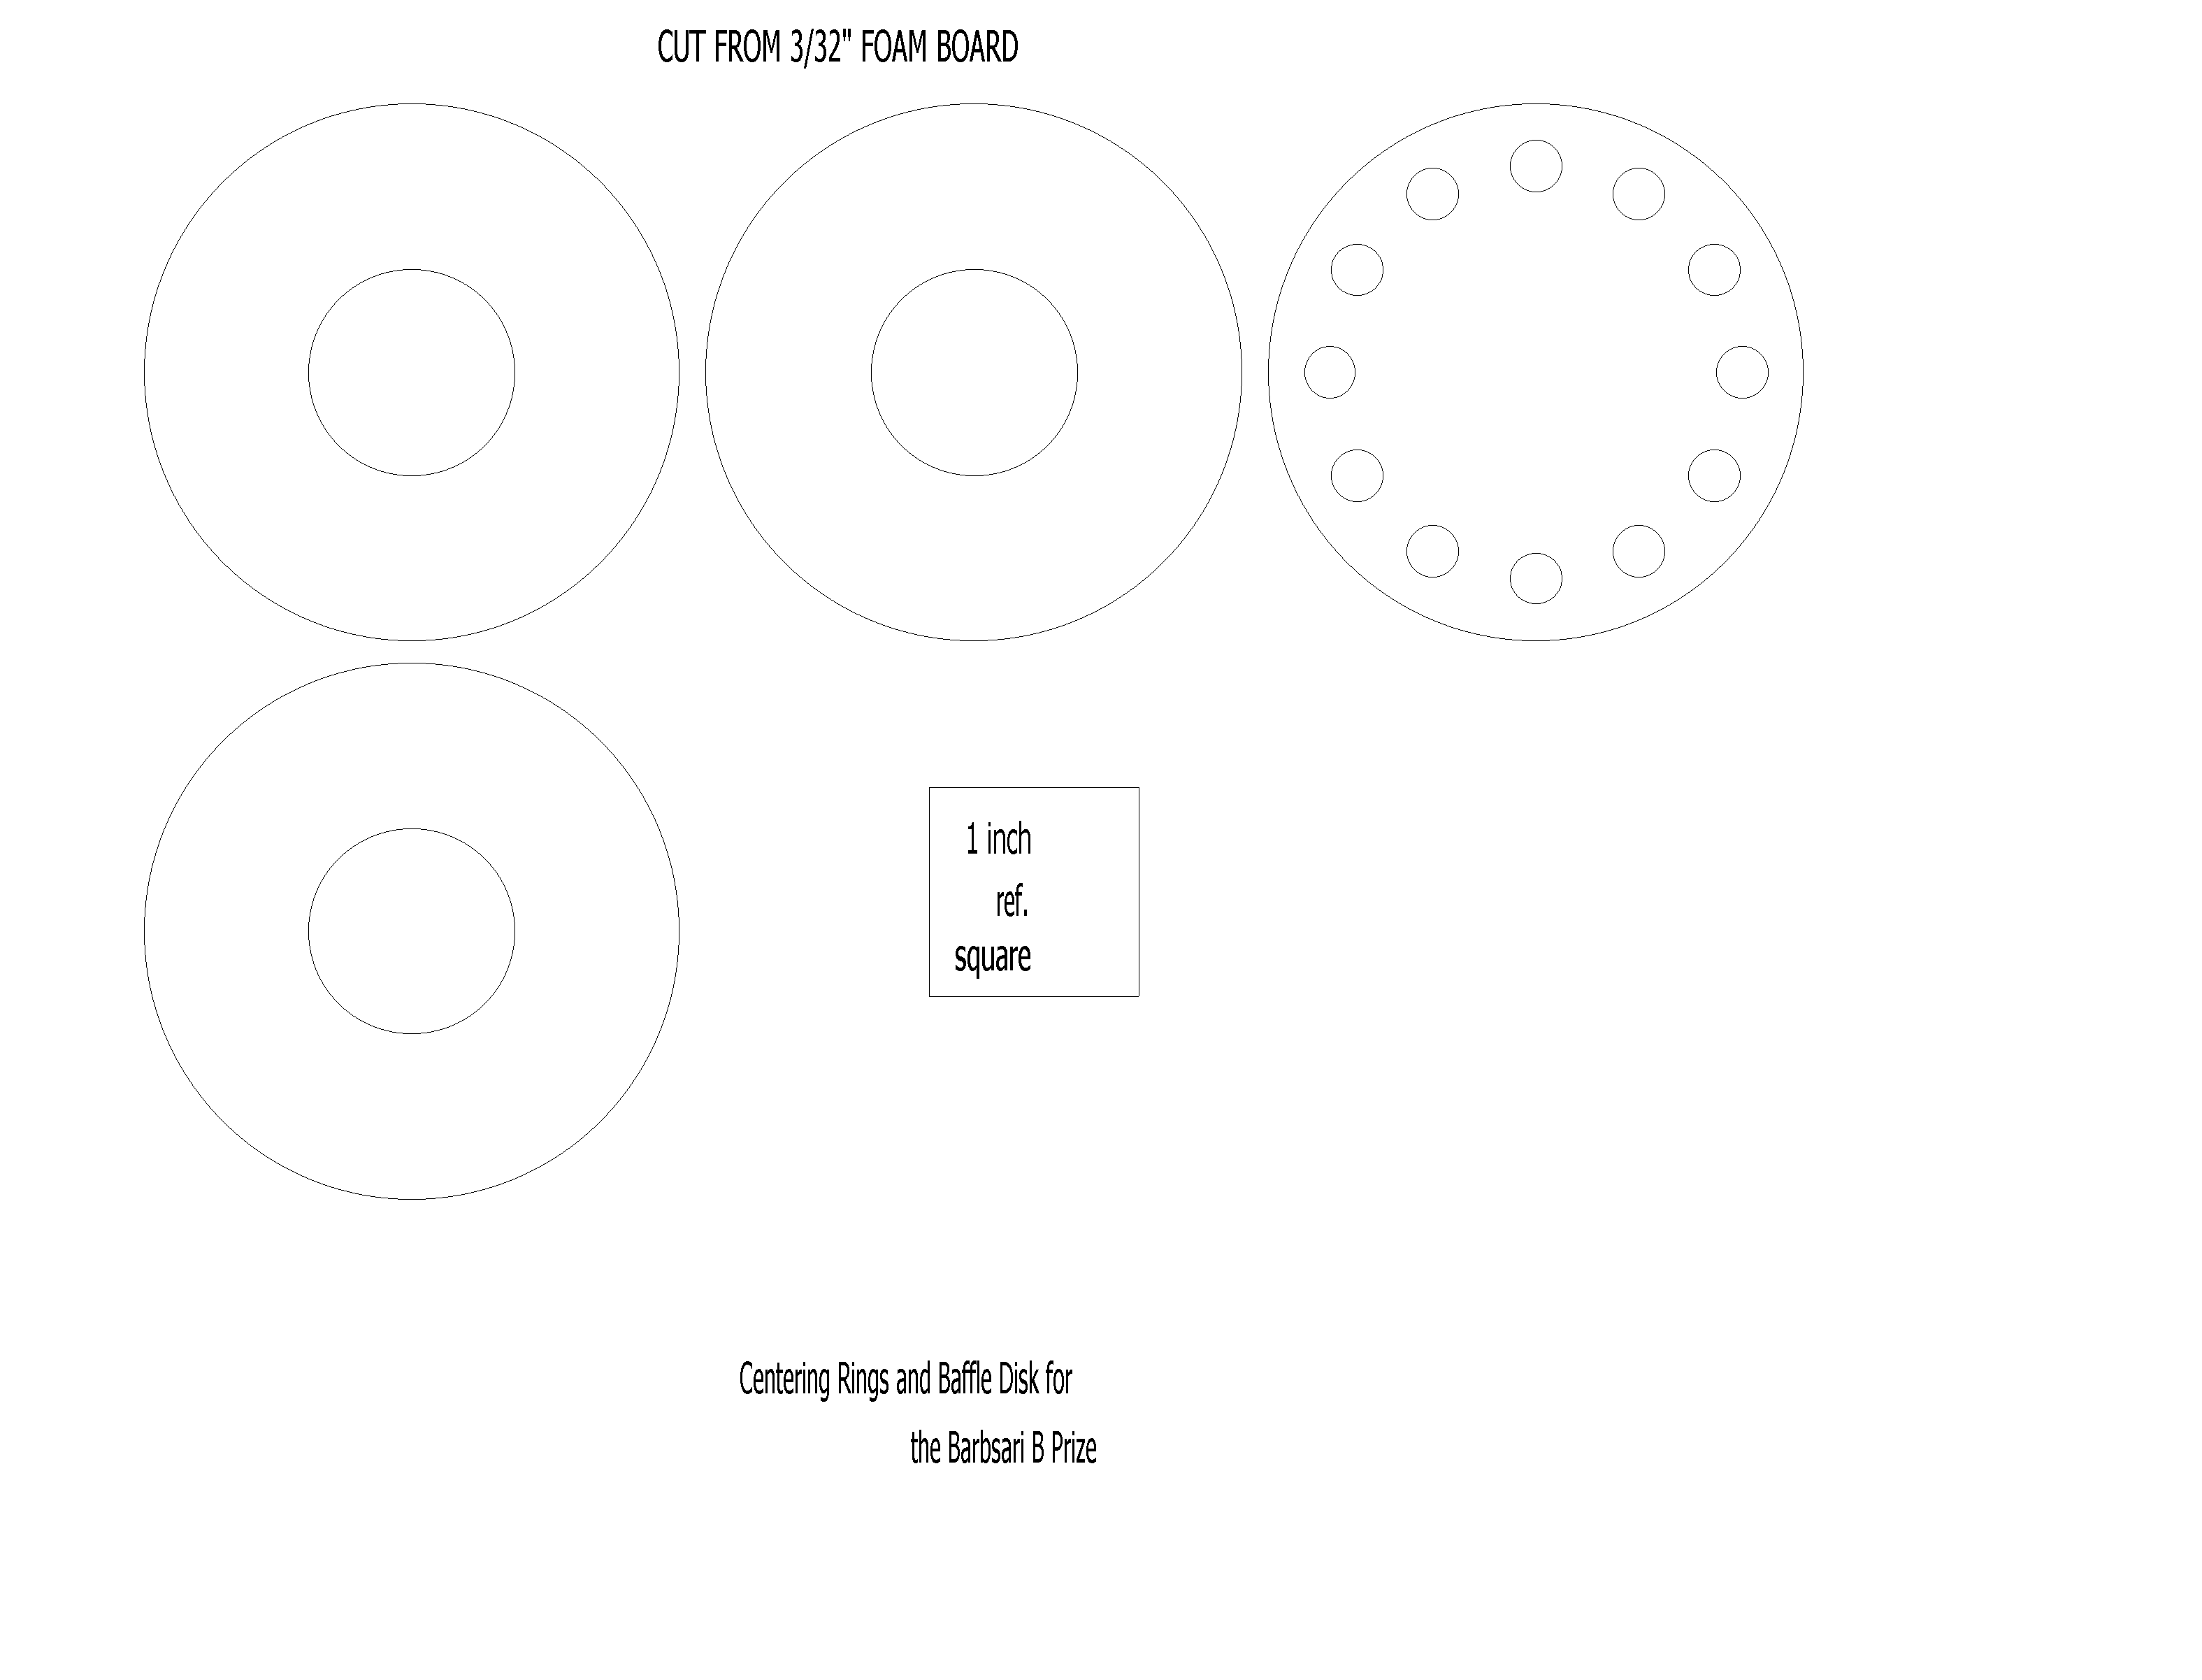
- Rings and Disks Template - patterns for centering rings and baffle disk
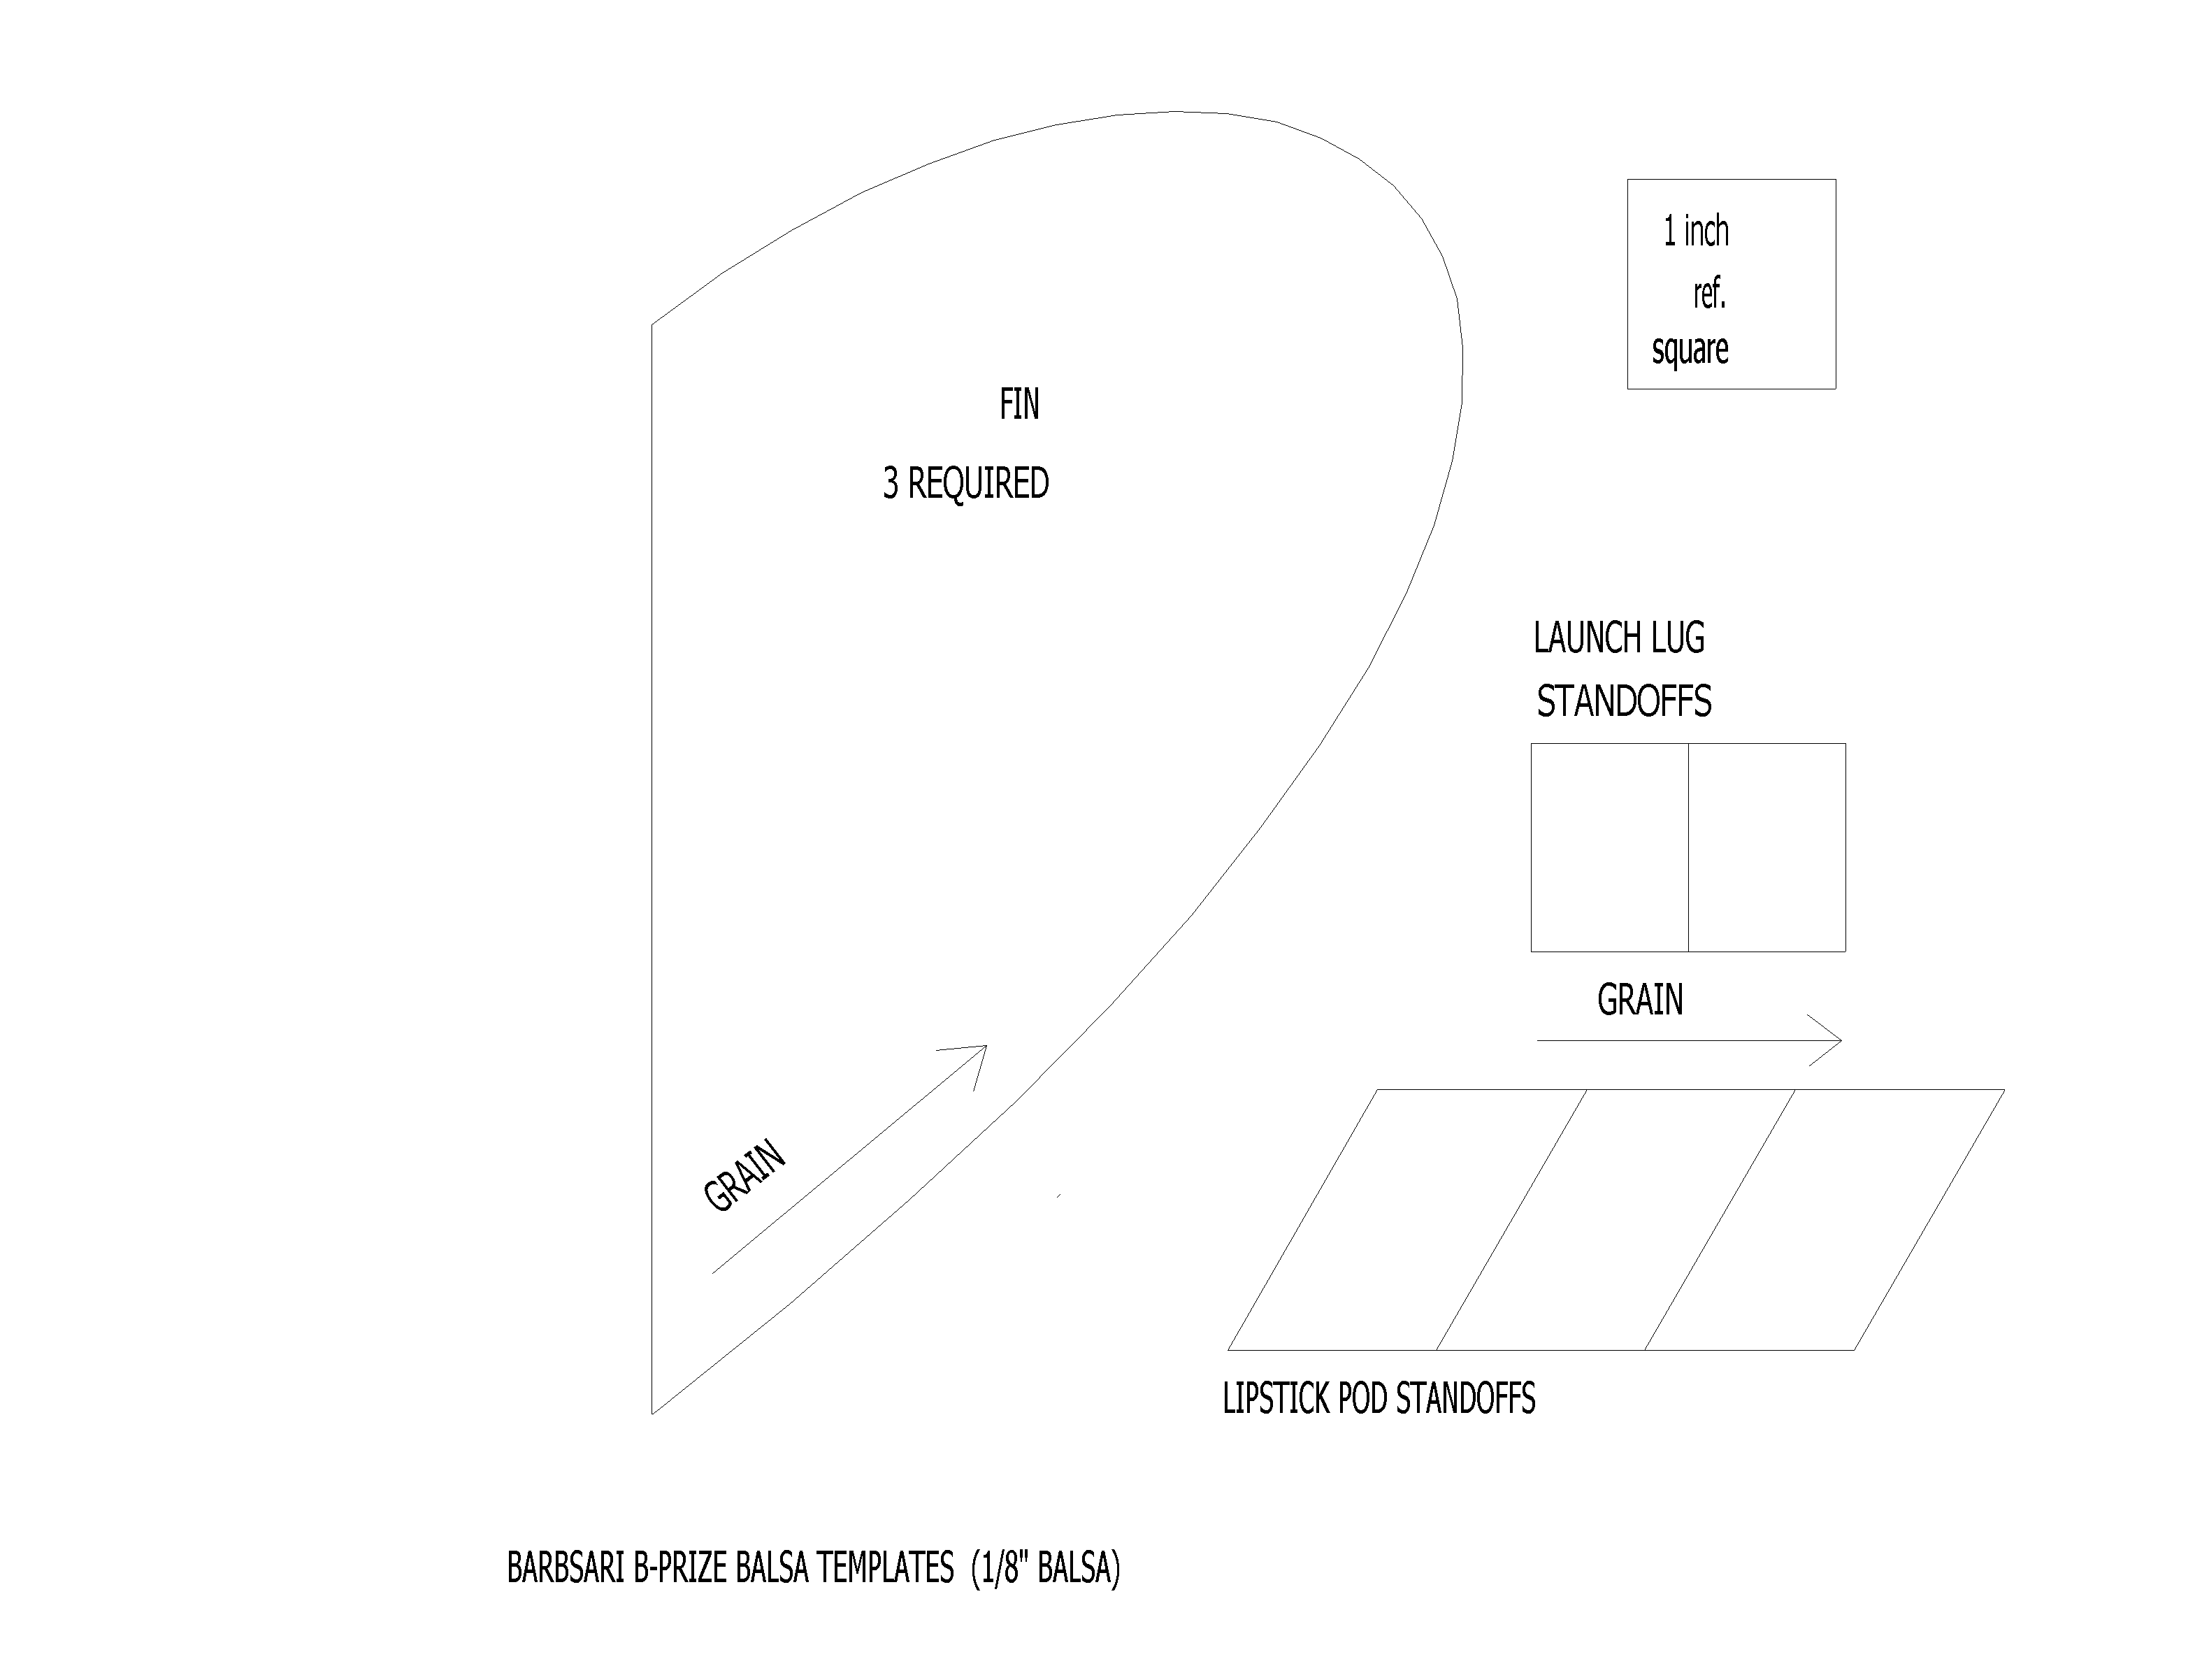
- Balsa Template - patterns for fins, launch lug standoffs, and lipstick pod standoffs.
- Bristol Board Template - full-scale 300 dpi drawing for parts that are cut from Bristol board
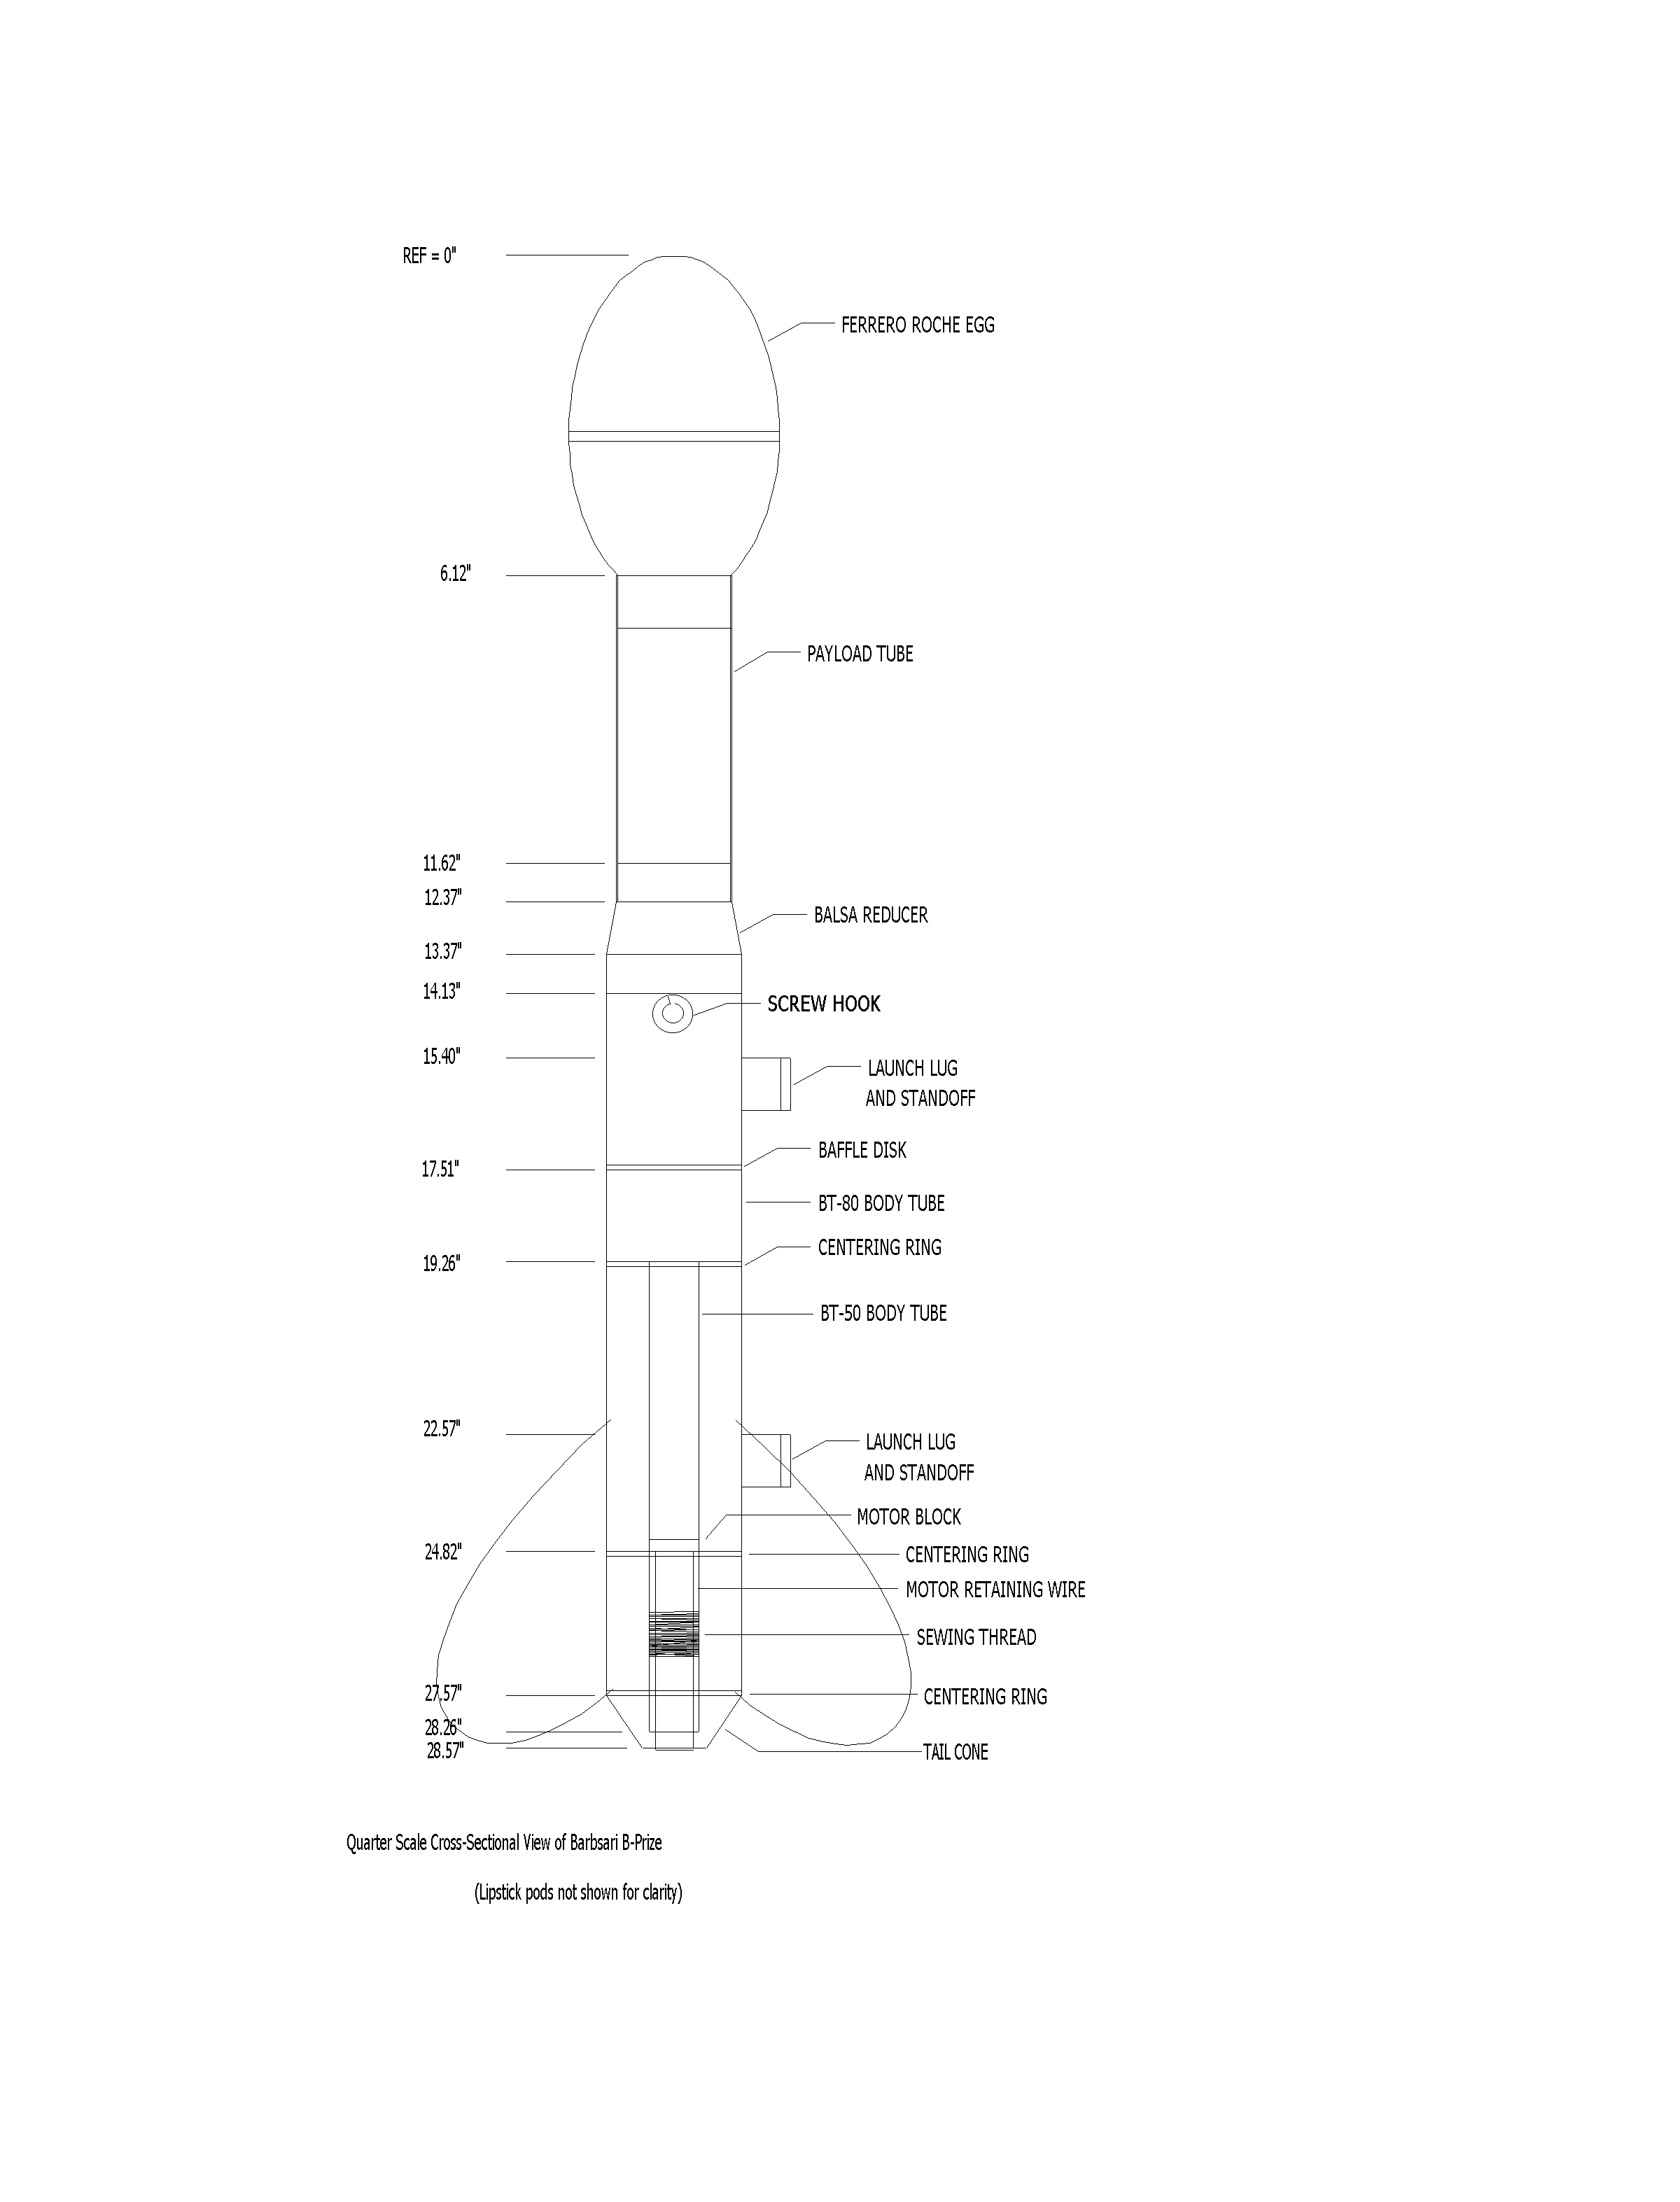
- Profile View - cross-sectional view with construction measurements
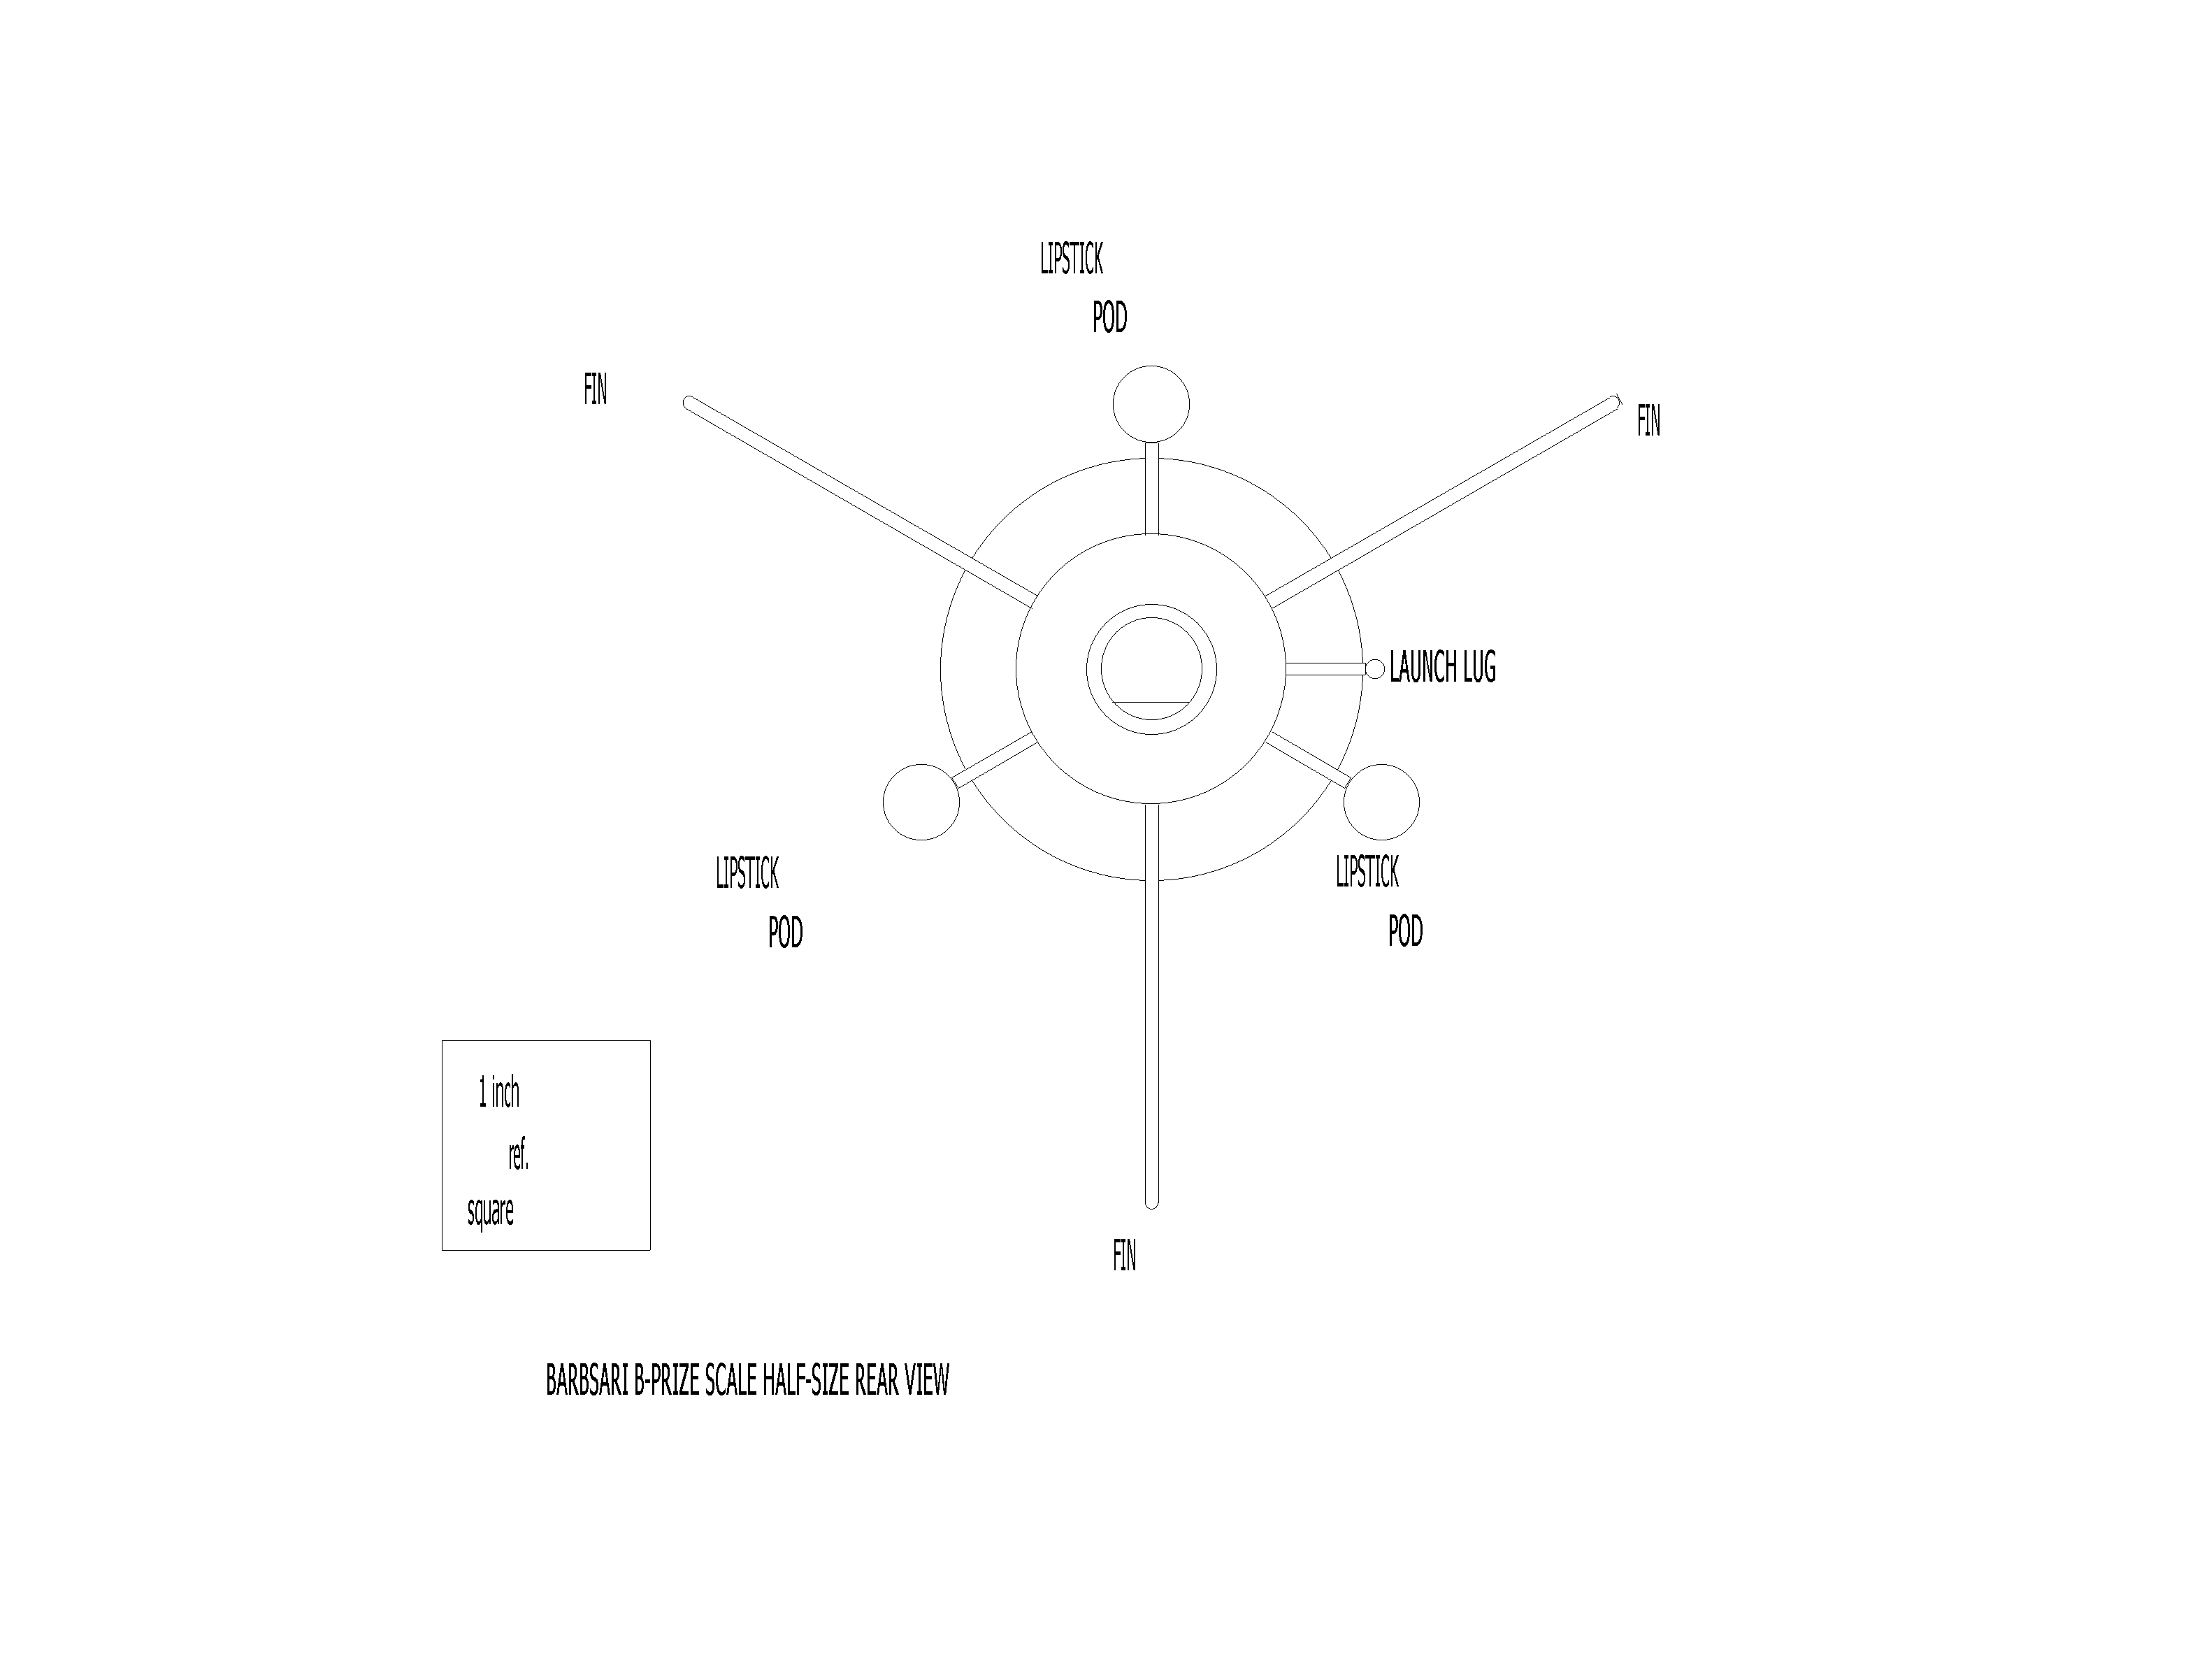
- Rear View - shows angular positioning of fins, lugs, and pods.
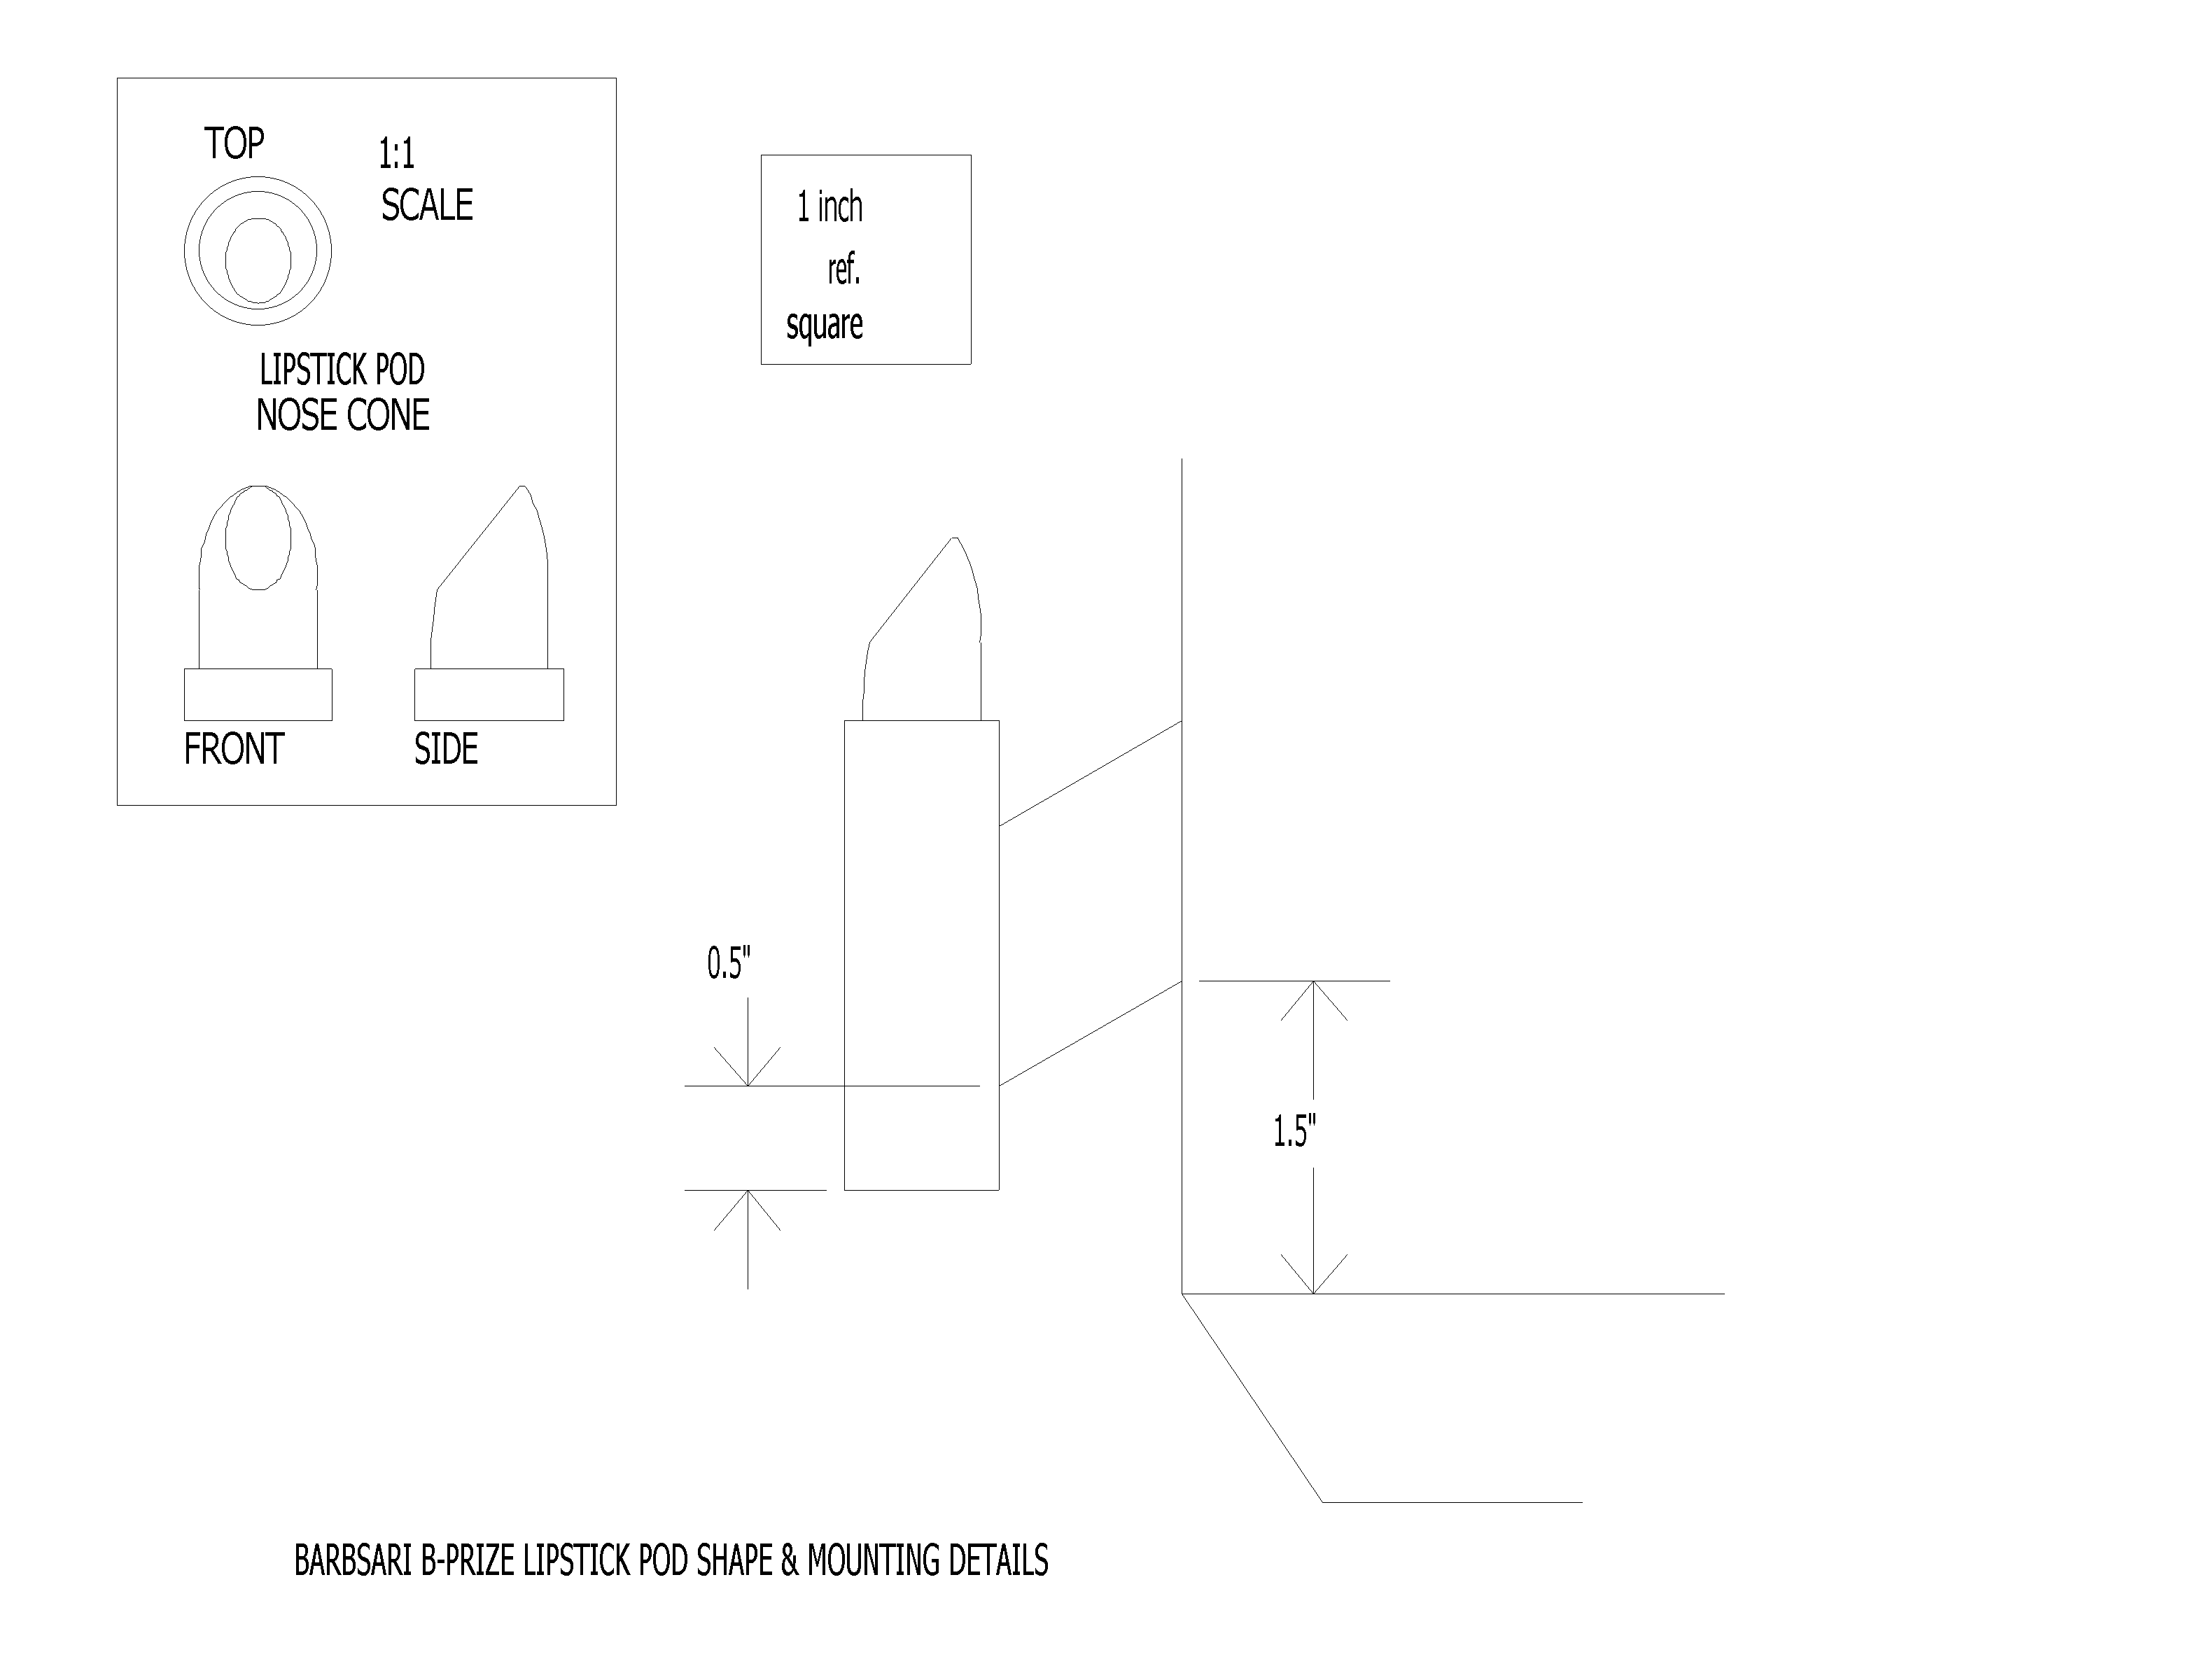
- Pod Details - a full-scale 300 dpi drawing showing the shape of the lipstick pod nose cones and showing dimensions for attaching the lipstick pods to the body
Construction:
Care must be taken when cutting off the base of the Ferrero Rocher egg, as the hard plastic splits when excessive force is applied. I used a fine-toothed razor saw for this step.
I was worried about joining the Ferrero Rocher egg to the payload tube, and finally decided on using the old Centuri technique of applying an adhesive-backed paper label to the egg base tube, applying white glue to the inside of the payload tube, and inserting the egg into the payload tube. I avoided using yellow glue to avoid shrink-pinching the tube.
Fins and lipstick pod standoffs are all cut from 1/8" balsa stock.
I designed the motor tube assembly to accept an Estes E-engine and to form the bottom half of a Centuri-style baffle. I used the Model Minutes -style motor clip wire, but an Estes E-engine or D-engine motor clip could be used instead. The three centering rings and the baffle disk are all cut out of the foam board.
I used an Estes-style folded card shock cord mount for the booster body. The baffle should extend the life of the shock cord mount and shock cord. Since I was using foam board for the baffle disk, I decided against mounting the shock cord onto the baffle.
Finishing:
All exposed balsa surfaces were sealed with a few coats of sanding sealer. The body of the rocket was painted with a coat of Krylon primer, then a few coats of flamingo Armor Coat Fluorescent Spray Paint. The lipstick nose cones were brush-painted with a few different reddish-pinkish shades of gloss acrylic enamel. The lipstick body tubes were brush-painted with dusty-looking periwinkle, violet, and turquoise acrylics.
Stability Testing:
Swing-testing this rocket with a D12-7 installed indicated that this rocket is stable with at least 20g of payload. This design should not be flown with less that 20g of payload!
Recommendations:
If I were to build another one of these, I would lengthen the booster body tube from 14.2" to 18". This would improve stability so that the B-Prize would be stable without payload.
When flying, I recommend wiring or tieing a "cage" around the egg. I'd first envisioned using tape to keep the egg together, but I think the top of the egg would receive a fair jolt when the parachute pops.

Flight:
 Launch time was 2:00pm, with
clear blue skies, temperature at +23F, wind was around 7 mph from the
southwest. The field was covered by 7 to 24 inches of crusty-topped snow.
Launch time was 2:00pm, with
clear blue skies, temperature at +23F, wind was around 7 mph from the
southwest. The field was covered by 7 to 24 inches of crusty-topped snow.
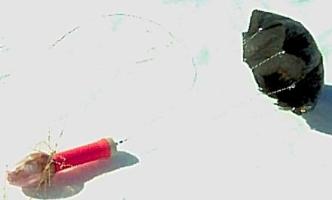
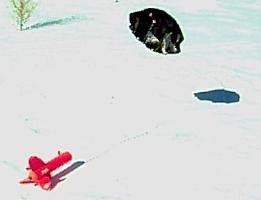
The B-Prize was flown twice on D12-3's. Both times, boost was moderately slow, arcing a bit into the wind at first, then straightening out as the rocket gained speed. Both times, ejection was at apogee a few hundred feet up, with the rocket starting to swing toward horizontal. The payload and booster separated nicely, and their parachutes popped open audibly, almost at the same time, giving an interesting pop-pop sound. Descent rate was about ideal for both the payload and the booster, so the 22" parachutes appear to be about the right size. The payload capsule touch down shortly before the booster in both instances. No damage.
For the first flight, the payload touched down about 70 feet northwest of the pad, and the booster touched down about 90 feet northwest of the pad. For the second flight, the payload touched down about 50 feet east, and the booster landed about 75 feet east.
I used cellulose insulation as wadding for the first flight, then omitted the wadding during the second flight. The baffle was effective, as the parachutes were not damaged when no wadding was used.
However, I found that the booster acts as an effective snow scoop if there is a bit of wind... not nice if the body tube has not been waterproofed. The B-Prize booster was not waterproofed, but I managed to get most of the snow out of the tube after each flight.
 |
 |