The Tower Ring Infernal

A field of scale modeling opportunities in Corpus Christi, Texas. Fractionators, deethanizers, debutanizers, oh my!
History
I've done some work in oil refineries (which have some pyrotechnic attractions of their own), and I've always thought that their towers might make interesting subjects for modeling. This project doesn't model any particular tower, but an amalgam of typical refinery features, including a tower with side draws, reboilers, cat walks, and a pipe rack.
For motivation, imagine that hydrocarbon seas need to be refined on Titan, and we're assembling the refinery on orbit, in large pieces, and sending it directly to Saturn, using temporarily inserted solid rocket motors. Or imagine a debutanizing tower has decided to try to launch itself into the Gulf of Mexico (despite appearances, they make rather poor rockets. Or build it because you've never built a tube fin and ring rocket before. Or build it because this is the one rocket that looks realistic with a red and gray primer finish. Or build it because you'll be practically guaranteed to be the only one at the next launch with a flying refinery!
|
 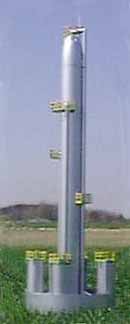
AKA, "Da Beaut"
Parts list
- A Big Bertha kit
- Some 29mm motor tubing
- 9/32" Styrene tubing
- Skinny styrene rod and strip stock
- 3/16" wooden dowel
- scrap poster board
- scrap 1/8" plywood
scraps of balsa wood
|
|
Assembly
- Cut four fins from 1/8" plywood. Base is 2.5" long, tip span is 1", root is 2".
- Enlarge the centering rings for the Big Bertha to accomodate a 29mm motor mount tube, approximately 6" long. Make an extra centering ring or two. Reinforce with CA, or use 1/8" plywood if you want.
- Glue the fins to the motor tube, about 3/8" up from the bottom end.
- Glue the centering rings to the motor tube.
- Cut four lengths of 29mm motor tube, each 4.25 inches long. Using the existing fins to mark the tubes for slots so that they fit over the fins.
- Cut a slot in each tube. It is very easy to do this if you have a drill press:
- Chuck in a spiral cutting bit
- Raise the table so that the tip of the cutter is about 1/2 of a body tube diameter from the table.
- Clamp a fence on the drill table 1/2 of a body tube diameter from the cutter.
- Set the drill to high speed, turn it on, and feed the tube smoothly into the cutter using the fence as a guide.
- Glue the tubes to the ends of the fins so that the tips of the fins are glued to the outboard inner walls of the tubes, and the tubes extend below the fins about 3/8".
- Fillet generously.
- Use the completed tail structure to mark the BT. Slot it as in Step 6 above.
- Glue the tail structure into the body tube. Fillet.
- Add an Estes-style parachute mount. I use tubular nylon shoelace material as shock cord.
- Attach side draws and overhead draws to the BT. The overhead draw is 9/32" styrene tubing, and should extend to the end of the BT. This will also be your launch lug. The smaller side draws extend just partway up the side of the BT. Note that the top ends of the side draws should be rounded; on a real tower these are pipes with elbows that extend into the tower itself.
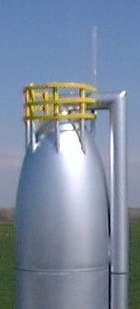
- Cut a length of 9/32" styrene to reach from the shoulder of the NC to just past the tip. Miter the top of this piece at a 45 degree angle. Glue this continuation of the overhead draw to the NC, so that it extends just past the top of the NC. Now cut a second section and miter the end, to match the first part. Glue this to the top of the nose cone. Line it up with the overhead draw on the BT. When launching, rotate the NC slightly so the launch rod can go through the BT-mounted overhead draw.
- Simulate a catwalk by gluing a crown of styrene rods to the end of the nose cone, and add some horizontal rails around this crown. A longer lightning rod can also be added. Add similar overhead draws, but without the horizontal section, to each of the reboilers (tube fins), making sure to keep them inboard of where the tail ring will be.
- Add catwalks at the top end of each of the sidedraws by gluing on more styrene bits, or simulate them: Glue small balsa squares to the BT, and then add stiff cardboard around the outside of these blocks (like a ring fin, but circling only 1/4 to 1/2 of the BT diameter). You'll draw the railings on after painting.
- Cut a tail ring, 2" wide, from posterboard. Wrap this around the fin/tube tips, and glue into place. Stiffen with CA.
- Add 1 to 1.5 oz of weight to the nose, so that the CG is about 2" ahead of the tail ring. Swing test to be sure that stability is sufficient.
Finishing
- The neat thing about this project is that a lousy finish is a scale finish. Spray it with red or gray primer, or both. Then paint it silver, or not. Catwalk railings on newer towers are often yellow or red, but may be silver or rust colored. The picture at the top of this page shows towers with both silver and red railings.
Draw horizontal pipes around the tail ring, and railings around the catwalks if you simulated them.
|
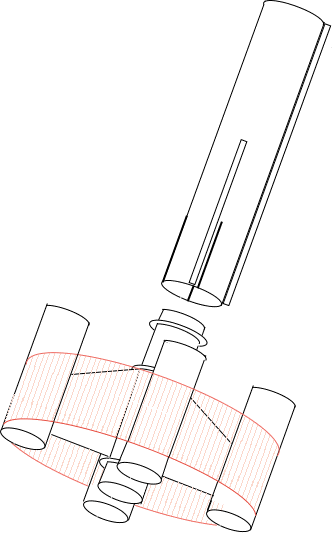
Schematic of Fin can/tube fin/tail ring/motor mount assembly. (Not to Scale)
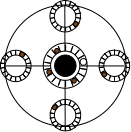
Bottom view, showing major structures.
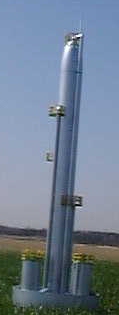 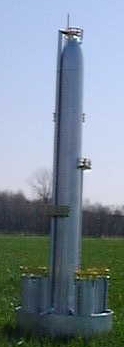 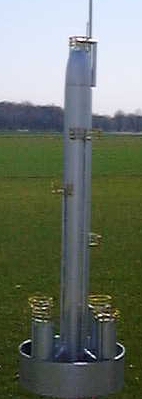
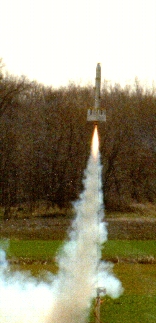
Three more views. The rightmost is on the pad: Note launch rod, displaced overhead draw, and fins (less obvious in other views).
Flight Report
I used a 12" parachute for the nose cone, and a separate 24" parachute for the body. I had intended to use an RMS E18-S with a light ejection charge load for the first flight of the Tower Ring Inferno, but that case was full with a different reload, so I used an E15W-4 instead. Bad idea.
Conditions were very good for launch, albeit a bit breezy. Despite the estimated 10 mph breeze, the boost was straight and true, with no obvious wobble or spin and with only minor weather cocking. Apogee was higher than I expected, perhaps 800'. Ejection was just past apogee. Unfortunately, E15s have pretty hot ejections, and this was one of the hottest I've ever had. Despite copious wadding, the shock cord was brutalized and burnt in multiple places. The BT thus fell without benefit of a chute, and core sampled.
Surprisingly, given all that stytrene, the damage was relatively minor: about 2" of BT crumpled (to the top of the first side draw, which apparently was a good reinforcing structure), and the top catwalk popped off intact. The NC was recovered intact (even the lightning rod!). I'll add a coupler and another length of BT, and we'll be good to go again. (Next time on that E18, with a modest ejection charge! It's only a Big Bertha, after all!)
|


