| Manufacturer: | Scratch |
VSOS2: Very Stand-Off Scale Scout
Attempt at a "stand-off" scale
mid-power rocket of an early NASA Scout


Introduction:
I wanted to build something a bit more involved
than just a bigger or smaller version of the EconoExpress for my next mid-power
bird. While staring at the various cardboard tubes I had on my workbench, I
subconsciously began to assemble a rocket very similar-looking to the early
NASA Scout, a 1/30th scale kit which is available from
www.truemodeler.com, and which I had
seen on Essence's Model Rocketry Reviews.
After getting some of the scale information from the good folks over at True
Modeler, it became apparent that I wouldn't be able to do a scale replica, but
I still liked the look, hence the name of the rocket.
Nose Cone:
An old BT-55 nose cone from an Estes kit from
back in day that needed a bit of sanding to fit, as well as the inside of the
tube.
Body Tubes:
Top tube was from a roll of wrapping cellophane:
25"x1.25"
Middle tube was from a fabric roll:
30"x2.23"
Bottom tube was a used (address isn't current
though) mailing tube: 35"x3.1"
On the finished rocket, top tube is 21" long including transition, middle tube is 26" including transition, and bottom tube is 32".
Transitions:
Made from a $1.99 styrofoam cone from a fabric
store. Reinforced them with a layer of wood glue and paper, then carefully
forced the smaller of the intersecting tubes through it. If I had to do it over
again, I'd just make a paper shroud.
Motor Mount Tube:
The tubes from the wrapping cellophane make for a
great motor mount, just sliced a section out of one, inserted into another and
peeled off a layer of paper. Perfect fit for Econojets! Inserted a spare F20
spacer for a thrust ring.
 Recovery System:
Local fabric store was having a sale on some
post-Halloween fabric, picked-up some bright red lightweight nylon/polyester
for $.99 a yard. Cut-out a circle via the old string-and-tack method, then
reinforced the edges with a zigzag stitch. Placed 16 tabs made from duct tape,
put in grommets and tied on the shroud lines. Shock cord is 3/4 braided
polyester elastic, $1.75 for 5 yards. Used 4.5 feet of it from bottom section
to parachute grommet, then another 9 feet to the top section. Attached to
rocket by sewn loops in the shock cord with two 1/4 wooden dowels through them
which are then inserted through the walls of the airframe. Dowels also serve
double duty as stops for the ball of damp newspaper I use for recovery
wadding.
Centering Rings
Ended up having to make five of them for this
project! Ugh, nothing like carving these things out of 1/8" balsa with a
utility knife. Two for the top and middle body tube joint, and three for the
motor mount, since I didn't use thru-the-wall construction for this rocket. As
usual, covered them with wood glue and paper. How did I join the middle and
lower tubes together, and how did that work with the mid-body separation? Read
on!
Mid-Body Separation
When I first started building, wasn't sure how I
was going to go about creating the separation joint. Didn't have enough mailing
tube to make a coupler, and I didn't like any of the ideas I came up with using
a centering ring solution from the middle tube. What I ended up doing was
hacking off a 4" section of the mailing tube and permanently joining it
with the middle tube. Since the diameters were somewhat close, I just slit some
heavy cardboard tubing and built-it up some 1/2" in width centering rings.
Yes it is heavy, but this rocket wasn't about performance, and after five
centering rings, I wasn't about to do anymore. The system also gave me an idea.
I had another tube which had an external diameter a bit smaller than the inside
one of the mailing tube. Hacking apart my smashed 3x24mm rocket (don't ask), I
had just the right amount of tubing to form a coupling, and exactly the right
diameter with two layers wrapped around the smaller tube. What luck! Gluing
that into the other end of the 4" section, I had myself a strong albeit
heavy separation point.
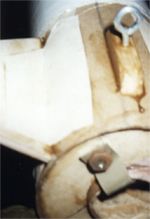
Motor Retention
Since I had inserted a thrust ring, I figured I
might as well make up a motor retention system other than friction fitting.
Found what looked like some oversized screen door clips that did the job
perfectly. Just glued in screws through the third motor centering ring
(reinforced with another layer of balsa and wood glue behind mounting points),
threw on the clips and then some nuts, and it works fine.
 Fins:
Fins:
I was worried about sections smacking together at
ejection, so I wanted the fins to separate rather than crack, so no thru-body
tube mounting this time. Besides, I was running out of building time and
surface mounting is so much faster. 1/8 balsa stock, 20-pound paper and
watered-down wood glue, that's it. Right angle triangle shape, 4" root.
External paper fin mounts added after initial attachment, as well as a final
wood glue fillet.
Launch Lugs:
I wasn't happy with the rather weak link of a
screw eye being supported with just the body tube as on
EconoExpress, and this rocket was going to be
much heavier. By this point, I was really running out of time, and I was
visiting friends at the time, so no big work shop. I ended up screwing the
eyelets into pieces of somewhat streamlined balsa, then attached them to the
rocket with wood glue.
Painting:
Paint? Who said anything about paint? SOS will
probably remain unpainted, at least through the winter.
Note: I did end up throwing a layer of
paint on it, since the temps have reached over 50 degrees in the Northeast in
January, I couldn't pass the chance up. The middle section if you can't tell
from the pictures is metallic wrapping paper with prism dinosaurs printed on
it.
 First
Flight:
First
Flight:
Happened to be visiting friends only about 15
minutes from CATO Rocketry's winter launch site. Hmm, wonder how that happened?
Was able to get one flight off. Of course, after getting the bird onto the
launch rod, I had forgotten an igniter... After inserting an igniter, realized
it was from an F20 and not the G35-4 package I currently had sitting in the
rocket. In other words, I didn't have much to work with. Taping the igniter in
place and barely having enough room for the clips, I taped the whole mess to
the motor. Crossing fingers and praying nothing would short, hold too well or
drop out, I took one last look at the mess and got ready on the front-line for
the flight. Waiting for the launch, I was zooming in with my camera to see if
the igniter was still installed. I was a nervous wreck. Finally, the mid-power
pad! First two rockets had various problems, and by this point I was getting
really nervous.
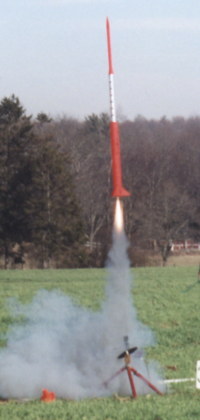
The button was pushed and... WOOHOO!! The motor lit! Jim, did you sell me some 'special' Econojets to get me hooked as a buyer or what? I completely flubbed trying to take a picture. I was just staring at the rocket as it soared straight upwards at a viewable speed, yet it seemed to totally ignore the wind. Beautiful, bright exhaust plume and the noise! Ejection occurred at or very near apogee with a clean separation and without any tangles, about 800 feet up. The rocket drifted, but still well within the field. Only damage to report is a ding on one of the fins, either from some separation contact or with a very suspicious-looking rock at the landing site.
Conclusion:
I'm certainly pleased with the result. I ended up
with an eye-catching rocket (at least from a distance) that stands 84"
tall, flies great on an Econojet G35-4, and cost me a grand total of $4.59-not
too shabby!
As of 01/10/00, it has a flown a total of three times, all on G35-4 Econojets. On the last flight, wind drove the rocket hard into the ground, burying the nose cone a few inches and cracking it a bit (easily repaired) and popped a fin off! The break was clean, and it was hanging by one of the external paper mounts. Some wood glue on the fin itself and a bit more on the paper mounts and it looked fine the next day!
 |
 |