DG&A High Power Rocketry Archblast
DG&A High Power Rocketry - Archblast {Kit}
Contributed by Bryan M. Chuck
| Manufacturer: | DG&A High Power Rocketry |

(Contributed - by Bryan M. Chuck - 09/10/02)
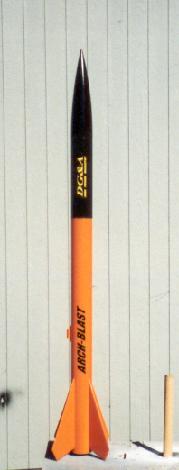
Picture Courtesy of
DG&A
Brief:
The DG&A Archblast is a single staged 29mm rocket that boasts beefy wood
parts, includes decals, as well as a photo illustrated instruction guide. The
rocket stands at 47" when complete. It could probably serve well as a L1
rocket.
[Editor's Note: DG&A has converted this kit to a 3" diameter and it now stands 59" tall and uses a 38mm Motor Mount]
Construction:
I received the Archblast from EMRR after winning one of their Rocket Give-Away drawings. The kit I received
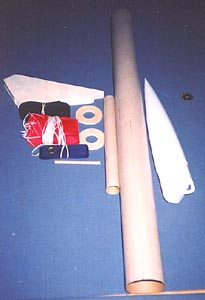
came in a box with the components secured and undamaged. Here's the breakdown
of the parts list per the instruction booklet:
- 1/ea 2.6" x 34" airframe kraft paper.
- 1/ea plastic nosecone (which looks like the cone of the Aerotech Initiator).
- 1/ea 29mm x 11" motor tube.
- 2/ea 0.25" ply centering rings
- 4/ea 0.25" ply fins
- 1/ea launch lug for 0.25" rod
- 1/ea 30" nylon parachute.
- 1/ea nylon strap
- ~15' of 1" elastic shockcord
- 1/ea instruction booklet and fin alignment guide
- Nylon decals sporting the rocket and company's name.
 NOTE: The inventory list of the kit's
instructions also mentioned a quick link which was not present. Also mentioned
in the kit's inventory list but not found were retention screws for the motor
anchoring duties (I assume this was a fluke). No biggie, though, since
retention screws and quick links are inexpensive at the local hardware store.
NOTE: The inventory list of the kit's
instructions also mentioned a quick link which was not present. Also mentioned
in the kit's inventory list but not found were retention screws for the motor
anchoring duties (I assume this was a fluke). No biggie, though, since
retention screws and quick links are inexpensive at the local hardware store.
The construction of the Archblast shouldn't be too tough if one is familiar with the basic components of a mid or high-powered rockets. No doubt, the pictures for each step of the build can help clarify things. I used Bob Smith 15 minute epoxy for the entire build and am confident that everything will hold together. I also must add that this is the first rocket in some time that I built essentially stock.
The wood components required some sanding, particularly the fins, to smooth out the surface, but nothing major. I rounded the leading edges of the each fin for aesthetics before getting started on the building process. I found the centering rings were a bit rough around the edges, but nonetheless, they "dry-fit" together on the motor tube well. As one might guess, the motor mount components were the first things to be adhered together. I supplied my own t-nuts and added them on the aft centering ring 180 degrees apart. The instructions direct the builder to epoxy both centering rings on the motor tube prior to installing it in the airframe. I deviated slightly from the instructions here because I opted to epoxy the forward ring on first and dry fit the rearward ring on because I wanted to add internal fillets to the fins. Hence, I applied epoxy at the correct depth inside the airframe for the forward centering ring and pushed the assembly in to the desired depth. I removed the rear centering ring after things had dried and started mounting the fins. After giving the fins internal fillets, I epoxied the rear centering ring on.
The Archblast employs through the wall fins and one must slot the airframe. With a new blade in the ole hobby knife this is easy. Although right out of the box the airframe is marked for each fin, I make a habit to check ANY pre-drawn lines on an airframe to make sure they are straight. I found the lines on the tube were a wee tad off, so I used the opposite end of the tube and drew new lines to use for my fin slot guides. I completed the build using the rest of the components as directed by the instruction booklet. I connected the parachute to the shock cord using a quick link I supplied.
Here are my pros and cons for the construction:
PROS
- Quality components.
- Instruction booklet, which also has tips to help less experienced builders achieve success.
CONS
- Missing parts listed on inventory list (i.e., quick link and t-nuts). Again, I assume this was a fluke.
- Premarked lines on body tube were not quite straight.
Finishing:
The vinyl decals supplied with the kit are black and I wanted to keep things
basic on the paint scheme for this rocket. I decided against filling the tube
spirals with putty and gave the rocket a couple of coats of Krylon white
primer, sanding between coats. Then I used gloss Krylon black for the nose cone
to compliment the decals and gloss Krylon pewter gray for the rest of the
rocket. Lastly, I coated the entire rocket with Krylon clear. Basic stuff,
really.
Construction Rating: 4 out of 5
Flight:
I haven't had a chance to fly the Archblast yet, and it might be some time
before I do :(. According to Rocksim, a G80 would take ~1500 feet, and an H128
could yield ~1900 feet. When I do get the opportunity to fly again, I will more
than likely use an H165R.
Everyone has their opinions on elastic shock cord. The Archblast has ~15' of one inch wide elastic, plus the nylon strapping anchoring things down inside the rocket. I feel that the supplied amount and width of elastic is probably fine is this rocket. The nylon strap and elastic connection point projects out of the front of the airframe, so if one decided to change to tubular nylon ex post facto, this could be done easily. I will follow up with flight details as soon as I get this bird off the pad.
Recovery:
I would speculate this rocket would perform well.
Flight Rating (subject to change upon actual flight): 4 out of 5
Summary:
Although I haven't flown this rocket yet, the build was pretty basic and the
rocket looks good. The fins are thicker than those kits of similar sized
rockets I've built and once you get them sandwiched in the centering rings,
they're staying put for good. The nylon decals are a fine touch, too. Yes, I
was missing a quick link and t-nuts, and the pre-marked lines on the airframe
weren't aligned to my liking, but I do ultimately feel that was an oddity. This
rocket would probably serve well as a basic sport flier or for a level 1
flight.
Overall Rating: 4 out of 5
 |
 |