| Construction Rating: | starstarstarstarstar |
| Flight Rating: | starstarstarstarstar |
| Overall Rating: | starstarstarstarstar |
| Manufacturer: | DG&A High Power Rocketry |
Brief:
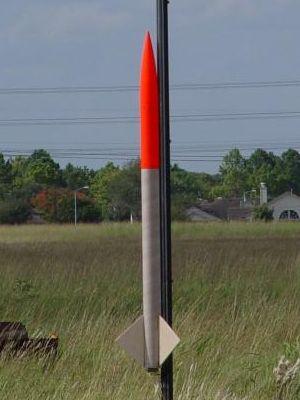
This is a single staged 3" airframe rocket with a 38mm motor mount from
Texas based designer Danny Cantu of DG&A Rocketry. It was my second rocket
intended for frequent H powered flights and the rocket which replaced my
retired L1 cert rocket, the BSD 38mm Sprint. For this particular review I
decided to write an article covering the entire life of a rocket, as opposed to
a review of a rocket I have only flown two or three times.
Construction:
I ordered this kit online from DG&A Rocketry in October of 2004 and the kit
arrived by FedEx the very next day. It contained pre-marked LOC airframes, RWW
nose cone, excellent quality 5-ply birch fins and centering rings, rail
buttons, tubular nylon recovery harness, a high quality nylon parachute, very
nice decals, rail buttons, and top notch, fully illustrated, and easy to follow
instructions. I had mentioned in my order that I was wanting a durable
"payload workhorse" and much to my surprise, Danny tossed in a free
3" electronics bay kit.
Building this rocket was quite simple and almost exactly like the build of my BSD 38mm Sprint--a nearly identical rocket with exception of the fin shapes. I removed the glassine layer from the motor tube to get better fin root adhesion.
Upon completing this rocket I learned one of the most valuable lessons ever when it comes to high powered rocketry and it was a tuff pill to swallow: In all of my past experience in model rocketry I had understood the shock cord as being an element of the recovery system that must have some elasticity to it in order to absorb "shock". My L1 rocket from BSD had included a heavy duty elastic strap as part of the recovery system and I was somewhat "shocked" (pardon the bad pun) that the WASP only included a 20 foot piece of tubular nylon, which upon visual inspection does not appear to have much "shock" absorbency. Thanks to much more experienced club members who patiently participated in a lengthy discussion regarding shock cord material in high power rocketry, I was taught that the recovery harness if long enough does not require much elasticity as long as that your ejection event is somewhat near apogee with single deploy and that the harness itself dissipates the kinetic energy of the separated airframes often without the need for more elasticity. Many people showed me the different techniques that they use and I learned that there is a very large variety of opinions and preferred methods of recovery harness selection which include a variety of materials such as elastic, tubular nylon, tubular Kevlar®, sliders, etc. with varying combinations of materials. I decided to go with what the kit came with and just see how long it would last.
During the discussions of shock cords, I learned that using U-bolts, particularly stainless steel is a wise decision in construction as the eye bolts that come with most kits are not forged which can allow them to stretch out over time and ultimately fail. As I had already started construction of the rocket with the provided non-forged eye-bolts I took the rocket to Midas Muffler and had them weld the eye-bolts shut so that they would not fail over time.
Finishing:
Finishing this rocket does not require any special techniques and is fully open
to the rocketeer as to how you want it to look. It comes with top quality
decals so you can replicate the look of the prototype on DG&A's website.
Originally this rocket was day-glo orange over white Kilz primer and as you
will learn, this rocket had several different looks throughout it's life.
Construction Rating: 5 out of 5

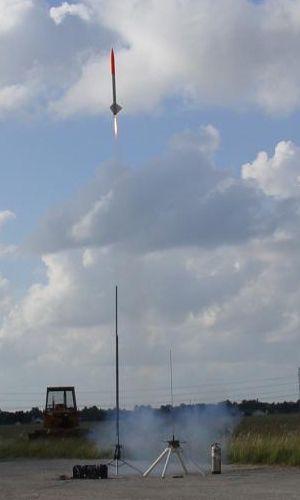
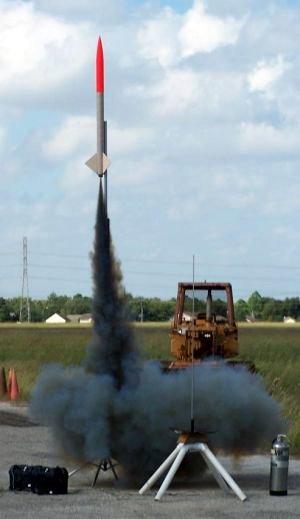
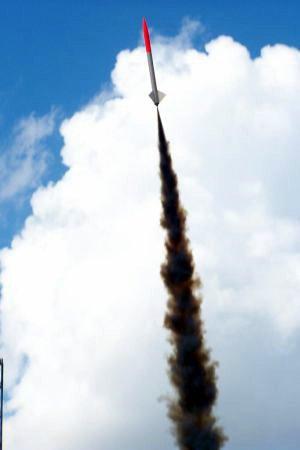
Flight:
This rocket has had 19 flights
First flight was on October 23rd, 2004, at Rushing Park in Katy, Texas with the Challenger 498 Rocket Club. Its very first flight was almost its last. I had selected a Cesaroni G60 and attempted to set the delay at 6 seconds. While I had used several CTI motors before, this day it seemed for some reason like the CTI delay tool just didn't want to core into the delay grain material in the delay module. I felt like something was wrong and should have stopped prepping the motor at that point. I launched it anyway though. The rocket went up nicely but then looked like a guaranteed core sample. In fact, I didn't even want to watch as it looked like it was going to slam into the street nose first at high speed. Other club member and I were sure that this was going to be recovered as a wreckage, but by sheer luck, the ejection finally went off less than 30 feet from impact. The main airframe swung around and thudded into soft mud within a few feet from the asphalt pavement and I was amazed to find that it had no damage. I discovered later what the problem was when setting the delay. The CTI delay tool can also used to set the delay on a Loki Research 38mm motor. The previous weekend I had flown the first certified Loki Research motor in the state of Texas as NASA's Johnson Space Center. The Loki case came with O-rings so the O-rings in the reload kit were saved as extras. In order to keep them in a safe place, I put the extra Loki O-rings inside my CTI delay tool and they were still there! I did not see them down inside the tool when trying to set the delay so what should have been a 6 ended up being about a 12 or 13 second delay. That blunder almost cost me a nice rocket on its very first flight.
Second flight was on October 23rd, 2004, in Katy, Texas. It was lightly raining now. I used a CTI Pro38 G79 and set the delay to 10 seconds. This was a little longer than needed and the rocket splashed down in water and mud with no damage. I dried it out quickly with towels.
 The third
flight was also on October 23rd, 2004, in Katy, Texas. There was moderate rain
now. This launch was pretty crazy. We stood in very heavy rain and lightning
huddled under canopies for several hours just waiting for the weather to clear.
It stopped raining briefly and we had been looking forward to flying so much
that when it started raining again, we just gave up on waiting for better
weather and launched all day, even in the rain. On this third launch it was
raining pretty hard. I used a CTI G79 set at 8 seconds and that was perfect,
however, the rocket splashed down again, but this time in a gully full of
rushing water that was several feet deep. I yanked out the recovery system and
dried out the rocket with towels again. I went home soaking wet and tossed the
recovery system in the clothes dryer with the rocket out in the garage
connected to the clothes dryer vent to blow the hot air through it and dry it
out. It suffered no visible damage from the two splashdowns and was ready to
fly again the next day.
The third
flight was also on October 23rd, 2004, in Katy, Texas. There was moderate rain
now. This launch was pretty crazy. We stood in very heavy rain and lightning
huddled under canopies for several hours just waiting for the weather to clear.
It stopped raining briefly and we had been looking forward to flying so much
that when it started raining again, we just gave up on waiting for better
weather and launched all day, even in the rain. On this third launch it was
raining pretty hard. I used a CTI G79 set at 8 seconds and that was perfect,
however, the rocket splashed down again, but this time in a gully full of
rushing water that was several feet deep. I yanked out the recovery system and
dried out the rocket with towels again. I went home soaking wet and tossed the
recovery system in the clothes dryer with the rocket out in the garage
connected to the clothes dryer vent to blow the hot air through it and dry it
out. It suffered no visible damage from the two splashdowns and was ready to
fly again the next day.
The fourth flight was on October 24th, 2004, in Houston, Texas at NASA Johnson Space Center. What should have been the fourth flight of this rocket and its first flight on an H motor ended in disaster. I had selected a Cesaroni Pro38 H143SS, set the delay, and then got distracted. It was a fairly large launch with a lot of people there. The rocket had a Giant Leap Slimline retainer and at some point I dropped the CTI reload into the rocket and screwed the ring on for safe keeping as I went to visit with others. I had not put the reload into the Cesaroni aluminum case. I went off and talked to other folks, even did a shift of operating timers for some NAR contest flights, and then came back to the rocket about an hour or so later. I checked my recovery system which I had already packed, saw the motor in place and thought to myself, "This is ready to rock & roll!". With the Slimline retainer you can not see if a CTI motor is in it's case or not. I loaded the rocket onto the rail, awaited countdown and, well, it was not a pretty sight. The rocket started smoking and just sat there. The ejection charge blew the nose cone and chute and flames started to erupt out of the fore end of the ship. A large amount of black smoke from the Smokey Sam motor ensued. The main airframe just basically sat there and smoldered and burned to the ground right in front of my eyes. Finally, the airframe collapsed as safety crews put it out with fire extinguishers. When inspecting the remains at home that night, I found that the entire motor tube and rings were gone with just ash and cinder left in their place. I had used AVES epoxy putty as external fillets and not only did they survive the fire, but the fins are still attached well enough to stand on them. The booster however, was a total loss. After telling other club members what I had done, I was somewhat relieved to learn that this mistake is so common that the Texas clubs have what is called a "Hall Of Flames" listing the names of dozens of others that had made this same mistake. This was my entry. I ordered another WASP kit from DG&A the following Monday and it arrived via FedEx the next day.
The fifth, sixth and seventh flights were on October 31st, 2004, in Houston Texas at NASA Johnson Space Center. I learned about a high powered test launch at NASA less than 24 hours before the launch. I only had about 3-4 hours of possible build time left that night and this should serve as evidence as to how easy it is to build a DG&A kit. Within 4 hours I finished a complete rebuild of the new WASP kit, less the nose cone and payload bay. I used those from the original and the WASP V1.5 was born. It rose from the dead on Halloween 2004 exactly one week later from the same rail from which it had previously burned down. I started the day with the same motor it should have used the last time, a CTI Pro38 H143SS, then followed up with 2 more flights on CTI Pro38 H153s. They were all beautiful flights and my first time ever to use 3 H motors in the same day. It was a nice way to turn the page on the unfortunate disaster at the pad the previous weekend.
 Eighth and
Ninth flights were on November 13th, 2004, at Katy, Texas. Two more nice
flights using CTI Pro38 G79s. I learned that when using an X-shaped parachute
that unless you are using a swivel, the chute will tend to self reef, causing a
constantly increasing descent rate. Now damaged, this rocket performs
excellently even when you are limited to a large G motor.
Eighth and
Ninth flights were on November 13th, 2004, at Katy, Texas. Two more nice
flights using CTI Pro38 G79s. I learned that when using an X-shaped parachute
that unless you are using a swivel, the chute will tend to self reef, causing a
constantly increasing descent rate. Now damaged, this rocket performs
excellently even when you are limited to a large G motor.
Tenth flight was on December 11th, 2004, again in Katy, Texas. Out for another perfect flight on a CTI G79.
The eleventh, twelfth and thirteenth flights were flown on December 27th, 2004, at Katy, Texas. It was another trio of nice G flights on a CTI G79 and two G69's.
Fourteenth and fifteenth flights were flown on January 8th, 2005, at Hearne Texas Municipal Airport. I started the day with a nice smokey CTI G79SS and then followed that flight up with a CTI H153. At this point it just seemed that this rocket was die-hard with no need for any repairs at all since the 4th launch.
The sixteenth and seventeenth flights were on January 15th, 2005, at NASA Johnson Space Center. The first flight on a Loki Research H144 was beautiful. It was my first time to use a Loki motor in this bird. As the day drew to a close, I decided to try to get just one more H flight in and the recovery system failed. I was using a CTI Pro38 H153 and at apogee several people said, "We have a separation". I could not believe that because I had the eye-bolts welded shut and could not figure out how on earth this rocket could have come apart. I felt I knew it very well. The airframe tumbled with no recovery system and sort of glided due to the shape of the fins. It landed with no damage at all. The nose and payload bay drifted a long way under canopy. Upon recovery of both sections, I discovered that the tubular nylon shock cord or more proper "recovery harness" had burned in half from the ejection charge. I had added at least an extra gram of BP to the charge and even while I was using a Nomex® heat shield on the harness, it appeared as though the tubular nylon harness must have been laying right on top of the motor's forward end causing the extra ejection charge to sever it. It's amazing to me that there was no other damage. Since I had to remove the airframe to access the recovery harness mount, I replaced the harness with tubular Kevlar®. The new airframe stretched the bird by two more inches, thus WASP V1.52 was born.
 Flights
eighteen and nineteen were on January 29th, 2005, again at NASA Johnson Space
Center. Sporting a new orange and white paint job, the WASP V1.52 took to the
sky with its new main airframe on a Loki Research H144 for a gorgeous flight
atop a brilliant white flame and puffy white smoke. The Loki H144 is a
beautiful motor. The final flight to date was on a Cesaroni Pro38 H153. The
motor failed and blew the nozzle out taking part of the case with it. The
grains came out at about 900 feet and lit on the way down for an interesting
rain of fire, and since there was nothing left to ignite the delay charge, the
rocket slammed into the ground at full speed after falling from over 1000 feet.
I was not able to dig the nose cone out of the ground and to this day it is
still in the ground at NASA. The rocket suffered massive damage to it's new
airframe, yet the fin can is still intact. A rebuild is possible but I have not
started on it yet. Some day this year this rocket will rise up again for it's
twentieth flight, as the WASP V1.6.
Flights
eighteen and nineteen were on January 29th, 2005, again at NASA Johnson Space
Center. Sporting a new orange and white paint job, the WASP V1.52 took to the
sky with its new main airframe on a Loki Research H144 for a gorgeous flight
atop a brilliant white flame and puffy white smoke. The Loki H144 is a
beautiful motor. The final flight to date was on a Cesaroni Pro38 H153. The
motor failed and blew the nozzle out taking part of the case with it. The
grains came out at about 900 feet and lit on the way down for an interesting
rain of fire, and since there was nothing left to ignite the delay charge, the
rocket slammed into the ground at full speed after falling from over 1000 feet.
I was not able to dig the nose cone out of the ground and to this day it is
still in the ground at NASA. The rocket suffered massive damage to it's new
airframe, yet the fin can is still intact. A rebuild is possible but I have not
started on it yet. Some day this year this rocket will rise up again for it's
twentieth flight, as the WASP V1.6.
Recovery:
While I only used the supplied parachute a few times, it is good quality and
worked fine. I experimented with different types of parachutes with this
rocket, like the Perfectflite X-Chute from Quickburst and the TAC-1 from The
Motorman (aka C.L.E. Enterprises).
I also learned that tubular nylon will fail over time. I now use tubular Kevlar® to the motor mount and tubular nylon only as additional length when not exposed to the main ejection area.
Flight Rating: 5 out of 5
Summary:
If you want a nice, simple, yet high performance and reliable L1 range rocket
that you can learn from and depend on, this is it. I am giving this rocket and
DG&A Rocketry a well deserved and highest rating possible.
Overall Rating: 5 out of 5
Related External Links
 |
 |