| Construction Rating: | starstarstarstarstar_border |
| Flight Rating: | starstarstarstarstar_border |
| Overall Rating: | starstarstarstarstar_border |

Brief:
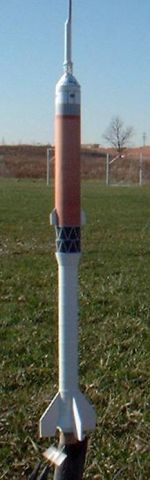
This is a semi-scale replica of NASA's next generation manned launch vehicle. I
say semi-scale, as NASA's design is constantly shifting, and this reflects a
sort of blend of the various styles. Currently called the Ares, this vehicle
started out as The Stick and consists of a single SRB from the shuttle along
with an Apollo-style CEV capsule.
Construction:
Parts were typical Zooch quality: good, unexceptional. The preprinted wraps are
good ink jet resolution and the balsa parts are a bit rough. The goal here is
affordable scale modeling with this kit selling for $20-25.
Parts include:
- BT-50 body tube [Note: most Zooch kits are BT-60]
- 18mm motor tube, centering rings
- balsa fin stock
- balsa nose cone
- dowel for LEM tower
- 6" plastic chute
- elastic shock cord
- patter & wrap sheet (color)
See any number of other Zooch reviews for commentary on the instructions. They're amusing and reasonably well written with basic illustrations. Many folks find them as much fun to read as the kits are to build.
The SRB tube is a slick looking component. It starts with a simple BT-20 tube that is slit for a metal motor clip. Next, slit a short piece of BT-20 and wrap it around the main BT-20 with the exposed slit over the clip. Next comes forming a couple of shrouds for each end. Finally, for a very cool effect, cut little strips of paper and wrap them around the tube at various spacing. This gives the appearance of ribs. Note that the instructions contain an error here, calling for more strips than necessary, as the text was presumably just cut/pasted from the shuttle kit instructions.
The upper body assembly couldn't be much simpler: cut out the wrap and using a very thin layer of white glue, bond it to the tube. No finishing/painting is needed, but you might want to paint the SRB white before bonding the SRB and upper tube together as making the paper wrap would be problematic.
Stability is accomplished via 4 definitely not scale fins. I suppose for $25, one should not expect active guidance systems. These are a little tricky as they must conform to the taper of the lower shroud.
 To finish up, you
get to choose which tower option you want to go with as there are multiple
versions shown by NASA including two different designs posted on the same week
in November 2005. One version shows a Saturn-like tower and another shows a
simple dowel/shroud style tower. Being a glutton for punishment, I chose the
much more complex tower assembly. This is built using 4 tiny dowels for legs
plus wire cross braces. This is definitely a tweezer job and left me thinking
it might be time to invest in a jewelers loop. Cap the tower base with a small
formed shroud and plant the dowel in the center. This is then glued with CA to
the nose cone.
To finish up, you
get to choose which tower option you want to go with as there are multiple
versions shown by NASA including two different designs posted on the same week
in November 2005. One version shows a Saturn-like tower and another shows a
simple dowel/shroud style tower. Being a glutton for punishment, I chose the
much more complex tower assembly. This is built using 4 tiny dowels for legs
plus wire cross braces. This is definitely a tweezer job and left me thinking
it might be time to invest in a jewelers loop. Cap the tower base with a small
formed shroud and plant the dowel in the center. This is then glued with CA to
the nose cone.
Finishing:
As previously noted, finishing is a snap on this thanks to the preprinted wrap.
The lower SRB and the tower assembly are painted white, and you should do this
before attaching the SRB to the upper tube.
Construction Rating: 4 out of 5
Flight:
For the first flight, I went wimpy with an A8-3. This is a lightweight and low
drag profile and wound up zipping up a bit higher than I expected. The flight
was perfectly straight though and deployment was right at apogee.
I'll have no problems going up to B6-4s but will hold off on C6-3 unless I'm on a large field or flying in calm winds--it will probably make it just about out of sight on a C.
Recovery:
I was a little put off by what I felt was a skimpy 6" plastic chute given
the delicate tower I had labored 2+ hours to build, so I swapped out for a
12" mylar chute instead. As it turns out, the 6" would probably
suffice as I had very slow descent rate on mine. If using the 6" plastic
chute though, I'd go short on the Kevlar®
shroud lines--the supplied material works out to almost 18" shroud line
length.
Flight Rating: 4 out of 5
Summary:
This was a quick and easy build and I was very pleased with how it turned out.
It looks good, flies great, and as with most Zooch kits, it's the only replica
of this rocket available.
There was one slight disappointment though: I've gotten spoiled by my other Zooch kits that fit back in the box they came in for easy transport to the field plus identification (each box has a drawing and label on the outside). For this one, the SRB and upper tube are just a bit longer than the box, so you'll have to stash this one mingled in with the rest of the regular fleet. If only he'd gone with a solid bulkhead transition and the rocket separated in the middle...
Overall Rating: 4 out of 5
 |
 |
Flights
|
|
|
|
Wes Oleszewski- Dr. Zooch Rockets (January 2, 2007)