| Construction Rating: | starstarstar_borderstar_borderstar_border |
| Flight Rating: | starstarstarstar_borderstar_border |
| Overall Rating: | starstarstarstar_borderstar_border |
| Diameter: | 2.22 inches |
| Length: | 28.50 inches |
| Manufacturer: | DynaStar  |
| Skill Level: | 3 |
| Style: | Futuristic/Exotic |
Photo Courtesy of Dynastar 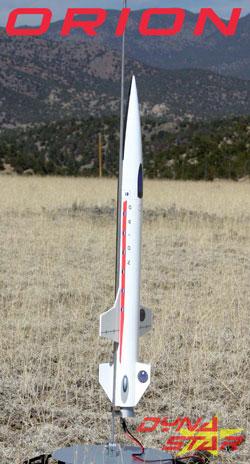
Brief:
This is a single stage futuristic 24mm motor rocket. It uses Estes and Aerotech motors, ranging from C11-3 to F21-8.
Construction:
This kit came with excellent quality parts including:
- 1 BT-70 main body tube
- 1 NC-70 nose cone
- 1 sheet of paper centering rings (BT70-24mm)
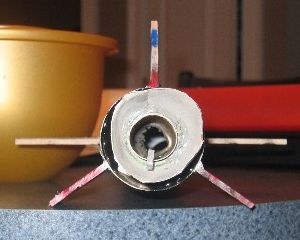
- 1 motor mount tube (24mmx4")
- 1 thrust ring
- 1 centering ring for paper nozzle
- 1 paper nozzle
- 1 32" chute
- 1 Kevlarshock cord
- 1 3"x1/4 launch lug
- 3 rear fins
- 2 wings
This was a simple kit to build, however there was no thrust ring included in my kit. This was no problem--I just made my own. I modified mine with an Estes "E" motor hook for retention as well. This kit uses no (mechanical) motor retention otherwise. The Kevlarshock cord is mounted to the thrust ring with a small groove cut into it with a X-Acto knife. Finally, the centering rings were glued on and set to dry. This kit uses a paper template to mark where the fins go. There are three main fins and two wings. The three fins are one piece each and the wings are two pieces each. I would have preferred having to mount the fins through the wall, but the kit was designed for them to be surface mounted. The nosecone doesn't require anything special, just a piece of tape around it for fit. Finally, I slid the motor mount inside the body tube so that 5/8" of the motor tube stuck out the back. Next, I glued the launch lug under the left wing. The parachute went together easily. It required cutting out, sticking on of tape rings, and shroud line cutting and attachment. The final step was cutting out the paper nozzle and gluing it to the thick centering ring. This slides over the back of the motor mount for a futuristic look.
I give this kit a 2 1/2 because of the missing thrust ring and it could use TTW fins. Also, a longer motor mount and smaller parachute would help a lot.
Finishing:
This rocket was simple to finish. I primed it with Rustoleum and painted it white. I then put Korean flags on the wings (I do Tae Kwon Do) and painted the fins red, white, blue, and black. I used my airbrush to do the flags. Once dry, I put on the decals supplied with the kit.
Construction Rating: 2 out of 5
Flight:
For the Orion's first flight, I chose an E9-4. This is a great motor for the rocket and it boosted to about 900 feet. However, it does not fly straight even if you are precise with fin alignment. Ejection was a little early but the 4 second delay will do. It flew the same way again on its second flight on an E9-4.
Recovery:
Both times the shroud lines stuck to the chute and it never unfolded. The rocket never broke any fins on landing however. An 18" chute would be more than sufficient to do the trick. Save the 32" chute in the kit for something worth that size.
Flight Rating: 3 out of 5
Summary:
This is not a great kit but it is not truly horrible either. It seems kind of mediocre and not well thought out, however, it does look really cool when finished.
Overall Rating: 3 out of 5
Other Reviews
- DynaStar Orion Transport By Nick Esselman (August 23, 2008)
(02/23/08) " This one is like a luxury aircraft, but built for space travel. " So says Dynastar website. The Orion Transport is a neat, futuristic-looking rocket with nice lines and decals to make it stand apart from others. The rocket includes a single white BT-70 (2.2") body tube that is 18" long. This with its 11" long plastic nose cone and cardstock thrust nozzle make up the total ...
- DynaStar Orion Transport By Drake "Doc" Damerau
This low to mid power kit is a space plane with parachute recovery. This kit comes with a polystyrene nose cone that's great for painting. It also has beautiful balsa parts, a nice body tube with no spirals to fill, a paper nozzle and stickers (but they are not decals). I was leery of the stickers at first but they are very thin and look great. The instructions were as detailed and ...
 |
 |
Flights
|
|
|
|
Steve Lindeman (November 22, 2013)
Although I can't say for sure, but a wind tunnel test would probably show, the tail wrap around the engine appears to be what makes this rocket wander on lift-off. My first two flights were a little squirrely as well and mine looked somthing like the photo of Alex's. I then made a new one and made sure it was uniformly rounded and centered and the next flight was almost perfect so my advice is to take time and make sure its well rounded and that sits centered and level. I also totally agree on nixing the 32" plastic 'chute in favor of a 24" nylon one (don't have to chase it a half mile).