| Construction Rating: | starstarstarstarstar_border |
| Flight Rating: | starstarstarstarstar_border |
| Overall Rating: | starstarstarstarstar_border |
| Manufacturer: | Edmonds Aerospace |
Brief:
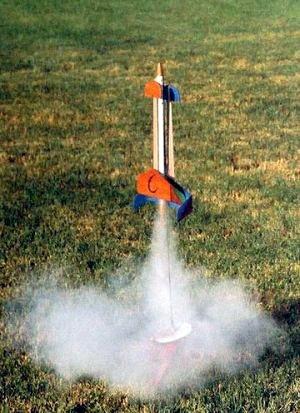
This is a two-stage balsa glider rocket with gap staging. Both stages are
gliders.
Construction:
The kit consists of 3/16 inch balsa, 1/8 inch balsa, balsa nose cone, and 2
body tubes.
I've wanted to build an Edmonds glider since I discovered their web site a couple of years ago. With the CiCi on the EMRR hit list, it was irresistible. Gliders are fun, but two gliders are more fun. Two gliders that are simple to build and fly as booster and sustainer are simply engineering marvels. This is the kind of concept that makes rocketry rewarding.
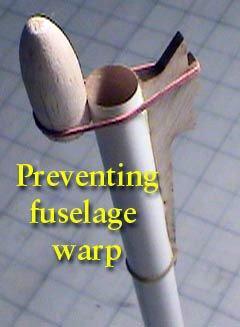
Instructions are simple, reasonably well written, and contain plenty of illustration. Assembly is straightforward. An hour of gluing (with carpenter's glue), let it dry overnight, and it's ready to fly. Both gliders checked out perfect for trim with no adjustments. I didn't even round the edges of the balsa or sand the surface. The laser cut balsa falls away from the waste easily. The body tubes are pre-marked with laser dots for alignment so you don't even have to do the door jamb thing. The vent holes are pre-cut. The dovetail joints give high strength and idiot proof tab to slot assembly. The nose cone shoulder was a little tight but main nose cone diameter was perfect. The balsa was all very good quality, flat, and didn't need to be sanded. None of the parts were broken or squashed in the well packaged box. The portion of the fuselage that is glued to the booster body tube warped as it got wet with glue. I wanted to pull away from the body tube so I rubber banded both ends in place until dry.
 Gotchas:
- There are proofing and consistency errors in the instructions.
- There are also some omissions, such as the type of tape (masking) to use for the sustainer bulkhead, the width the tape should be, and how to test and fix glider trim.
- There is no mention of the fact that the sustainer engine ejects.
- With gap staging, it's critical to scrape the oxidation from the propellant adjacent to the nozzle in order to get sustainer ignition, and there's no mention of this.
- The nose cone shoulder partially obscures the sustainer vent holes and there's no mention in the instructions whether this is as designed or if the shoulder should be shortened.
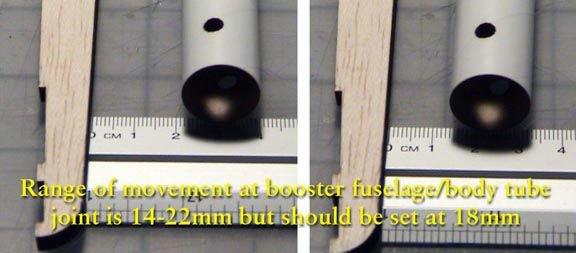
- The biggest gotcha in construction is the fit of the booster body tube/fuselage assembly on the main booster fuselage. There's some play in the joint which results in a range of 14-22 mm of space at the aft end. I assumed it was supposed to be the same distance the entire length of the fuselage and set it at 18mm.
Finishing:
This sample was finished with two-tone marker to minimize weight. There are no
decals.
Construction Rating: 4 out of 5
Flight:
Prep is easy in that there is no wadding or parachute and the engines don't
even have to be friction fitted. However, attention to detail is required for
taping the bulkhead and making sure everything fits. The booster engine is
taped externally to the body tube with no engine block so it stays in the
booster during glide. The sustainer engine is held in place only with thrust
after the booster falls away and tape wrapped around the outside functions as a
bulkhead for the booster. It's all held together by gravity on the pad. The
sustainer engine ejects at apogee.
Gotchas:
- I prepped for the first launch with 1/2 inch tape which is a standard size for external bulkheads on smaller engines. According to the description in the instructions on gap staging though, the half inch tape won't work because the vent holes are covered up internally by the engine and would block the escape of gases causing staging separation before ignition of the sustainer. So I removed the 1/2 inch tape and replaced it with 1 inch wide tape, which worked perfectly.
- The instructions don't specify how far the booster engine is supposed to protrude, so you have to "guesstimate" using the photos. I left it protruding 1/2 inch or so, which was fine.
Recovery:
First launch was with a B6-0 booster and A8-3 sustainer. Liftoff quickness was
average for a B6-0 with high stability, no spin, and perfect straight-up
trajectory. Sustainer ignition was slightly delayed compared to taped engine
staging, but not noticeable unless you're looking for it... It took perhaps
half a second. The sustainer had a slow, heart stopping arc into a nearly
straight down trajectory before ejection at 200-300 feet, then settled into a
satisfyingly long glide in a wide circle. The booster glided down nicely a few
feet from the pad. No damage at all.
The slow arc of the sustainer leads to my recommendation to never use a C6-5 (not a recommended engine anyway), and it's a good idea to try the 1/2A6-2 for the first flight, which is one of the recommended engines for good reason. I think maybe they should have named this one the CiBee.
Flight Rating: 4 out of 5
Summary:
This is a great rocket and an irresistible concept. If you've built a glider
before, enjoyed flying it, and want another, this is a "must have"
for your fleet. While there are some omissions in the instructions, it is very
easy to build and delivers spectacular flights.
Overall Rating: 4 out of 5
 |
 |
Flights
|
|
|
|
D.B. (February 18, 2007)