Estes Cosmic Interceptor
By Manny Trotta
2013-12-19
| Manufacturer: | Estes  | |
| Diameter: | 2.0000 inches | |
| Length: | 40.5000 inches | |
| Skill Level: | 4 | |
| Style: | Futuristic/Exotic |
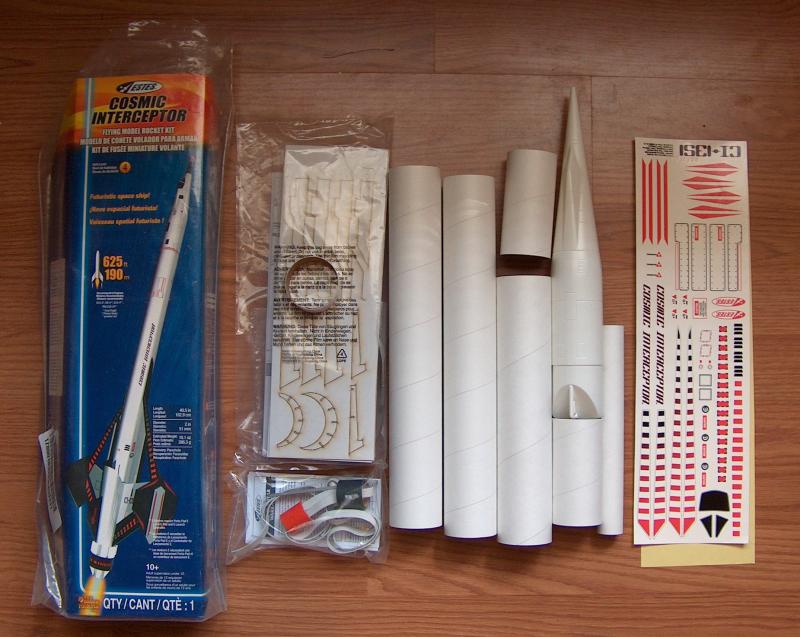
This project is a build of the Estes Cosmic Interceptor, a skill level 4 rocket with a futuristic design. The Cosmic Interceptor will fly up to 625 feet and uses D and E motors. The kit features a large amount of laser cut wood and other card stock parts, a nice sheet of waterslide decals and a large 18" fabric parachute. An impressive looking kit.


This is the tail/motor mount section.

I primed the tail section and per the assembly instructions recommendation, I left off the body tube ring for now. Since the tail section will be white and the ring black, it will be easier to finish and paint the tail components before joining them.

Just starting to seperate all of the fin parts

Assembling the wings. Once the parts were glued together and allowed to dry I applied epoxy to all of the joints. I then gave the wings a rough sanding and have covered their entire surface with a watered down Elmers Carpenter's Wood Filler.

The next step I decided to do is the main body tube assemply. It consists of 2 tubes and a coupler.

After sanding the coupler enough to fit into both tubes I glued them together.

I really want the whole rocket to look like one piece when it is completed so I decided to finish the body tube before attaching the wings. This way I can fill and sand the tubes without anything being in the way. I covered the spirals and the tube joint with a mix of Elmers wood filler and water.

I am using 180 grit sand paper on the tubes between filler coats. After 3 coats the tubes will be ready for the wings to be attached.

Main Body tube marked and lines extended using angle iron

Trying out my new guillotine fin jig on this rocket. The fins don't really fit in the jig because of the way they are shaped but it still helped me align them.

Here is another view of the Cosmic Interceptor in the jig.

Masking the fins and body tube for the application of epoxy fin fillets.

Here is a shot of the fillet. I used 60 minute Epoxy

The horizontal tail fins connect the body tube and vertical fins. In order to get the correct angle on the body tube side I wrapped a piece of sandpaper around the body tube and used that as my sanding block.

Here is one of the fins with a view of the sanded angle.

Sanded and test fit until both the right and left horizontal fins lay level.

At this point the fins looked good so I am ready to glue them into place.

I have the side fins attached as well as the outer part of the intake. The side fins are a little tricky to align and I think I would have done a better job if I had used some type of jig. They both seem to be pointing a few degrees in towards the nose but it's only slightly and they will have to do. The inner part of the intake is assembled, sitting behind the rocket, I'll install that after the rocket is painted.

I have all of the parts sprayed with primer and ready to be painted. For the last round of sanding before the paint I used 1200 grit. The nose cone has some etching so I will try not to over spray it and lose all that detail. I sprayed the intake fin unit black already but I am not going to attach it until the main part of the rocket is painted. The body tube ring that mounts on the engine mount will also get painted black before I attach it.

Here is a top view of the body showing the intake...

Here is the bottom. I also epoxyed all the joints so this is becoming a slightly heavy build but I like the way fillets look.

After looking closely at the body I decided on another coat of filler primer. Once I get this sanded down again I should be good to go with the paint.


Finally got a coat of Rustoleum gloss on the rocket today.


It was a little tough getting the spray into those little square openings so I will need to do some touch-up work


I decided to paint the motor mount before I attach it to the rocket.

For the nose cone I felt the Rustoleum right out of the spray can would go on too thick so I went and picked up an 8 ounce can of Rustoleum gloss white paint, the brush on type. Using mineral spirits I thined a small amount down to the point where I could spray it using my airbrush. It really went on great. I have one self inflicted issue on the far side that will need to be fixed but I was able to get a nice gloss coat applied and retain all the detail.

Trying to paint the black detail on the nose cone is something that I just cannot do so I gave up on that idea. To work around my lack of expertise in the painting area I used contact paper. The first step was to make patterns of the areas I wanted to cover. To do this I used tracing paper and a pencil to lift the detail.

Once I had a pattern I stuck this to the back of a piece of contact paper that I had sprayed gloss black. I used a small shot of adhesive spray to stick the pattern to the contact paper.

I had to cut each piece a couple of times in order to get the right fit but the contact paper goes on and can be lifted and moved easily.

Here is a pic showing a few of the black pieces in place. Much better than I did when I had tried to paint the areas.

I used Frogtape to mask around the areas to be painted black.

A little more black.

Here is the top of the left wing. I used frog tape to mask off the white, the stuff works really well. Masking this off was a little tricky so I decided to do one wing at a time. The black paint is mineral spirit thinned Rustoleum sprayed through an airbrush. Once this dries I will start on the right side wing.

Left wing bottom view.

Left wing where it meets the body tube.

Paint is done. The intake and engine mount have been attached. I just need to apply the decals now!


Applying the decals
I just realized that on the side fins I mounted the side panels on the forward end when they should have been mounted to the rear. I just noticed it now after all this time. I wonder how this will affect flight if at all. Anyone catch this earlier? The appearance actually dosen't bother me, I kind of think it looks good but for all my measuring and planning it does annoy me that I still get things wrong.

Test fitting the long fin decals I really didn't like the way the ends lined up at the side fin and thought they might look a little better if the angle was a little different.

With each of the side decals held in place with a small bit of painters tape I draw a line on each decal parallel to the side fin.

After trimming the edges, the ends of the decals are more in line with the side wing.

Here is one fin with the decals on.

Here is how the both fins look with the decals on. I think I could have gotten them a little closer to the side fins but the camera also seems to be exaggerating the distance and they don't look as far away as they appear in the picture below. You can also see the motor mount decal which is the first one I put on. I started at the bottom just because it seems easier to hold and move the rocket around as I am working on it via the body tube and I wanted to keep that section free of the decals for the time being.

This is just about finished. There are a couple more small decals I am not sure if I am using or not but here is how it looks


Without the parachute and shock cord it weights 10.25 oz. The approx. weight per the specs. is 10.1 so its pretty close even with all the finishing materials. I still want to clear coat so i'll have to check the weight again after that. I am planning on future floor polish over the entire thing with the airbrush but I am still not sure.

Sponsored Ads


 - 47776017535")


 Orange, 30 inches")
, 12.3 in. (31.1 cm)")


 |
 |