| Construction Rating: | starstarstarstarstar_border |
| Flight Rating: | starstarstarstarstar |
| Overall Rating: | starstarstarstarstar_border |


Brief:
OOP, 13mm, parachute recovery, Skill Level 1 4FNC.
A while back, I found an advertisement for an Estes Aerospace Club Viper kit on eBay. Not knowing anything about it except that I did not have one, I put in a token bid. Nobody else did so I got it.
It arrived and seemed to be intact. In looking over the instructions, I learned that originally the purchaser would be sent the decals when Estes received the EAC paperwork. Somehow, I didn't think that would work anymore.
Checking online, I found that the decals were available from Excelsior Rocketry. Having had good luck with them before, I ordered them.
Construction:
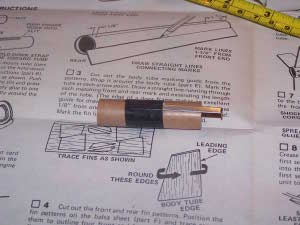
The kit came with a body tube, a motor tube, an engine hook, a thrust ring, an engine hook sleeve, a launch lug, a
sheet of balsa, an EAC Viper parachute kit, a plastic nose cone, a pair of centering rings and the instruction sheet.
As I mentioned before, I had to get the decals from Excelsior.
Construction begins with the motor mount. A slit was placed for the engine hook and the thrust ring was glued in place just ahead of it. The hook was then put in place and a black sleeve was slipped over it and glued into place.
I decided right from the start to forgo the Estes tri-fold in favor of a Kevlar® thread tied to the motor mount. With that in mind, I cut a small slit in the forward centering ring so I could pass the Kevlar® through and then glued the rings in place on the mount. After filleting the centering rings, I tied off a length of Kevlar® around the motor tube just aft of the forward centering ring and laid on another glue fillet to keep it in place.
A nice thing about this kit is something you don't often see in Estes kits anymore, especially Level 1 kits. You were provided with a template and expected to cut your own balsa. I used to hate doing this as a kid because I knew I would mess it up. It took me a while to get used to it as a BAR too for the same reason, but now I enjoy doing it occasionally as long as the profile is not too outlandish.
I cut the template out of the instructions for the forward and the aft fins and then traced their outlines on the balsa. I used a #11 blade to cut them out and am somewhat surprised, 2 weeks later as I write this, that my wife has still not noticed the little nicks in the tablecloth. I'll have to remember to rotate it around to the kids' position after they all go to bed.
The instructions came with a wraparound fin marking guide. I cut it out, wrapped it around the body tube, transferred the lines, and then ran them the length of the BT with the door jamb keeping me honest.
I also sanded the leading and trailing edges of the fins round. For some reason I do not remember, I did not do the outer edges.
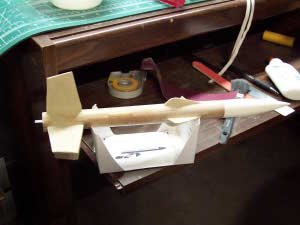
Then came the time to glue the fins one. I used yellow glue and mounted the rear fins first. When they were stiff enough to move on, I mounted the forward ones. All fins were then filleted with yellow glue.
The motor mount was slipped in from the rear and glued into place and filleted, making sure that the Kevlar® was passed through the notch I had cut. The launch lug was then glued into place with CA and the rocket was ready for finishing.
Finishing:
I painted the fins with Elmer's sealer and they had more than 2 weeks to set up before I could get to them again.
When I did get to it again, I spent some time sanding down the wood filler. I decided that I did not mind the spirals
all that much and left them alone.
After brushing the rocket off, I set it up in my booth and primed it with Kilz. After about an hour, I wandered over and gave it another shot of Kilz to touch up a few bare places.
I left the rocket to dry overnight and then sanded it down. The real painting began with 2 coats of gloss white.
The instructions say to match the colors (besides white) on the rocket to the color of the decals. This boils down to an orange-ish yellow and a pinkish purple. I tried numerous home improvement venues but was never able to find a good match. I finally tried the local hobby shop and found a couple that were pretty close. I knew I would find it there but I balked at paying the prices demanded for those itty-bitty cans. Sometimes though, you do what ya gotta do.
The yellow paint I used was called Smoothster Yellow from Boyd. I masked off everything except the forward fins and the tips of the rear fins and then painted.
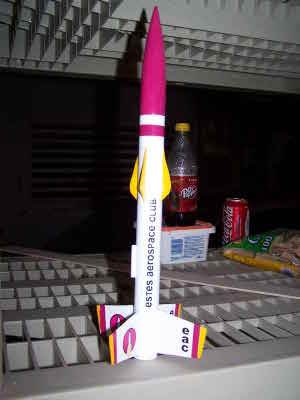 The
"purple" paint was from Model Masters and was called "Panther Pink". It was a very close match to
the decals from Excelsior. I masked off for the purple and sprayed. A few hours later, I gave another coat.
The
"purple" paint was from Model Masters and was called "Panther Pink". It was a very close match to
the decals from Excelsior. I masked off for the purple and sprayed. A few hours later, I gave another coat.
After drying, it was time to apply the decals. As I mentioned in the beginning, I got the decals from Excelsior Rocketry. I got plenty for my money in several respects. There were more decals than indicated in the instructions. There were spares of the designs I actually used, just in case I messed up, and they were all of high quality. In the end, I mostly went with the scheme indicated in the instructions but I did add 2 additional "Estes Aerospace Club" decals on the sides of the BT. I was well satisfied with the result.
Construction Rating: 4 out of 5
Flight:
I have to admit I was blown away by the performance of this rocket. I expected it to be fine but I did not expect
wonderful. Wonderful is what I got.
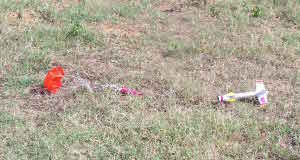
For the maiden flight, I loaded a 1/2A3-2T. It took off straight, deployed at apogee, and drifted down on the 9" chute I had installed. It was ready to go again.
The second flight was on an A3-4T. It again performed flawlessly and went much higher than I had imagined. It looked good coming down too.
The final flight of the day was on an A10-3T. I used that motor because it was one of the recommended ones, but I usually prefer a lower average impulse. On this rocket, it was the best of a very good lot. Straight and true, perfect in every respect---except the walking.
Recovery:
I replaced the 12" plastic chute with a 9" nylon one. The nylon worked just fine.
Flight Rating: 5 out of 5
Summary:
This was a nice kit. It looks better than your average skill level one and performs wonderfully. It's success with
kits like this that could get kids hooked.
Overall Rating: 4 out of 5
 |
 |
Flights
|
|