Modification Exoskell Extreme Modification
Modification - Exoskell Extreme {Modification}
Contributed by Stefan Jones
| Manufacturer: | Modification |
Brief: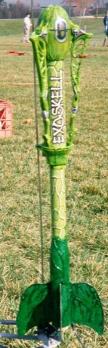
Estes Exoskell modified for 24mm motor power.
Modifications:
I usually don't go for Estes "novelty" kits, but when I saw an "Exoskell" on clearance for a few dollars, I snapped it up. I figured I could do something unusual with it, such as turning it into a cluster kit, or enhancing the pre-printed decor with more slimy details. Several months later, I had a go at it.
I started building the kit "stock." Although there were a few tricky bits, such as putting the pre-printed wrap around the body tube and mounting the spring-loaded fins, it went together fairly easily.
I also followed the instructions for washing the green plastic parts with black acrylic, in order to produce a model that looked like the one on the box. I experimented with adding a bit of Future floor polish to the black paint, with mixed results. It was at this point that I got impatient and did something stupid. I placed the wet pieces in my convection oven, and set it to "air defrost," in the belief that the circulation would quickly dry off the runny polish / paint mix.
Well! There turns out to be some heat involved in the defrost cycle. I noticed the problem almost immediately, but the "fin can" and one of the fins was badly warped. Yargh! I tried straightening the semi-melted pieces to no avail.
That's where I got creative! The Exoskells I've seen fly were all poor performers. The recommended C5-3 motor sort of "lobbed" it into the sky. It did not fly very high and tended to eject on the way down. Bleah! What this model needed was D power!
I found, in my spare parts box, a plastic BT-55 to BT-50 transition section and a 6" piece of BT-55 tubing. I also had on hand an Estes "D & E Engine mount kit." This kit has parts to mount D12 and the now-discontinued E15 motor in a variety of body tubes. I decided to modify the mount to allow use of the new E9-4 motor. I did this by snipping off the front tab off of the metal engine hook, and placing a thrust ring 3.5" into the mount tube. (The E9 motors are 3.75" long.) The engine hook was held in place by a fiber sleeve included in the motor mount kit.
I glued the mount into the BT-55 tube, and attached this "power pod" to the Exoskell's lower body tube using the transition section.
I used 1/16" basswood for the fins, which were scaled-up versions of the originals. To create a fin template, I placed one of the Exoskell's surviving plastic fins on my computer's scanner, scanned an image, and blew it up by 50% in both directions. I figured this would provide plenty of extra fin area (an extra 125%) to make up for the heavier motor and mount. I printed out the image, sketched in a tab along the root edge, and used the template to create four fins. I mounted these "through the wall" style for extra strength.
Construction:
Replacement materials:
- Plastic transition, BT-50 to BT-55
- Estes D/E Engine mount kit, modified
- 6" of BT-55 body tube
- 1/16" basswood
- "microballoons" filler.
The result of my modifications was pretty cool. I called it the "Exoskell Extreme."
Finishing:
The "stock" Exoskell doesn't require any real finishing. As mentioned above, I did take the time to give the original plastic parts a black wash. I also added the suggested silver highlights, and added my own details (a dark blue wash and darkened eyes) to the little plastic alien that is suspended in the recovery capsule.
This left the task of detailing the fins and power pod. The original fins had ribs and ripples that suggested a biological origin. I did my best to duplicate this by creating a network of "veins" that ran over the surface of my new parts. I used a mixture of yellow glue and "microballoons" to create a thin putty. I dribbled this over the surface using a BBQ skewer. Since the yellow glue wouldn't stick to the plastic transition, I used tube-style plastic cement as the base for the putty I used on its surface.
The ribs came out looking pretty good. I was less successful with my paint job. I could not find spray paint to match the light-gloss-olive-green color of the body wrap, or even the candy-green color of the plastic parts. I might have resorted to using brush-on enamels, but a launch day was approaching. As you can see in the picture, there's a definite color mismatch between my parts and the originals!
Flight:
I flew the Exoskell at the LUNAR field in Livermore. The maiden flight was on a D12-3. It flew great! The model flew straight up at moderate speed and ejected near apogee.
The main body's parachute only partially deployed. Fortunately, everything held together just fine and there was no damage. The alien recovery pod drifted down on its fairly-large chute for a soft, spring-loaded landing. I find it hard to pack the two parachutes in the Exoskell's rather small recovery compartment.
I flew the model again with a D12-3, this time getting a perfect recovery. Then I went for broke and popped in an E9-4 motor. The model flew noticeably higher on this fine motor; however, because the "main event" of the Exoskell's flight is the interesting two-part recovery, I think it would be fine to stick with the D12-3.
Summary:
Despite the rushed paint job, I was really happy with my efforts on the Exoskell Extreme. It got great comments on the flight check-in line, and flew perfectly. I've moved since building and flying my "Exoskell Extreme". I gave the model away to a former coworker whose two sons were just starting to get into rocketry. I'm sure they'll enjoy it . . . it's a real eye-opening model both on the ground and in the air.
In one of those "it was meant to be" situations, I found ANOTHER marked-down Exoskell the first week after moving into my new home. This battered kit lacked directions and the body wrap. I intend to build another Exoskell Extreme, this time adding putty "veins" to the entire body tube surface and painting everything a uniform color.
Hmmmm. I wonder if there's room for a strobe light in the alien's recovery pod . . .
Related Products
 |
 |