| Construction Rating: | starstarstarstar_borderstar_border |
| Flight Rating: | starstarstarstarstar |
| Overall Rating: | starstarstarstarstar_border |
| Diameter: | 1.64 inches |
| Length: | 25.00 inches |
| Manufacturer: | Estes  |
Brief:
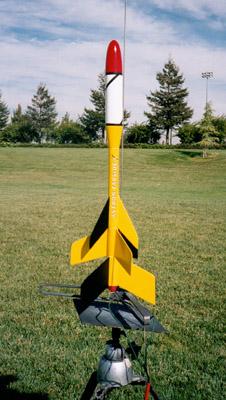
The first model rocketry catalog I ever saw -- Estes' 1970 edition -- was chock-full of models that are today considered classics. For the last few years I've been recreating some of these golden oldies. One of the first recreations I started back in '98, but that I didn't finish until this summer, was the Farside-X. The Farside was Estes's first three-stage model. It came in two versions: The plain old Farside, with a BT-50 sized payload section, and the Farside-X, which had a big BT-60 payload section. I obtained the plans for the Farside-X from the "JimZ" plan site: http://www.dars.org/jimz/k-12x.htm
Construction:
 The Farside-X uses standard Estes components: Three lengths of BT-50 body tube, three BT-20 motor mount tubes, and a BT-60 payload tube. I ordered the tubes from Rogue Aerospace and cut them to size using this handy chart: http://www.ninfinger.org/~sven/rockets/body_tubes.html
I also purchased the motor mount parts -- couplers and centering rings -- from Rogue Aerospace. I obtained the balsa reducer and nose cone from Balsa Machining Service. The cone is a special-order item, the BT-60L. I decided to use 1/16" basswood fins, for extra strength and ease of finishing. I used an antique 12" Estes red & yellow parachute in my Farside. The retro logo fit the project. The shock cord was a 36" length of 1/8" sewing elastic. I used barrel swivels and snap swivels to eliminate "shock cord wind up."
The Farside-X looks like a relatively simple model at first glance, but besides there being a lot of everything (nine fins, three motor mounts, etc.) there are some hidden complexities that make it a bit of a challenge to build. It has canted fins, causing the model to spin in flight, thus adding a bit of stability. The motor mount design must be followed exactly to allow the three motors to butt together. I found the Farside plans were fairly clear and easy to follow, but might be a bit "dense" for younger modelers used to E2X construction and die-cut fins. As with all recreation projects, building the Farside required a lot of hand-cutting body tubes and fins. There's a good section on these techniques in the old Estes Model Rocketry Manual: http://www.ninfinger.org/~sven/rockets/nostalgia/estesmrm.html
I had to "wing it" when building the motor mounts. Like a lot of older kits, the motor mount used thin centering rings glued on the ends of a length of tube coupler. Since the thin-stock TA-2050 centering rings were not available, I used slightly thicker fiber rings provided by Rogue Aerospace. In order to preserve the length of the I cut the couplers a bit short so that the ring/coupler assemblies would be the same length as the original kit. I mistakenly glued the launch lug and standoff to the third stage rather than the second stage. This didn't have a big effect on either looks and performance, so I wasn't too upset!
Finishing:
I decided to base my paint job on the one shown in the 1971 Estes catalog: http://www.ninfinger.org/~sven/rockets/catalogs/estes711/711est32.html
I didn't end up with an exact match, but I liked my compromise: Yellow overall, with a black fin on each stage, a red nose cone, and a white payload section with black trim tape. I purchased a recreation decal from JimZ. I like to give my recreated kits "catalog perfect" finishes. Because the Farside has so many fins this means a LOT of filling and sanding. In fact, there was so much finishing work involved that after I applied its first primer coat, the Farside-X sat in a box for two years! I finally got around to the final finishing in the Summer of 2001. The painting and masking were a real chore, but I think things came out pretty good!
Construction Rating: 3 out of 5
Flight:
The plans list LOTS of recommended motors, including many, such as the A8-0 and 1/2A6-0, that simply aren't around any more. Fortunately, it will fly on the available booster and sustainer motors. I've flown the Farside-X once, using a bunch of vintage motors: A B14-0 in the first stage, a 1/2A6-0 in the second stage, and a A8-5 in the upper stage. An odd combination, but I wanted to both have a stable flight (the B14 gets a model up to speed really quickly!) and to come back!
Prepping the Farside isn't easy. The motors are taped together with cellophane tape, and to the end of each stage's motor mount with masking tape. This isn't easy! Per the instructions, I inserted a 2 oz. payload -- some cubes of modelling clay -- into the Farside's payload section prior to flight. I must have done things right, because the Farside-X flew perfectly! The first two stages burned quickly and got the model up to speed. Staging was smooth, and didn't result in any course changes. By the time the A8-5 burned out, the top stage was REALLY moving. The spin-fins did their thing too; it was plain that the model was spinning like a top. I was very pleased and surprised by the model's performance on this combination of motors. I'm going to have to find a bigger field if I move up to anything using C motors!
Recovery:
Ejection took place near apogee, and the parachute deployed nicely. I had to walk a bit to retrieve the model, but only because it flew so high!
Flight Rating: 5 out of 5
Summary:
The Farside was a challenge to build and finish, but I'm very proud of the results. It looks great and the one flight to date was a real thrill.
Overall Rating: 4 out of 5
 |
 |
Flights
|
|