| Manufacturer: | Scratch |
Brief:
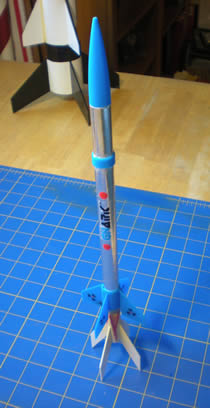
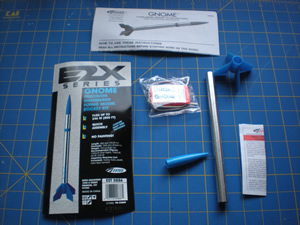
This is a Stage Bash that was used as an entry for the 2009 EMRR Challenge. This 2-Stage rocket was created from an
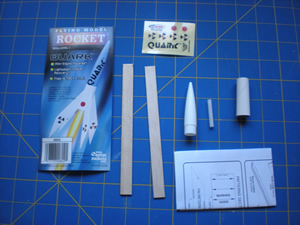
Estes Gnome kit and Estes Quark kit.
Construction:
The following parts from the two kits were used:
- 1 Gnome plastic fin and launch lug set
- 1 plastic nose cone from Gnome
- 1 elastic shock cord from Gnome
- 1 streamer from Gnome
- 1 body tube from Gnome
- 4 balsa fins cut from Quark fin stock
- 1 body tube from Quark
- 2 engine blocks cut from spent 13mm casing
The following parts were not used from the kits:
- 1 Engiine hook from Gnome
- 1 plastic nose cone from Quark
- 1 launch lug from Quark
This was a very staightforward 2-stage kit bash. I lead the rocketry club at Sonoran Science Academy for 3rd, 4th and 5th graders and wanted something that was an easy, simple demonstration of "bashing" two simple-to-build kits together.
Everything for the bash was included in the two kits plus two engine blocks cut from a spent 13mm motor casing.
Left over were the engine hook from the Gnome kit and the nose cone and launch lug from the Quark kit. Everything
else was used.
First, the two blocks were cut from the casing with a razor knife and miter box. Then, the ends were sealed with thin CA to prevent unraveling.
Next, the Gnome kit was built as per the original instructions, except the motor hook was left out and the engine block was used instead.
The Quark's body tube was marked for 4 fins with an Estes fin marking tool. The 4 fins were cut out using the
Quark's pattern. They were stacked and sanded together.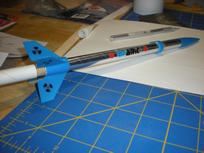
The second engine block was glued flush with the bottom of the Quark's tube. When this was dry, the 4 fins were set in place and later fillets were added.
Finishing:
The upper stage Gnome did not require finishing other than applying the decals. We cut the "GN" from the
Gnome decal and the "ARK" from the Quark decal and the used them together to spell "GNARK". We
added the little red Japanese suns to either side of the name decal. The other decals were applied to the sustainer
fins.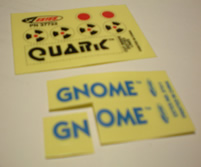
The booster stage made from the Quark was sanded and primed with 2 coats of gray primer. Per my son's suggestion, I painted the booster yellow to look like fire coming out of the Gnome sustainer.
We did change the paint scheme after this first day, though. Because, as winter is coming on, the grass on the
field was somewhat yellowed in color. This made it more difficult to find the yellow colored booster once it landed.
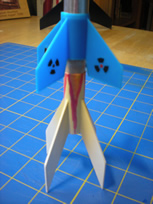
After we got home from the first launch, we painted some red "flames" on the body tube with a brush and sprayed gloss white on the booster's fins, feathered toward the tube. this will make it much easier to spot both in the air and on the ground next time we launch it.
Flight:
Recommended Motors: Booster: A10-0T Sustainer: 1/2A3-4T
The motors are taped together with celophane tape as typical with many small multi-stage rockets.
Masking tape is used as necessary around the motors to give them a tight enough fit for retention in the individual stages.
One piece of Estes wadding was used in the upper "Gnome" portion of the rocket.
This kit bashed rocket flew extremely well with this motor combination. It was a very straight-up flight with
excellent separation and ignition of the upper stage. One neat thing about this setup is the power of the A10-0T
booster motor in relation to the rockets small size. The ignition and separation of the 2nd stage take place very high
in the flight.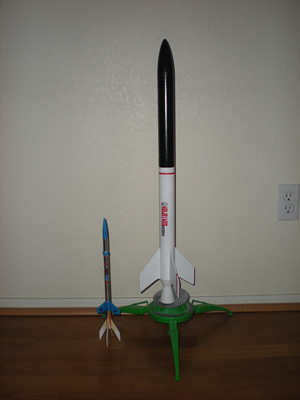
We use this same booster motor in a Semroc Booster-16 with the Semroc Centurion, which is a much larger rocket. Notice the size difference in the pictures. With the Centurion, the separation happens very early in the 2-stage flight because of its much greater size and weight.
The streamer included with the Gnome kit was used and it worked quite well. It was somewhat short, but very easy to see coming down and slowed the sustainer enough to prevent any damage.
Both the booster and sustainer were recovered after each of the three 2-stage tests flights in perfect condition. We also flew an additional single stage flight that went just as well.
Recovery:
As it was a kit bash I used the stock eleastic cord and streamer which proved to be just right. It goes so high that
a streamer works just fine. It also flies so straight that, when there was no wind, it almost dropped right on top of
the pad. Perfect recoveries and no damage whatsoever.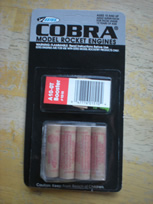
Summary:
Overall, this makes a great little 2-stage rocket. the biggest problem I see is getting your hands on Zero second
delay 13mm motors like the Estes A10-0T motors we used.
PROS: Inexpensive 2-stage rocket. Flies great, high and straight. Has an interesting higher-than-most second stage separation event.
CONS: Difficult to find the A10-OT motors. Other than that, nothing.
 |
 |
Flights
|
|