| Construction Rating: | starstarstarstarstar_border |
| Flight Rating: | starstarstarstarstar_border |
| Overall Rating: | starstarstarstarstar_border |
| Diameter: | 3.00 inches |
| Length: | 19.00 inches |
| Manufacturer: | Estes  |
| Skill Level: | 2 |
| Style: | Sport |
In keeping with my likes of "stubby" rockets, I decided to build three more that were around three inches in diameter to compliment my 2.6" and my 4" collection. So, I set off to get a LOC Onyx, a RocketVision Grymm, and the Estes Big Daddy. See my 3" Stubby Rocket Comparison Page
The Estes Big Daddy qualifies as a "stubby" rocket because it is 19" long and has a 3" diameter giving it a less than 10:1 ratio (6.3 to be exact).
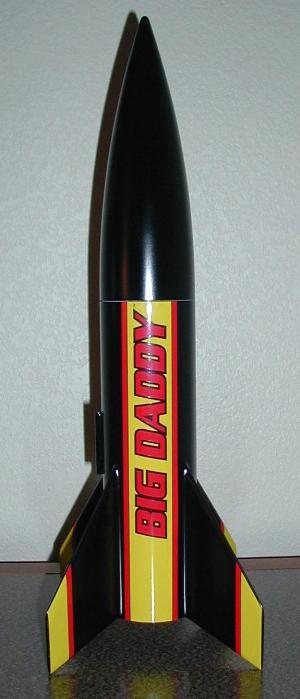 The Big Daddy could be the next step in the Fat Boy family, however, they are very different, especially the longer nose cone.
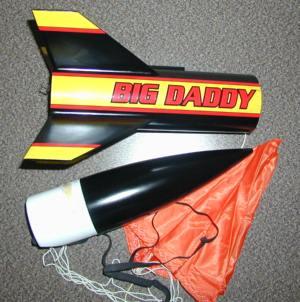
The Big Daddy includes a 10" long paper glassine coated airframe. It is pre-slotted for the four fins. The plastic nose cone makes up the remaining length. There are four (4) 1/8" thick balsa fins that are die-cut. There are also two (2) 1/16" thick paper centering rings (die-cut). The motor mount is 24mm and 4" in length (2 5/8" is where the motor block is). It includes a standard Estes motor hook. The recovery system consists of a standard 24" plastic parachute and 36" of 1/4" wide elastic. There is an 1/8" launch lug and some decals to complete the kit.
CONSTRUCTION:
The instructions for the Big Daddy were consistent with the clear step-by-step method that we expect from Estes. No surprises and the illustrations were clear to allow an easy build.
I deviated from the instructions with the recovery system. They gave 36" of shock cord which isn't too bad in light of Estes norm, however, I feel is was still too short and didn't like the attachment method either. I added a 2' piece of 1/8" Kevlar which I tied around the motor mount and through a hole I made in the upper centering ring. I then tied the provided elastic shock cord to that. The directions did deviate from Estes' normal 3-fold method and instructed you to attach it to the upper centering ring which is a nice change, however, I don't like elastic so close and unprotected to the motor mount and ejection path. So by adding the Kevlar I'm sure to extend the life of that attachment and I extend the length of the shock cord at the same time.
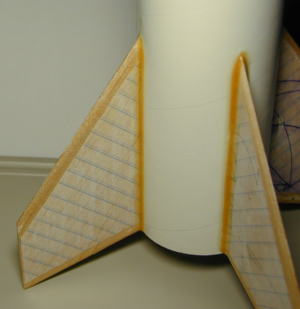 Another technique I tried while building this rocket was on the balsa fins. I tried gluing paper to them, like a laminate, to give them strength and ease the finishing job. The first was accomplished but it did not ease my finishing job. As you can see I used a thin notebook paper. First I put CA all over the fin and spread it out thin, then applied the notebook paper and then CA'd over the top of the paper. On a couple of the fins the paper seems to bubble which left a problem for finishing. I feel this was due to the thickness of the paper and next time I will use tissue paper. The thickness also made the edge more prominent and it actually had to be filled and hit with several coats of primer to finally get it smooth.
You may also notice in the picture the color of the fin fillet. I used a ProBond glue for the initial fillet and then filled over the top with epoxy. I have used this technique several times and really like it.
For finishing, I didn't use anything to fill the spirals and just started in with several coats of Plasti-Kote Sandable Primer. After many coats on the fins, I finally was able to hide the paper edge and fill in the paper "bubbles" to a "as good as it gets" finish. I then moved on to the painting. The instructions are clear in how to paint the rocket and the nose cone technique is well described. I chose not to paint the nose cone tip and simply painted the entire rocket gloss black using Walmart's paint.
 After the paint dried I applied the peel-n-stick decals. They applied nicely and look great on the black rocket.
Overall, for CONSTRUCTION I would rate this kit 4 points. Instructions are good, components are of good quality and the through-the-wall fins make this a nice building kit. The main detraction is the recovery system.
FLIGHT/RECOVERY:
Download RockSim file here! This file is set up with a modified nose cone weight and a mass object that are used to set the weight equal to my finished rocket (7 ounces) and adjust the CG to 12.5" without motor.
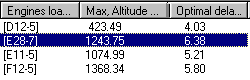
Winter had fallen upon us and it didn't look good to get this bird in the air, however, we planned a vacation to Arizona and it just so happened that there was a launch on 12/23/00. So I packed this rocket and 3 others into a box and shipped them to Arizona. I had to rely on the vendor at the launch for motors and since it was a Tripoli High Power launch, there was not much selection for 24mm motors. I was able to purchase a three-pack of E28-7's which allowed me to fly the Big Daddy™.
 I prepped it using a Heat Shield and had swapped out the plastic parachute with an 18" nylon one.
With a picturesque view of mountains in the back and a beautiful Arizonia day, I put the Big Daddy™ up for her maiden voyage. The E28 popped it off the pad and it was straight and stable. It was still traveling up when the ejection charge went off but deployed fine. Descent rate was good and there was no damage upon impact. All-in-all a nice flight.
For FLIGHT/RECOVERY, I would rate this kit 4½ points. This is only based off of one flight, however, as I am not the first one writing a review on the Big Daddy™ and by looking at the flight logs I think everyone would agree that this is a good flier. Others have also changed the recovery system. I will fly it again in the spring.
Overall, the Big Daddy is another very nice "stubby" rocket. After the enhancement of the recovery system and strengthening the fins, I expect to get a lot of flights out of this one. Estes only recommends their D12 motor, however, this one is begging for Apogee (E6's) and Aerotech D-F motors. The only problem for the Apogee motor is the length so use caution with your center of gravity. I give the kit an OVERALL rating of 4½ points.
Other Reviews
- Estes Big Daddy By Dave Brunsting (January 28, 2007)
This project was an upgrade of the typical Big Daddy to a 29mm mount with fiberglass reinforcement to the fins and lots of nose weight with a funky flame job. Modifications: This is an old style Big Daddy I ran across for $15 which sure beats the heck out of the regular retail price of ~$30 or whatever it is. So first up is the MMT. I used 30 minute epoxy because that’s what I ...
- Estes Big Daddy By Jim Stuckman
19" LG X 3" Dia 24" Parachute 24mm Motor Mount - D12-3 & 5 recommended This is a great sport flyer that builds very quickly. If you upgrade the parachute to a quality nylon chute you have a very versatile companion for your Aerotech 24mm RMS! 4 My kit is a pre-release beta kit so it did not come in the standard Estes packaging - just a basic plastic bag. All parts were present ...
- Estes Big Daddy By Jon Revelle
Short, stubby, and fun rocket. Flies on Estes D engines. Unfortunately I think it was just discontinued because it was not in Estes' 2005 Catalog. The rocket made its debut in the mid 1990s. At the time, kits were being made with a 4/6 sided box with a bag. This one was no exception. It had: 1 Nose Cone 1 Fat body tube 1 24mm Motor tube 1 Sheet of balsa 2 Centering rings ...
- Estes Big Daddy By Andy Tate
single stage, 24in. parachute, 24mm motor mount, 3/16 launch lug This is a standard Estes kit. It utilizes TTT (through the tube) fin mounting for the four balsa fins. One three inch paper tube is the body tube with a 24mm paper tube for the motor mount. The nosecone is a large plastic one with the standard Estes shock cord attachment loop. Two cardstock centering rings are included. The ...
 |
 |
Flights
|
|
R.T. (November 1, 1999)
E.P. (April 1, 2000)
G.B. (April 1, 2001)
B.E. (May 1, 2001)
D.B.Jr. (June 1, 2001)
D.C. (June 1, 2001)
D.B.Jr. (June 1, 2001)
T.J.C. (September 17, 2001)
P.T. (October 2, 2001)
M.V.L. (October 19, 2001)
C.V.H. (November 19, 2001)
T.W. (June 3, 2008)
A.H. (June 7, 2008)
Steve Lindeman (February 14, 2015)
This is an absolute must have kit. I have bought and built 3 kits so far and this is my goto rocket at launches. Kit #1 was lost in a tree:( Kit #2 was soon built to replace it and kit #3 was lengthened 30" and modified for 3 - 24mm motors (3D MD).
|
|
T.T. (July 1, 1999)