| Construction Rating: | starstarstarstarstar_border |
| Flight Rating: | starstarstarstar_borderstar_border |
| Overall Rating: | starstarstarstarstar_border |
| Manufacturer: | Estes  |
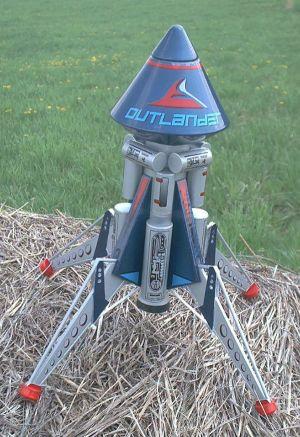
Brief:
Single stage, parachute recovery with shock-absorbing landing gear.
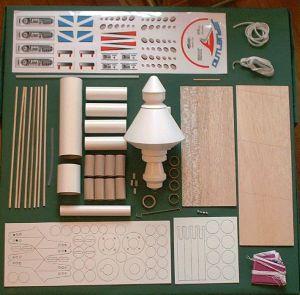
Construction:
Upper BT-60 body tube of 5 11/16", lower BT-60 body tube of 2",
blow-molded ascent module, nose cone and engine nozzle, four legs made of
die-cut balsa, 1/8" dowels and foot pads, 18 inch parachute, 24 inch shock
cord, numerous die-cut cardboard centering rings, leg support struts, tank tops
and bottoms, four BT-50 tubes and eight BT-20 tubes for tanks, and generous
"decal" stickers.
The instructions are easy to follow and the illustrations clear for the careful modeler, but this is not a kit to be rushed. It perhaps should be rated higher than a skill level 3, as careful attention to detail is required, particularly to replicate the paint scheme on the card.
One "gotcha": The 2" wooden dowel that is glued to the motor mount is too long, and must be trimmed to allow the fore centering ring to settle in the right position. (The dowel seems designed to keep the holes in two of the rings lined up, and really isn't necessary at all if you simply use one of the leg dowels to line up the holes.)
 To replicate the
manufacturer's paint scheme, it is necessary to carefully follow the painting
guide provided in the instructions. Painting is not left to the end of
assembly, but rather takes place throughout the build. It is also important to
mask the areas of various parts to which glue will be later applied.
To replicate the
manufacturer's paint scheme, it is necessary to carefully follow the painting
guide provided in the instructions. Painting is not left to the end of
assembly, but rather takes place throughout the build. It is also important to
mask the areas of various parts to which glue will be later applied.
A razor saw (or perhaps a fine-toothed hacksaw blade) will ensure clean cuts of the leg dowels and when separating the three parts from the ascent module/nose cone/engine nozzle unit.
The legs attach by running dowels through two centering rings on the motor mount, then attaching those dowels to the leg assembly dowels with a length of silicone hinge tube. The two wooden ends inside the tube are kept from rubbing together by small plastic "knee joint" balls.
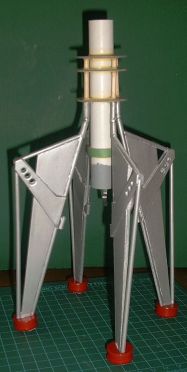 Elastic cord
attached to a small launch lug on each leg is held to the lower body tube when
the engine nozzle is installed to provide shock absorption.
Elastic cord
attached to a small launch lug on each leg is held to the lower body tube when
the engine nozzle is installed to provide shock absorption.
Finishing:
Finishing takes place throughout the construction process and care is
necessary. For the dark blue parts of the Outlander, I chose Model Master (by
Testor's) "Arctic Blue" spray paint and a matching bottle of the same
color to be brushed on the leg support struts and gear housing covers for a
perfect match. Legs and tanks are silver with the foot assemblies a bright red.
Decals (stickers, actually) are generous and add a great deal to the futuristic
look of the model.
Construction Rating: 4 out of 5
Flight:
Preparation involved a fair amount of "dog barf" wadding (it is a
BT-60 after all!) and motor retention is the familiar tried and true Estes
engine hook.
I can't imagine launching the Outlander on either of the recommended B motors. The C6-3 took it on a very straight flight to about 150 feet, and even with the short delay, ejection came a bit late. It did not land on all fours but tipped over without damage.
The second flight was on a Aerotech D21-4, with a flight about three times as high as the C motor. Again very straight with ejection at apogee but the Outlander was circling at the end of the 18" parachute and longer shock cord I had installed (standard three-part Estes mount), and even on a windless day did not "stick" the landing.
Recovery:
The recovery speed seemed about right. The rocket suffered no damage but it
failed to land on all fours. Perhaps I made the shock cord too long.
Flight Rating: 3 out of 5
Summary:
This is a beautiful futuristic kit that gets a lot of attention at the launch
site. Estes is to be congratulated for coming up with something so far removed
from the 3FNC designs that have dominated their catalog in recent years.
It's definitely way more "show" than "go," but as such makes an attention-getting small-field flyer that would be great for demonstration flying for a group of children. It's an excellent value at the full retail price of around $20, though it can be had for several dollars less.
Overall Rating: 4 out of 5
Other Reviews
- Estes Outlander By Chan Stevens
Brief: Based on the Mars Lander design, this is clearly one of the best-looking designs of Estes 2004 fleet. I really wanted to like this. Really. Unfortunately, this great design was very poorly executed and the result is a very disappointing performer. At nearly $30 retail, I can't recommend this kit unless it's for display and being built by someone with considerable patience. If ...
- Estes Outlander By Eric Maher
Brief: Next generation Mars Lander. Construction: The kit includes: 2 BT-50 (one long, one short) 1 BT-20 1 large blow molded plastic piece from which you cut the nose cone, ascent module and nozzle 2 die-cut paper sheets 2 die cut balsa sheets 18" parachute Sticker type decal sheet Typical Estes materials including engine mount I bought this ...
 |
 |
Flights
|
|
D.W.G. (May 5, 2004)
R.M.F. (May 27, 2004)
D.L. (June 6, 2004)
M.M.Jr. (January 16, 2005)
K.F. (July 8, 2010)
John R, Brandon III (November 26, 2010)
Wonder if it would be possible to scratchbuild a version using a balsa nose cone and cardstock and paper shrouds to cut the weight down?
Ken E. Coyote (March 6, 2015)
Another glaring issue I noticed when building this rocket was that the design allowed the lander legs (fins) to flop/flutter in their housings. In no way are floppy fins good for a rocket and this may explain some of the wild flights (in addition to being under-powered). I fixed this by gluing small balsa shims to the legs where they rub against the housing. This resolved the floppy fins and my first test flight on a D12-3 was straight (up) as an arrow. I highly suggest anyone else thinking of building one of these do the same or if you have one to fix it in this way if you're going to launch it...and definitely use a bigger motor with added nose weight!
|
|
J.R. ()