| Construction Rating: | starstarstarstarstar_border |
| Flight Rating: | starstarstarstar_borderstar_border |
| Overall Rating: | starstarstarstarstar_border |
| Length: | 26.60 inches |
| Manufacturer: | Estes  |
| Skill Level: | 3 |
| Style: | Futuristic/Exotic |
Brief:
The Renegade is a cool staged rocket featuring a tumble recovery for the booster and a parachute recovery for the 2nd stage. It also flies great as a single stage rocket.
Construction:
The kit came with a whole lot of parts, including two lengths of BT-60 body tubes (one of them was much shorter, of course, for the booster section), a tube coupler, a couple different types of nose cones, two BT-20 engine mount tubes, two short BT-5 tubes and two BT-50 tubes for the boosters, 8 fins, a decal sheet, 4 centering rings, elastic shock cord, a 12" parachute, as well as some other little couplers and adapters.
The instructions were very easy to follow and all I used was Elmer's white glue. This actually was my first rocket ever. My wife gave it to me as a birthday gift and I was thrilled with its looks. Building the model went well but there was one thing that looking back, I would have changed: the "boosters." The "boosters" that attach to the booster section fit between fins on either side and are easy to attach, but after the glue dried I tried to fit the two stages together and found it to be a tight fit since those pesky "boosters" were nearly touching the upper stage. This really became a factor once a couple layers of primer and paint were applied. Aside from the "boosters" though, everything else was fine with kit assembly and all parts fit perfectly.
Finishing:
I primed the entire rocket with grey primer, then painted the whole thing with a blue-black pearl paint. After the paint was dry I put on the decals, then sprayed it all down with Krylon clear coat. Decals went on fine, but I had to do a little trimming on the fin decals. Again, the painting is where the "boosters" were a problem. It was difficult getting paint down into the spaces between the "boosters" and the fins/body tube. Anyway, it worked out. Painting the "boosters" prior to attaching them to the lower stage would take care of that headache.
Construction Rating: 4
 Flight:
Motor retention is friction fit with masking tape. To prep it, you use Scotch tape and tape the booster motor onto the bottom of the upper stage motor. Then you fit it into the upper stage. Once that is securely in place, you slide the lower section into the upper part (the booster section has a motor block in the lower engine tube to prevent the motor from falling out the back). I first flew this baby on a C6-0 in the booster and a C6-7 in the upper body. I wanted to see it fly, and that's what it did. Rather slow lift-off due to the weight and a great first flight to an unknown altitude.
Next flight was on the same configuration and it again flew perfectly. Since those first few flights I have always used a C6-0 in the booster section but have tried B6-4s and C6-5s in the upper section as well. I have flown it many time as a single stage on C6-7s and C6-5s. I even tried it once on an A8-3, but that was a nail-biter and the chute barely deployed with 20 feet to spare. Luckily I flew it over a grassy baseball field and it suffered no damage.
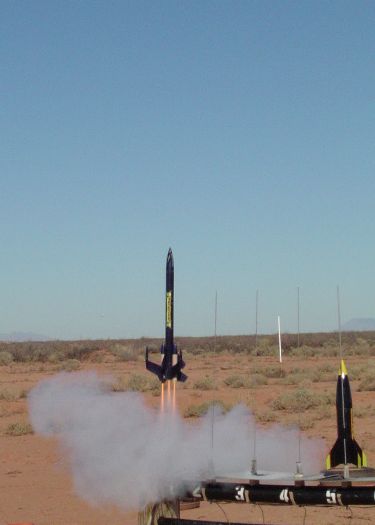
This is a picture of the Renegade launching after being modified. The booster is being powered by 3 Estes D12 motors, and the sustainer flies on a C6. Flight was spectacular to well over 1200'. Booster suffered damage to one fin during launch, but it is repairable and will fly again
Recovery:
The shock cord attaches to the inside wall of the body tube with regular white glue. I have never had it pull away or fail in any way and this rocket has flown over a dozen times. The upper stage recovers via a small 12" parachute. It comes down faster than I would like, but I have not lost any fins yet and we fly in the desert in southern New Mexico where the dirt is rather unforgiving.
The booster uses a tumble recovery but it is so stable that it comes down rather straight and fast, causing me to wince every time. The booster section began showing serious signs of wear after about the 4th flight, when the BT-50 tubes began crumpling slightly. I still flew it and it did fine. Finally, however, the shock from the 8th tumble recovery caused the motor mount centering rings to fail and break away. The booster section itself was fine, except the BT-50s were also destroyed. Fins were all still good and the upper stage was still intact.
Flight Rating: 3
Summary:
I like this rocket and it looks cool when fully assembled for staged flight. It is nice to be able to fly it as a single stage in case you are out of booster motors (or money). It flies great either staged or single and all flights are fairly straight. The abuse that the booster takes is a drag. Some form of a streamer recovery would be great if you could swing that one.
Overall Rating: 4
Other Reviews
- Estes Renegade By Duane Boldt (November 9, 2009)
Brief: The Estes Renegade kit is a very sharp looking 2-stage kit that looks great in any fleet. It looks good on the shelf and it looks good in flight and staging. It flies on 18mm motors and used tumble recovery for the booster and a parachute for the sustainer. Construction: The Estes Renegade kit contains the following parts: 1 - BT60 x 18" Body Tube 1 - ...
- Estes Renegade By Bob Bernatchez
Brief: Very cool looking, two stage design. The upper stage can also be flown as a single stage rocket. Construction: There are a fair number of parts in this kit. Tubes included are two BT-60 for the airframe, two BT-50 side pods for the booster, two BT-20 for engine mount tubes, and two short lengths of BT-5, again for the booster. Also included are various couplers, adapter ...
 |
 |
Flights
|
|
D.S. (November 22, 2004)
K.L.M. (January 28, 2006)
|
|
J.L. (August 17, 2004)