| Construction Rating: | starstarstarstarstar |
| Flight Rating: | starstarstarstarstar_border |
| Overall Rating: | starstarstarstarstar |
| Diameter: | 0.98 inches |
| Manufacturer: | Estes  |
Brief: - A classic high-performance rocket from the 60’s
Forward: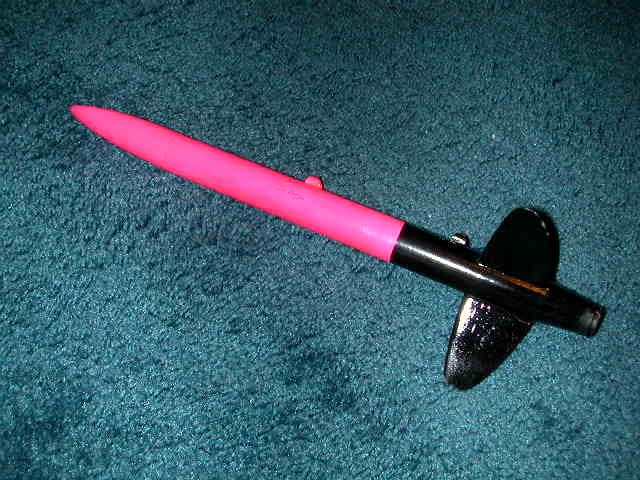 The Estes Sprint is one of those timeless classic designs that old rocketeers remember fondly. This Mike Dorffler design looks like it’s going fast even when it’s just laying there and the exceptional performance has had me hooked since the first one I ever owned ’way back in the early 70’s.. It would leap off the launch rod in a blink, much like the Mosquitoes, but unlike the ’Skeeters, could actually be seen at apogee and recovered! I’ve built many of the standard sized Sprints, sometimes from a kit, but lately from scratch, and a few upscales too (see the Sprint Magnum. The fleet just isn’t complete without one.
The original kit came in the standard plastic bag, with the card front, and very detailed and well illustrated instructions.
Parts List:
- BT-50W body tube (3 1/4-inch)
- BT-20J motor tube (2.75-inches)
- EW-49 Shroud pattern - printed on card stock
- Two AR-2050 centering rings - spiral wound paper
- EB-20B motor block - spiral wound paper (1/8-inch)
- BNC-50X nose cone - balsa (3 1/4-inches)
- BFS-30 fin stock - balsa (3/32-inches)
- SE-1 screw-eye (1-inch)
- NCW-1 Ballast - lead disk (.15oz)
- SC-1 shock cord (1/8 x 20-inches)
- LL-2A launch lug
- MG-505 marking guide
- TD-1A Tape Disk
- SM-1C Streamer (1-inch by 90-inches)
- SMC-50 Shock Cord Mount
- KD-49 Decal set
- D-14 Decal set
Construction
The kit was built in the standard Estes tradition; measure and mark the motor tube, and then glue on the centering rings at the marks. A motor block was glued into the top. That assembly was then glued into one end of the body tube with just a fraction of the aft-most centering ring hanging out to form a ledge for the boattail. The boattail was cut from the card stock and shaped to a cone before being glued on. The shock cord was mounted to the inside of the body tube with the well used three-fold paper mount. The screw-eye was threaded into the lead weight, then into the nose cone. It was then removed, glue squirted into the hole, then re-inserted. The fins were the standard die-crunched from stock fins, which were removed from the remains by the builder, then sanded to an airfoil shape before being glued to the body. The marking guide was a bit of a departure from the standard wrap-around that has become so common. These guides were a set of stands die cut from a relatively heavy card-stock. They had a flat side for a base, and a hole in the center through which the airframe was inserted. This arrangement was placed on a flat, level surface, and marks were made fore and aft in the small notches spaced around the holes. A door jamb was used to connect the marks. This method was used in one or two other Estes products of the day, but went out of favor by the cheaper and easier to use wrap that we have become so familiar with.
Since this kit is long out of production, some comments on cloning might be in order. First, see the plans on Jim Z’s web site (Adobe Acrobat File). Second, since the lead disks are no longer available, some other method of adding weight to the nose is required - don’t leave this out! The balsa nose cones themselves are available from the Balsa Machining Service. For nose weight, I will normally drill a 1/2-inch hole in the base of the cone about two inches deep. Then add an equivalent weight of BBs or lead shot mixed with epoxy, and plug the top of the hole with a one-inch length of hardwood dowel. The screw-eye is then driven into the hardwood (make a pilot hole or it will split). Also, a length of Kevlar® tied to the top motor mount centering ring provides a better shock cord mount. It’s just as secure, but doesn’t create a snag point in the top of the airframe for the recovery system to grab on its way out. Another method is to epoxy a loop of Kevlar to the side of the airframe (being careful to get it far enough down the wall to clear the nose). The pool of epoxy should be sufficient to create a smooth, snag free, bump on the side wall. Finally, decals are available from Tango Papa Decals.
Finishing:
There were two common finish schemes shown in the plans. A white and gold scheme with navy blue emblems, and a black and white scheme with black trim decals. Either is now a classic design; my preference is the white/gold scheme. Neither was particularly tricky to pull off. The current Sprint in my fleet is sporting my official contest livery of hot-pink and black, with a highly polished gloss coat.
Construction Rating: 5 out of 5
Flight: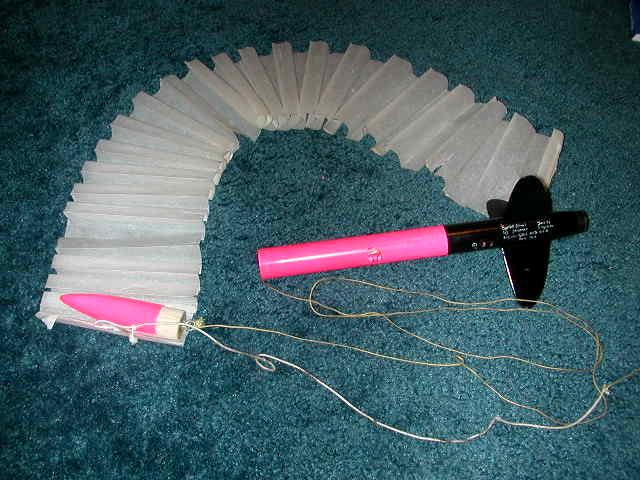 The motor is friction fit into the after end of the rocket — a single wrap of 1/2-inch tape was generally enough. On the more recent versions of this rocket, I’ve been leaving an 1/8-inch of the motor tube hanging past the shroud. This forms a nice lip to use to wrap a single wrap of tape around the motor and mount for reasonably secure retention. The body tube is then stuffed with three and a half sheets of wadding, and then the streamer is folded on itself several times then rolled the rest of the way, or in the case of competition streamers, fan-folded most of the length. It is always a bit of a challenge to get it all stuffed in there (hence the preferred snag-free methods of shock cord mounting.) The modern versions I’ve been building are usually equipped with a baffle to eliminate the wadding. Once ready, the launch is usually pretty fast, even on A motors. The streamer unrolls slowly at ejection, and the rocket usually tumbles some under it as it descends. Since it’s a streamer recovery, something occasionally gets dented or a fin gets snapped if it lands on something hard. Usually, though, it’s unscathed and ready for another flight in short order.
Flight Rating: 4.5 out of 5
The Estes Sprint has always been a great deal of fun to fly. After two or three great flights on A and B impulse motors, I would generally get carried away and put in a C6-7. That generally resulted in a lost rocket, due to losing sight of it in the air, or carried farther afield and sight lost (not being too good at fixing a position in my younger days), or lost to the common rocket eating trees. Even so, it was such fun to fly, especially on C6s that it was simply too hard to resist. Even now, the thrill of a C6 in an Estes Sprint is hard to top. The charge is still alive after all these years, and even after much larger motors.
Overall Rating: 5 out of 5
Specs:
- Length: 13.8-inches
- Diameter: 0.976-inches
- Weight: 1.0-ounces
- Suggested Motors: 1/2A6-2; A8-3; B4-6; B6-6; C6-7; B14-5
 |
 |
Flights
|
|