| Construction Rating: | starstarstarstarstar_border |
| Flight Rating: | starstarstarstar_borderstar_border |
| Overall Rating: | starstarstarstarstar_border |
| Manufacturer: | Estes  |
 Brief:
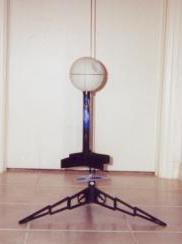
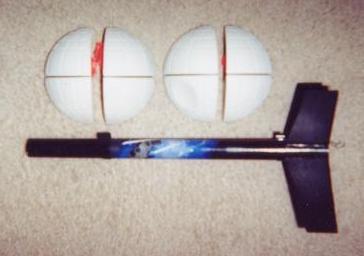
This is a skill level 1 flying model of the Death Star from the Star Wars movies. It consists of a booster and four foam quarters that make up the Death Star. It flies on B and C engines and has a parachute for the booster and a streamer for each Death Star quarter.
Construction:
The kit includes instructions, two body tubes (one slotted), coupler, engine tube, hook, centering rings, four fins, plastic launch lugs, four Death Star quarters, inserts, 12 inch plastic parachute, streamers, two bundles of shroud line, shock cord, tape rings, and a vinyl decal.
PROS: Easy assembly; CONS: None noted.
To build this kit you need the usual hobby tools, plastic cement, white glue (I used Pica Gluit), sandpaper, flat black spray enamel, water based contact cement, Testors or other urethane based spray enamel for the foam parts, and automotive primer.
The instructions were the typical Estes material complete with illustrations and text and were easy to understand.
 Body Assembly
The construction starts with the engine mount. I built this according to the instructions. Next, the tube coupler is glued into the lower body tube. Once the glue dries, the two tubes are then joined. Once this was done, I draw a line down the body tube between two fin slots. At this time I glued the completed engine mount into the lower tube, aligning the retainer hook between fin slots.
Fin Assembly
The fin assembly starts with sanding the fin sheets smooth with a piece of #320 grit sandpaper. I then took my knife and carefully cut the fins free of the sheets. When that was completed, I stack sanded the fins on a sheet of sandpaper on a flat surface. Now I sanded the leading and trailing edges round.
Fin Installation
It is best to test fit the fins first. When satisfied with the fit, glue on one fin at a time until all four are in place. Now align them before the glue sets up.
Launch Lug Installation
The top lug has an extension and has to be applied at the top. The bottom lug is applied first. Apply a thin ring of tube-type plastic cement above the fins and then push the lug into place aligning it between two fins. To install the top lug, I put a mark about 4 3/8 from the top of the body tube. This has to be as precise as possible or the assembled Death Star won't fit properly. Now apply a ring of plastic cement above this mark then lower the lug into place and let dry.
Finishing:
PROS: Easy Prepping for finishing. Finished product looks good. CONS: Instructions a tad out of sequence (see text).
The instructions intend for the booster to be primed and painted at this time. I used Krylon Gray Primer and Gloss Black for this. I then applied the supplied decal to finish the booster.
This is where the instructions got out of sequence. I now glued the inserts into the Death Star quarters. The instructions called for water base contact cement. I couldn't find any so I used Elmer's spray adhesive which worked very well.
For finishing the Death Star quarters, I used Testors Flat Light Aircraft Gray for this. After that dried, I hand painted the recessed center lines with Testors Flat Black bottle paint.
The recovery systems are installed at this time. I assembled the shock cord mount then attached it to the inside of the body tube. I then assembled the parachute and attached it to the shock cord with a triple knot. With this completed, I assembled the streamers and attached one at a time to each Death Star Quarter.
Construction Rating: 4 out of 5
Flight:
PROS: Unique recovery method. CONS: Rocket is time consuming to prep for flight and can have a rough fit on the launch rod if it is bent.
Recommended motors are B6-2, C5-3 and C6-3(first flight). I would not recommend the B6-2 because I don't think it would have enough lifting power for this rocket.
I have flown this rocket twice and used a C6-3 for each flight. I wanted to use a C5-3 but didn't have any at the time.
This rocket does require recovery wadding and is time consuming to prep. I used six squares compared to the recommended three. The retainer hook holds the engine in place.
Recovery:
The first flight on a C6-3 went off the rod and climbed at a steep angle. The ejection fired and the Death Star quarters separated and came down their streamers while the booster gently floated down on its parachute. All pieces were recovered and inspected. No scorch or burn marks. Flawless flight.
The second flight lifted off on a C6-3 and went straight up. The charge fired and the pieces separated properly. But upon recovery I found scorch marks on the parachute and three of the streamers. One with a hole on the bottom of it. I may cut the streamers off and let the pieces free-fall to the ground on the next flight.
Flight Rating: 3 out of 5
Summary:
I feel the rocket is adequate for someone with limited building experience and a fan of Star Wars (like me). I feel that the main PROS are easy assembly, good performing design, and the finished product looks sharp. The main CONS are out of sequence instructions, and time consuming recovery system preparation.
Overall Rating: 4 out of 5
 |
 |
Flights
|
|