| Construction Rating: | starstarstarstarstar_border |
| Flight Rating: | starstarstarstar_borderstar_border |
| Overall Rating: | starstarstarstarstar_border |
Brief:
If you're interested in flying radio control and want to move up a notch above the very beginner-friendly Edmonds Arcie II boost glider, try to grab yourself one of these vanishing OOP kits. It's a pure rocket glider, meaning it goes up on its own without a pod. With a wing span of 55" and weighing it at a bit over a pound, it can boost slowly enough for even a novice flier to get the hang of it.
Construction:
First I'll cover what's not included in the kit, which you'd have to come up with on your own:
- 2 servos--I used Hitec micro HS-55's, about $14 apiece
- 1 receiver--I used Hitec HFS-05, although I highly recommend the Berg 4L
- 1 battery--anything in the 4.8-6.0V range
- 1 transmitter--I used the cheap Hitec Focus FM unit that came with my Arcie II
What is included:
- Molded plastic canopy/fuselage
- Tail boom
- wing foam cores
- 1/8" balsa sheet for tail
- Obeche wing skins
- Balsa block for leading edges, wing tips
- 24mm motor tube, metal hook
- Music wire control rods
- mechanical mixer kit (not needed with modern-day transmitters)
- Control horns
I've got to confess, I'm an RCRG phobe. I've had nothing but success with the Arcie II, but that's a parasite boost glider that doesn't require any piloting skills during boost. I'd tried quite unsuccessfully to convert a hand-launched glider (Art Hobby's Colibri) but just couldn't handle the tweaks and fast reflexes needed to pilot a poorly built glider during boost. I'd accumulated a number of nice kits (Vector Aero Cuda, Aerotech Phoenix) but was afraid to trash them until I'd somehow mastered boosting on a trainer-type model. I'd had a Sweet Vee in that pile, and when I came across another one for sale at a decent price, I decided to crack open one of them and give it a shot.
For the most part, the construction was completed in just a couple hours the same day I had the impulse to start building. The wing added another 3-4 hours, so it is sort of a separate project on its own. The instructions are very good, and I'd rate building somewhere between a skill level 2 and 3.
The wing is composed of 4 separate sections--left and right, inner and outer. Each section is built up from a foam core covered with a very thin obeche wood skin (which is very nice looking when finished). While they can be built using ordinary tools and materials, a friend of mine trying to coax me into RCRG generously offered to loan me his vacuum-bagging gear and teach me the basics of that technique. I cut the skins slightly oversized, applied a very thin wipe of laminating epoxy (not the gel-like stuff we normally use in rocketry), and placed one wing section into the bag sandwiched between mating foam shells. After turning on the vacuum, I stacked about 20 pounds of books on the bag and let the assembly cure for a good 48 hours. I then repeated this with the other sections. All told, the wing pieces took about a week but only 2 hours or so of "touch time". Lacking a vacuum bag, you can still build these up just fine under weights, but you'll just wind up with a slightly heavier wing.
After skinning, the excess obeche is trimmed off then balsa blocks were epoxied on and sanded round for leading edges. Another balsa block goes on each wing end and was rounded. The inner and outer sections are epoxied together forming a dihedral, then the left and right wings are epoxied, again adding more dihedral. Each epoxy joint was reinforced with a strip of fiberglass and tacked on with more laminating epoxy. I sanded everything down with 400 grit, then applied 3 coats of clear lacquer sealer, sanding down again with 400 and 600 grit.
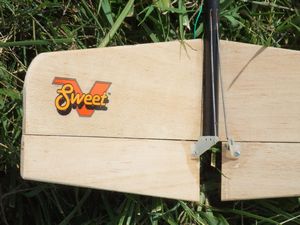 The V-tail is solid balsa, cut from 1/8" balsa sheet using templates provided in the instructions. Each side of the V is 2-piece--a stabilizer and a flappable control surface. They're joined using basic airplane hinges, which meant cutting out small slits in each piece. This is generally not something done by hand very easily, so I recommend picking up a hinge cutting tool from your local hobby shop or online, which probably costs about $15. The left/right sides are glued together (regular CA or wood glue is fine), then tacked onto the tail boom (epoxy recommended).
The wing is designed for permanent mounting, meaning this thing will take up a lot of space to store and transport. It's mounted to the forward end of the tail boom and held in place with a pair of plastic brackets CA'd to the skins.
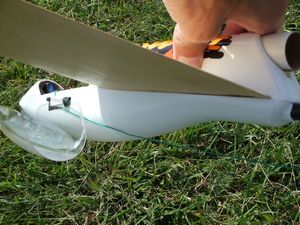 While the canopy is molded plastic, there are several large sections that need to be cut out, and it's thick enough that a good razor saw is recommended rather than a basic utility knife or X-Acto. I had to cut out the outline of the clear canopy cover, a slot on each side for the wing, and the opening for the motor tube. After mounting the motor tube assembly (a basic 24mm tube, motor hook, and external coupler sleeve), the canopy slides over the front of the wing and is epoxied to the tailboom and wing.
Rigging the radio gear can be a bit challenging for newbies, but this kit includes good guidelines although the gear recommended is obviously very outdated and larger/heavier than modern gear. What I found kind of amusing was a pretty clever mechanical mixing assembly that's obsolete since just about every transmitter on the market today includes electronic mixing. For those not familiar with the concept, a V-tail just has two control surfaces (one on each side). With one servo driving each, you need the ability to push both up, both down, or one in each direction. Driving one in each direction requires mixing. This compares to a rudder/elevator conventional plane, where one servo drives the rudder left/right and the other drives the elevator up/down, so no mixing is needed.
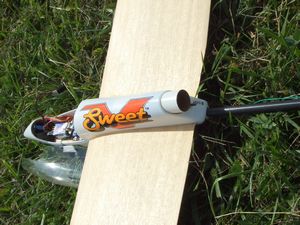
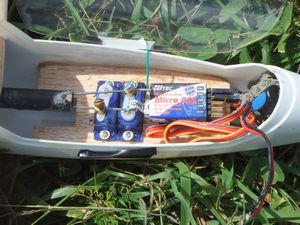
I mounted the control horns to each control surface right where the plans called for them, then fed the music wire push rods through the boom. They already had Z-bends, eliminating one slightly tricky piece of work.
Since the kit was designed for larger servos circa 1995 and I was using lightweight micro servos, I wound up having to cut a balsa plate fit for the canopy and cut out rectangles for holding the servos. I used two-sided tape to hold the receiver in place on top of this plate.
The model was designed to require nose weight to bring the CG into line, and given how much lighter my R/C gear was, I had to add quite a bit of weight to mine (the whole nose is clay). You definitely don't need to worry about finding a small, light battery...
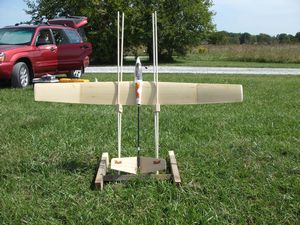
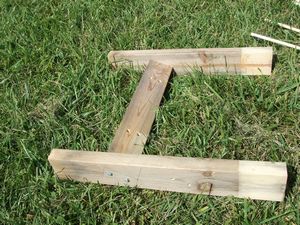
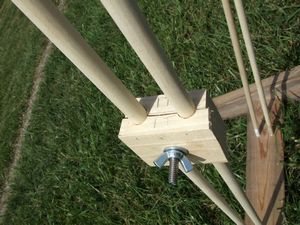
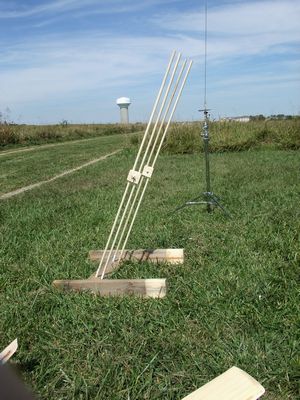
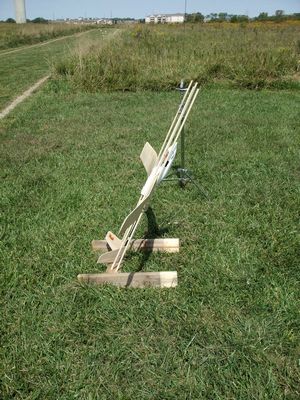
There's one last little "bonus" construction task. RC gliders are not generally designed to boost starting out vertically off a launch rod. They generally need to be angled about 20-30 degrees from vertical and need some guide rods to hold the wings oriented to prevent pitch or roll during the first few feet of boost. There aren't any commercial towers out there and the handful of homemade towers I've seen are somewhat complex to build. This kit includes plans for a very simple launch tower that can be built from a 2x4, 4 wood dowels, and a couple other small blocks and common hardware. It set me back about $10 for materials, packs flat, and works fine.
Finishing:
While it's certainly possible to add some pizazz to the finish using something like Monokote or even light paint, I really wanted to leave the beautiful obeche skins looking natural, so I left it alone after the lacquer clear coat. There are a few basic peel and stick decals as well.
Construction Rating: 4 out of 5
Flight:
Before even attempting a first flight, it's critical to test out the trim and the gear so I started with a couple light hand tosses. Throwing it forward and level, I managed to cover about 50-100 feet long flights, and after 5-6 had tweaked the trim to something reasonably level and straight.
I didn't want to mess with any the higher CATO risk of older plugged BP motors so I picked up the special Aerotech RC reload case (solid forward end, no delay/ejection cap) and went with a D9 for starters. I had zero confidence in my boost piloting skills so I enlisted the help of Ryan Woebkenberg, a very experienced, exceptional pilot who recently qualified to join the US team in international rocket glider competition. I loaded everything up and handed him the transmitter. That turned out to be a great plan as the glider immediately yawed left and started to pitch over onto its back right as it left the tower. He reacted immediately, straightened it out, and got a great boost to easily 150 feet. He then adjusted the trim and settled into a nice glide, dancing in and out of light thermals, turning into the 5-10 mph winds, and showing off by landing it about 10 feet away from me after a good 100-120 seconds.
Post flight, he helped me figure out how to set my transmitter trim to minimize the wild left turn and back flip. I then decided to try a flight out on my own. With the new, improved trim settings, most of the wildness was avoided, but it still proved to be a bit of a bucking bronco, turning left out of the tower again. I was ready for that though, brought it back in line, and got a not-as-wonderful 100 feet or so of altitude. I then totally forgot to slide into glide trim, but using the stick was able to do a decent job of keeping it level and doing a couple laps around the flight line before setting it down after around a minute, 10 yards away.
Recovery:
What can I say? R/C recovery done right is a breeze--landing in short grass right by your feet. It doesn't get much better than that.
Flight Rating: 3 out of 5
Summary:
I really enjoyed the simplicity of the build on this, the fact that it's designed for rocket boost and glide as opposed to trying to convert something not designed for rocketry and the ease of flight. The only con is that the design is a bit dated around obsolete radio gear so a minor amount of research/experience is needed to finish it off these days.
The adventurous first flight is more likely a reflection of my building skills (or lack thereof when it comes to gliders), not a design flaw, and were easily corrected. There are still a few of these that occasionally pop up on eBay or in online forum yard sales, and there's nothing currently in production that's anywhere near as easy to build and get flying (in terms of pure rocket gliders) so if you can find one, I highly recommend it.
Overall Rating: 4 out of 5
 |
 |
Flights
 |
 |
