| Manufacturer: | Clone |
Brief: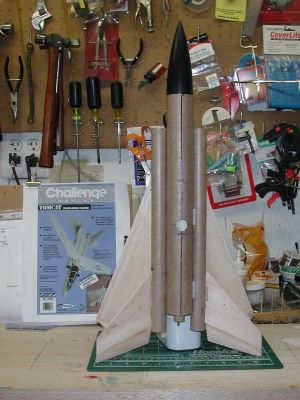 The Tomcat is a single stage, swing wing glider rocket. Estes used to make a Skill Level III "Challenge" series kit of this model. The wings fold back during launch then unfold during ejection via a clever valve and pin mechanism enabling a glide recovery. When finished the model resembles an F-14 Military fighter jet. It was built from plans downloaded from JimZ's Rocket plans.
Construction:
After downloading the plans. I searched eBay for a kit. I found three right away. One went up to $51.00 plus $8.00 shipping and another one went to $47.00 plus $8.75 shipping. I figured I could scratch a Tomcat for less than that. The "kit" requires One standard BT-60 12.45 inches long and two BT-50's 12.7" long. On my first trip to the hobby shop, I also purchased an Estes BT-60 nose cone 4-pack and two sheets of 3/32 X 36" balsa for wings and fins. You will also need some 3/16" dowel rod and a piece of aluminum tube 0.155" OD 2.1" long. The valve mechanism uses a piece of 0.055" wire about 10" long (get some extra). I also used and engine mount tube from a "bag of parts" I bought off the internet a while back. No shock cord or parachute is needed. For the engine centering rings, cardboard from a small box was used. The very last step is to glue the plastic nose cone in place. This allows the builder to add clay for nose weight if necessary.
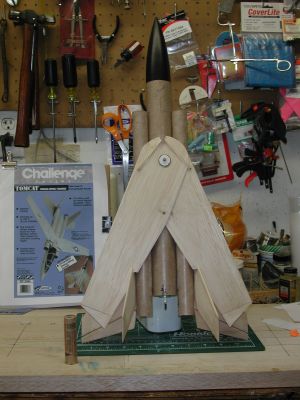
The tricky part of this build is the alignment of the wing "trigger holes". The wire comes up through the fuselage (center tube) and pokes through each wing half to hold them in the folded "launch position". These must be in the right place. In addition make sure that the two vertical fins are positioned far enough aft to allow the wings to come together over the release pin. That is the wings must just touch the leading edge of the vertical fins when retracted, and the fins must not limit the wings from coming back enough to allow the "trigger holes" to line up over the pin. I suggest, cutting out the wings with all holes and all the tail fins, installing the 3/16" wing rotation pin, then slide the horizontal and vertical fins in place. Put the wings over the pin and check to make sure the holes line up over the pin before gluing the fins. I bought all of my rocket supplies from Lightship Hobbies in Charlottesville, Virginia. If you follow the instructions there are little guides to help in alignment. I used a single edged razor blade to cut out the balsa, running it along a metal edged ruler as a guide. Go easy on the glue as weight is an issue with this model. The 0.055" valve spring wire must be bent carefully. It took me two tries, but it wasn't all that difficult with a pair of good pliers. The engine mount rings and bulkhead discs were cut using a Compass Cutter by the C-Thru Ruler Company. It works pretty good if treated gently. Also, a Dremel tool with a cut off wheel came in very hand several times on this one.
Flight:
The recommended motor is a C5-3 for first flights and then C6-3. All I found to purchase was the C6-3 so I used that for the first flight. To prepare for flight, hold the pin valve open on the bottom of the fuselage then slide the wings over the pin, bottom wing first, and release the pin valve. Make sure that the valve is well seated in the opening. Install the engine and it is ready for launch! No wadding, no chute, no shock cord is required so prep is easy. The motor is held in by a typical Estes type metal clip.
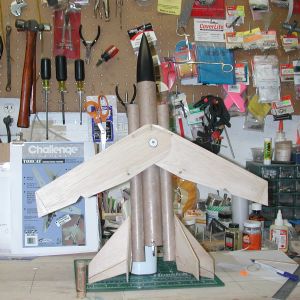 The downloaded kit cover page showed a weight of 4.1oz. I didn't make a canopy and didn't use paint at all so my version came in at 3.9oz. I can't imagine flying this thing any heavier. The first flight didn't go high on the C6 engine maybe 150 feet or so. It made a beautiful tight slow barrel roll on climb out, just like an air show pilot might do with an F-14.
Recovery:
The three-second delay burn was a heart stopper! The model pitched over and dove straight down toward the dirt! We were yelling, "Eject! Eject! Eject!" Finally at about 30 feet up, the charge fired and the wings swung into proper position. The Tomcat swooped into a sweet glide and slide into a grassy landing. Everyone laughed and clapped! There was no damage at all. It was a very windy day. Perhaps on a calm day it would go straighter and higher.
Summary:
This is a "Challenge" kit. It would be similar to building three normal rocket kits at the same time. Actually though it's not terribly difficult, especially if you have a couple of builds under your belt.
It looks really nice finished and the swing wing is very cool. The F-14 is a really hot looking fighter even without the canopy. Wings swept back, on the pad, just begging for that big kick in the afterburner! Boost flight is awesome and fun. Many thanks to JimZ's plan page, and he even had the decals!
The main CON is that this kit is no longer manufactured, although at least one clone company has announced that they plan to produce it "soon". You can still find some original Estes kits on eBay almost every week too. The price at first seems high, but after buying all of my parts piece meal, I had a credit card bill of $51.23 which was only $8.00 less than the highest eBay price including postage! However, now I do have several spare body tubes, some paint and a few extra nose cones left over!
Other:
A very talented old friend of mine, Rudy, who built and repaired many many things used to say "just get your hands dirty". What he meant was don't be afraid to jump in and do it. This being my first totally scratch built rocket in a long long time, I'm glad I took his advise! It's an exciting rocket fun to build and fun to fly. A real crowd pleaser too.
I might try making the wings a little bigger, perhaps just upscaling them 10% for a longer glide. Keep it light. Specifically use a copier to size the pattern pictures from JimZ's web site. There is a ruler shown on each pattern page so that you can match it to a standard 12" rule and scale to the correct size. I had to enlarge the wing pattern 113% and shrink the fin patten to 86%. The engine mount and airframe alignment guide were shrunk -76%. Your printer might bring them out differently.
The plans show bulkheads in each side tube, and a bulkhead behind the nose cone. Eliminating these might save a little weight. Making the engine mount a simple tape in type ala Edmonds glider kits would save additional weight. Furthermore, one might consider using CA glue exclusively in order to shave off a few more grams. Don't forget to trim your wing trigger pin to just above the upper wing with the Dremel tool to prevent one wing hanging in the tuck position. Too bad they don't make a C12-2 or something...so build light!
Related Products
 |
 |