| Manufacturer: | Modification |
 Brief:
This is a modified Estes 4-inch V-2 converted into a Bumper Wac.
Construction:
I started out with the Estes 4-inch diameter V-2, which is just crying out to be converted into the Bumper Wac. The V-2 is built according to the Estes instruction and only the nose cone needs to be modified. I did replace the original parachute with homemade parachutes made of mylar. The V-2 body had a 40-inch diameter parachute and the nose cone had a 14-inch diameter parachute. A good source for mylar is the thermal blankets sold in the camping section of your local sports store. I modified the construction of the fins as explained in the EMRR specific tip (02/02) for the V-2 (OOP). I used launch lugs for a ¼" rod.
The Wac Corporal has a BT-20 body tube (length ~9.31") and a suitable nose cone (length ~3.19"). The fins were made from stiff cardboard (1/16" thick) and used the pattern scaled up from Peter Alway's Rockets of the World. I used a streamer recovery for the Wac Corporal.
To construct the opening you will need a dremel tool and the attachments. I cut off the tip of the V-2 nose cone to match a BT-20 tube diameter and then proceeded to grind out some of the interior so the BT-20 tube would fit. This is a trial and error process. The final hole is about ¾ inside diameter. Of course 4 fin slots must also be cut. The arc length of the fins along the nose cone surface about 2-½ inches long. A hole must be cut in the base of the nose cone in order to insert the electronics.
An Adept ES231MLH unit is mounted on a short piece of plywood that is attached to a circular piece of aircraft plywood (3/32" or 1/8") by epoxy. Attached to this base plate is a large a large wood dowel with a screw eye for the parachute attachment. The base plate has brass strips with holes that can be bolted to T-nuts in the nose cone base. Originally, I was going to put the electronic unit and 9-volt battery into a cardboard housing, but later I found a plastic pill bottle and cut off one end of it, but either way can be done.
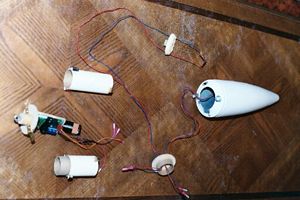
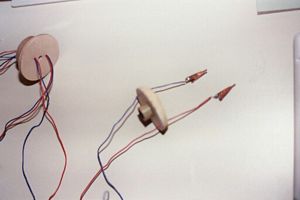
Both the base plate and the housing end cap have 2 tiny screw eyes on each piece. Small rubber bands can then be inserted into these screw eyes to pull the base plate and the end cap together holding the cylindrical housing in between airtight over the electronic unit. The blast deflector consists of a circular plywood piece covered in Durham's rock hard water putty. Holes are cut in the plywood base for the leads to the micro-clips. An 18mm engine block was glued to the bottom of the base plate. I could then insert a long empty BT-20 tube into the engine block and the mount the blast deflector inside the nose cone with epoxy. Before doing this I sprayed the inside of the nose cone with black barbecue paint. An electric switch for turning on the electronics was mounted on the base of the plastic nose cone.
Finishing:
The whole rocket was painted using the black and white scheme of Round B-5. The B-5 decal was obtained from Tango Papa. I used ordinary masking tape for painting, but pressed it hard and removed it carefully after painting. Sometimes, I use a hot air gun lightly for removing masking tape. Recently, I found a product called Shurtape that works well, but it is expensive. The black stripes were made auto stripe tape that can be found in your local auto parts store.
Flight and Recovery:
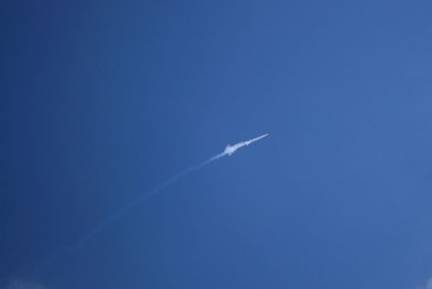
The V-2 main body weighed 14oz (empty) and the entire nose cone with batteries weighed 11.5oz. The Wac Corporal weighed 1.25 oz. With the motors, an AeroTech 24mm F-39-6T and A8-3, the entire model was 1.8092lb. To estimate the altitude I used "The Model Rocket Altitude Predictor" written by Mark Sullivan that I found on the internet. The predicted altitude for the first stage was 336 feet occurring at 4.8 seconds after launch using a drag coefficient CD = 0.85. The 6-second delay time was too long and I should have cut down the delay time by about 2 seconds. Typically, I have done this by drilling down into the delay charge with a small drill bit about 0.03" for each second of delay removed.
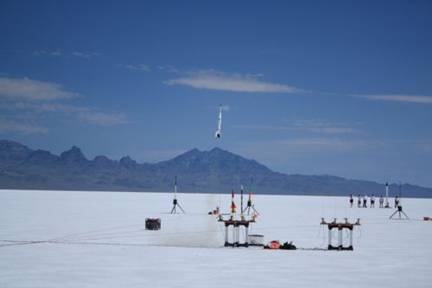
Bumper Wac take-off
Bumper Wac before staging
The instructions for the ES231 MLH unit explain how to set the time manually by holding and releasing the Acceleration Switch. This process is somewhat confusing at first but becomes easier with practice. I set the timer for about 1 second delay, but I noticed in a bench test that it seemed to me that ignition of the Estes solar igniter took about another second. I am now thinking that I might want to set the timer for zero seconds next time. There is some difficulty in putting the micro-clips through the hole in the nose cone tip after the A8-3 motor in the Wac Corporal has been hooked up. I put masking tape on each micro-clip so that it would not short out. I tried using the new Quest igniters, but they did not work too well and the old Estes solar igniter seemed to work better.
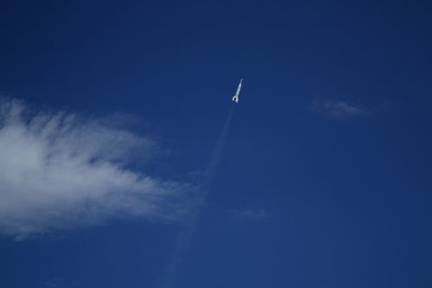
Wac Corporal staging from V-2
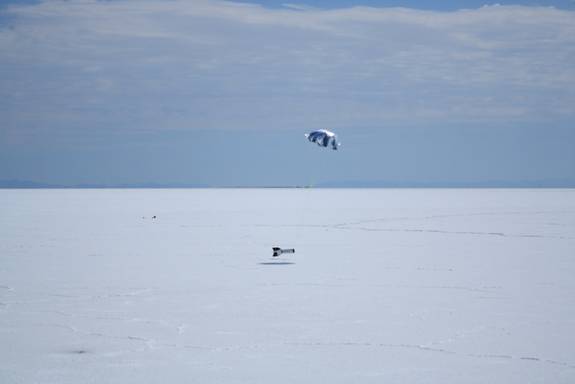
V-2 main body landing on the Bonneville Salt Flats
There was a only slight wind at the time of launch so the flight was almost straight up. The ejection delay charge was a second or two and late and the fishing tackle connector for the nose cone parachute broke. Damage was done to the nose cone and I am now in the process of repairing it. I have cut off the base of the nose cone and I am building a small coupler tube using PML 3.9†diameter phenolic tubing. The micro-clips for second stage ignition are toasted and need to be replaced. The Wac Corporal has some soot on the fins from the black powder A8-3, but it can be fixed.
Related Products
 |
 |
Flights
|
|
|
|
Robert A. Morstadt (May 22, 2011)
2011-05-21 Re-built nose cone with PerfectFlite mini-timer3. Good flight at UROC with F39/A8-3. No damage. Timing for 2nd stage & 1st stage chute a little bit late.