F with Multiple D Pods Build
By Dave Sullivan
2014-07-27

My project was the US Rockets “F with Multiple D Pods” rocket kit. The kits I built back in the day and the most recent kits that I built with my kids were simple, straight forward Estes kits. So for my next project, I wanted to try a cluster motor kit with external tubes that actually carried motors. So after looking around a bit, I chose this as my first foray into this style of rocket.
As far as this build thread goes, when I started the kit, I wasn’t thinking about writing about it. I just took some pictures as I went along to show the progression of my effort. Then I found this site and decided to give a build thread a try. I’ll pay more attention during the next one.
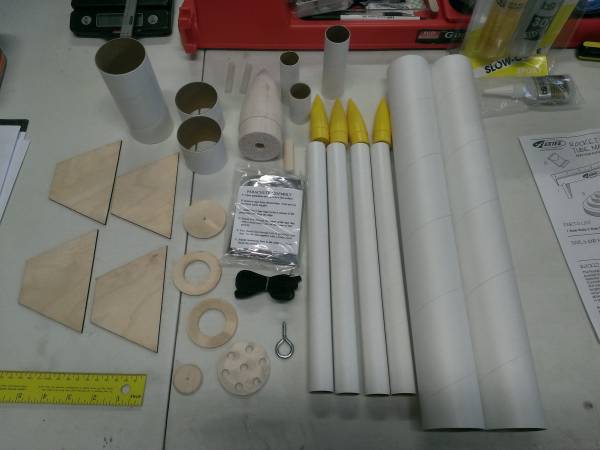
The kit is skill level 3 / 4 (depending on which website you look at) with a five engine cluster. I bought mine online from the nice folks at Apogee. The rocket has one 29mm motor mount at centerline (it also has a 24mm adapter for this space), and four 24mm tubes on the exterior for a total of five engines. The kit says it will accept combinations of motors - C through G.
The kit comes with a number of different tubes sizes, with the main body tube being 2.25”dia., total height of 47” and having an overall dia. of approximately 8.25”. It shows total weight of the kit at around 1.5 lbs. (I would imagine that would be finished weight WITH engines, but that’s simply a guess.) The fins and rings are plywood and are well cut. The kit comes with a large solid balsa wood nose cone, and four plastic nose cones for the external 24mm tubes. It also comes with a 16” Mylar parachute (which I would imagine would be fine), however for my build I upgraded with a 24” rip-stop nylon chute to give it a little more loft and a slower decent. For the chute, it comes with a 7’ elastic shock cord that uses a standard 3-fold paper body tube wall mount.
The kit also does not come with any type of motor retainer for the 29mm or the 24mm motors. From the looks of it, the kit appears to be designed for use of masking tape thrust rings and to simply have the motor held in by tape. Not a bad thing however, the external pods are long enough where they will hold any 24mm motor, and the 29mm motor mount is open at both ends, so it will hold any single use or reloadable 29mm motor out there.
When it comes to the finished rocket, this kit only comes with a couple of US Rockets logo stickers. Not much to speak of, so it’s pretty much up to your imagination on how you want the finished product to look. On a side note, that decal was missing from my kit. Not a big deal since I wasn’t planning on using it in the first place.
I only had a few complaints regarding this kit, one of which was the instructions. Four pages, very basic info. If you’re an old school rocketeer with some mad modeling skills, I’m sure they would be just fine. However for an average Joe like me, the instructions for this kit are pretty bare bones and left a lot to be desired. After reading through the instructions, it left me with a LOT of questions, so I hit the net and read all the reviews and watched all the videos that I could find to see how others did it, taking notes along the way. This truly helped and pre-planning my course of attack definitely paid off in the long run.
Parts Prep
2014-07-27

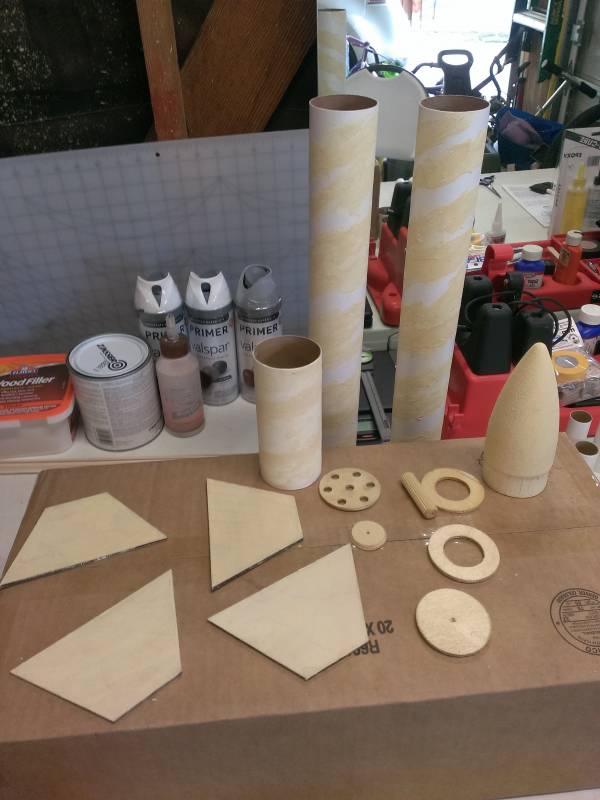
To begin, I prepped all of the wood pieces using sanding sealer and once dry I gave them a quick going over with some 120 grit sand paper to knock the roughness out. Then I prepped all pieces with wood filler to fill in any holes, voids, and the body tube seams.
I then sanded them down with 120 first, then 320 to smooth the pieces to a nice smooth workable surface. The body tubes took a extra effort to get the seams to fill right. Once I sanded them down, I hit them with some white primer, which showed all of the places that I missed. So I filled, sanded and primed until all the flaws went away and they were nice and smooth.
As mentioned earlier, this kit comes with a balsa main nose cone. This took a little trial and error to seal, fill, prime, sand and paint, to get it nice, smooth and shiny and NOT change the shape of the cone. Again, patience paid off here.
When dealing with the tailfins, I tried and tried but just couldn’t get them to get perfectly smooth. I must have filled and sanded them four or five times. A minor setback came up when I noticed that after I achieved the smoothness I was looking for, I realized that the fins had warped a bit. Panic set in as I thought I had ruined my fins! I then got each fin slightly damp, and set them in a vice between two pieces of smooth wood. After about a week in a hot garage – they straightened themselves out. Dodged a bullet on that one!
Prep Continued
2014-07-27

After getting the wood pieces squared away, I cut out the holes that were called for in the body tube and external pods (my first attempt at this type of design). After using the template in the instructions that showed where your body tube lines needed to be, I made my guide lines first using the old door-jam method. Then using a homemade heavy stock paper template, I marked an outline of where the holes would go. I used a fresh hobby knife blade for each hole to try and keep them as clean as possible. This took time and patience. But then end result was very nice, and the holes lined up perfectly.
Now as I went into this, I decided to make the four external pods look like SRB’s from modern rockets. At first I thought of using homemade body wraps, but that just became too much of a pain and I couldn’t get it to work out to my satisfaction. So I opted to use homemade decals (clear inkjet printer labels printed and cut to size).
[A note on that: I read online that after printing inkjet label decals, you need to spray your decals with clear coat, to seal them as the ink may run. THIS IS VERY IMPORTANT! After my decals were printed, I let them dry at room temperature for a solid day. Once dry, I touched them and messed with them, and the ink seemed to have set just fine. It wasn’t until I had them on the SRB and it was mounted to the main body tube with some CA that things went amiss. Using wood glue to seal the holes with small pieces of paper where the two holes come together is when the ink decided to smear. What a mess. Fortunately, this happened with the first SRB I mounted. So I stopped, clear coated all of my SRB’s and let them dry for a solid day in a hot garage, and that fixed the problem.]
I thought about mounting the SRB’s on the main body tube first, then placing the decals on them, but I didn’t think I could get the decals all the way into the seam AND have them nice and straight. So I opted to finish the SRB’s prior to mounting them. One thing that did worry me (and not sure if it really would have been a real issue) was mounting the painted/finished external pod tubes to a primed and painted main body tube. Would the glue-on-paint joint fail at the speeds and pressures that this rocket could place on the seam at launch and simply cause it to tear off? Since I didn’t know the answer to this question and couldn’t fine it on the net, I decided to place a long strip of blue masking tape (about ¼” wide) along the line where the external pod and main body tube would be joined, on both the main body tube and each external pod. Then once finished, I would simply remove the tape and join the pod to the tube together – cardboard to cardboard - in the normal fashion.

Beginning Assembly
2014-07-27
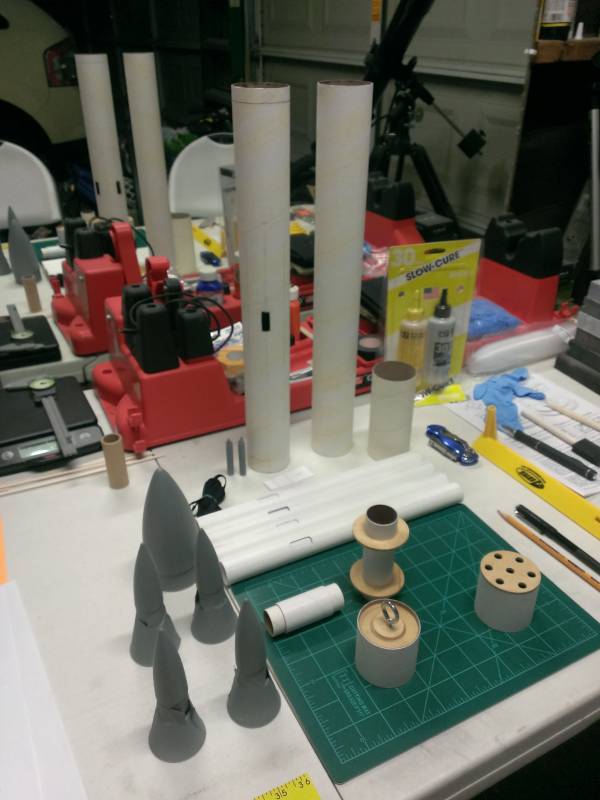
After all of the prep work was complete, I began to assemble to rocket. 29mm motor mount, 24mm adapter, the two couplers (one for the main airframe and the other for the base of the payload bay). These parts were assembled using wood glue, and then reinforced and filleted using epoxy.
Here I ran into one of my complaints about this kit, which was the plastic nose cones for the external pods. The cones were shiny yellow plastic. So when I initially primed them using white primer, the yellow would bleed through. After a number of coats of primer and a really significant difference in the color of the main nose cone and the pod nose cones, I sanded them down, used gray primer and then started over with the white. This fixed the problem and all five cones came out the same color.
(In this picture, if you look at the four external pods, you can see a piece of paper inside of the tube through the hole I cut out. Those were my body wraps, before I opted to use paint and decals. I rolled them up and placed them inside to form to the shape of the tube, but it just never really worked out.)

Still Building
2014-07-27

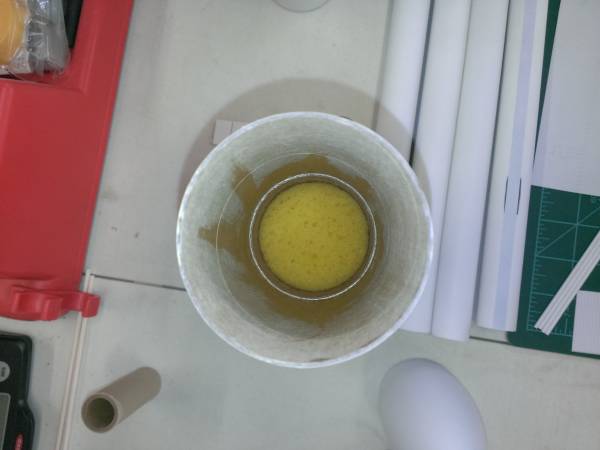
Once the payload bay was complete, I noticed the pointy part of the threads of the eye screw significantly protruded into the bay. This caused me to wonder if it could damage anything that I might put in there (say like my altimeter perhaps). So I found a really thick sponge (like the type you use to wash your car) that was about 2” thick, cut out a circular chunk, and placed it at the bottom of the payload bay – over the screw threads. Worked out quite nicely and gave the bay some protection.
(In this picture, you can see the strip of blue masking tape I used on the external pods to keep the joint face paint free.)
Starting to Paint
2014-07-27

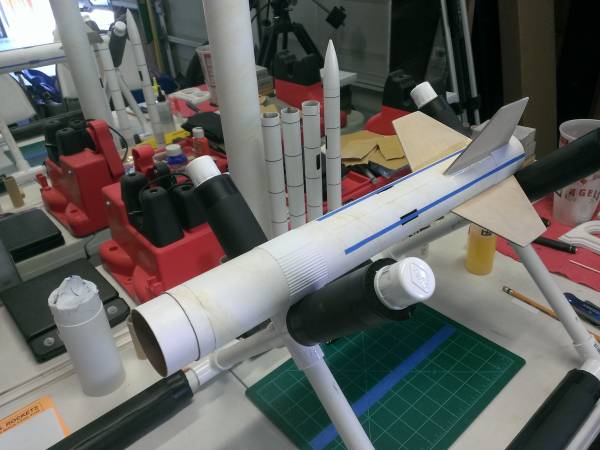
The final coat of gloss white paint on the external pods, their nose cones and the main nose cone. Once dry, I then decorated the external pods to make them look like SRB’s.

Body Wraps and Finishing the SRB's
2014-07-27
When I started this kit, I decided that I would move away from the normal kit look of a white body with red trim, and do something a little more interesting. I decided to theme my rocket after more modern rockets including the new Ares rockets, with a white main body, orange lower body/fuel tank, and white SBR’s with the various colored banding straps. I also wanted to add some texture to the model as it has a REALLY long main body tube and can look a bit plain. So while surfing the Apogee website, I found thin plastic body molds and decided to give them a try.
Putting the body molds on the rocket was pretty easy. Just take care to ensure your cuts are nice and straight, so the two ends can line up when you wrap it around. A little CA around the edges held it on nicely and the CA also filled in the gaps in the accordion shape on the upper and lower edges. If you need to add a little extra pressure to the wrap as the CA dries to keep it down and in place, a simple trick is to use plastic (like from a large clear plastic lunch baggy) to hold the wraps tightly with your hands as you put the glue along the edges. The CA will not dry to the plastic baggy and the baggy will keep it off of your hands!
More challenging was to add a body wrap around the base of the rocket, about ¾” up from the trailing edge, between the tailfins and SRB tubes. For this I had to cut one wrap into eight sections and then mount them individually following a guide line. This was done after the tailfins were added but before the SRB tubes. The measuring and cutting to allow space for the SRB tube took some thought (and math), but worked out pretty nicely in the end.

Finishing the SRB's
2014-07-27
Here is a picture of an almost finished SRB tube. The homemade decals worked out better than I had hoped, and their thickness actually gives each band a bit of depth adding to its reality! I kept the bottom of the SRB open to allow the application of tape to hold the 24mm motors in place and not tear up the decals taking the tape on and off.

The Final Touches
2014-07-27
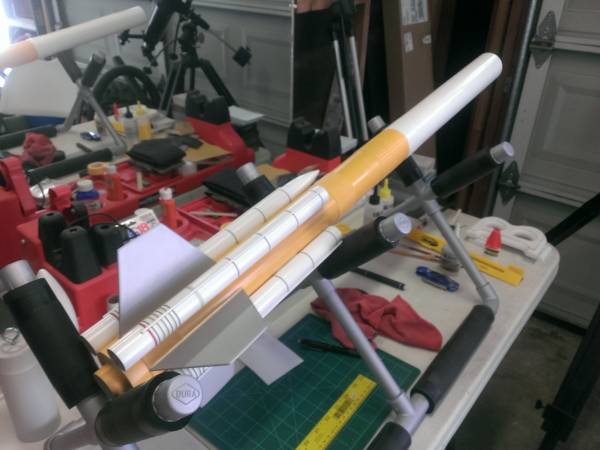
Here is the completed main body tube, with the plastic body wraps installed. The body has been primed, the upper portion has been painted with gloss white and the bottom portion is ready for a final coat of gloss orange paint. I also elected to paint the fins silver so that they would stand out a bit from the main paint theme.
On the SRB’s, I also added a single piece of 1/8” dowel rod down the tubes face at its outer most point to give each SRB a little bit of depth to themselves.

Almost Done
2014-07-27

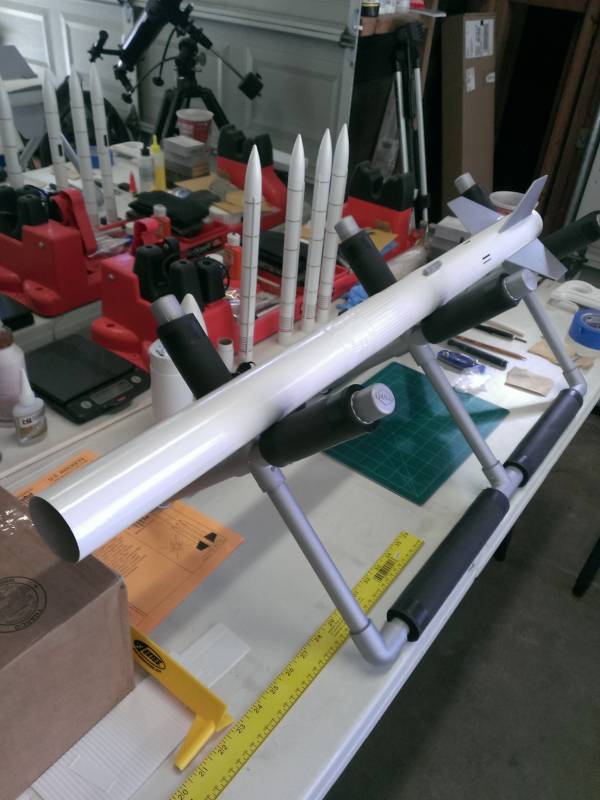
Here is the almost completed rocket. All four SRB’s have been mounted, the main body tube completely painted, and at this point, I was in process of mounting the SRB nose cones.
Once mounted and the spaces where the holes between the SRB and the main body tubes meet filled in, I used epoxy to add fillets along the seams on each side of the SRB’s. The four fins were originally mounted with wood glue, and then epoxy fillets added to set them in place.
Close up of Finished SRB and lower main body tube
2014-07-27
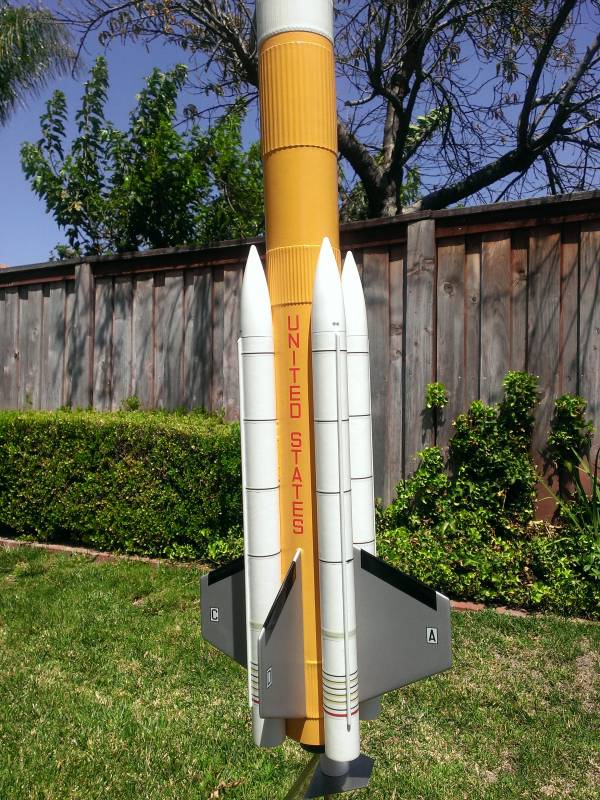
This is a view of the completed lower portion of the main body tube. I added small pieces of black MonoKote to the leading edges of the tailfins.
You can see at one point on the inner seam of the left “C” SRB, where there was some bubbling in the epoxy fillet. It only happened at this one point and it is exactly where the hole was covered, where the two ejection exhaust holes met. I’m thinking it has something to do with the epoxy being over the wood glue used to apply the paper to fill the hole but I’m not sure.

Final Product
2014-07-27

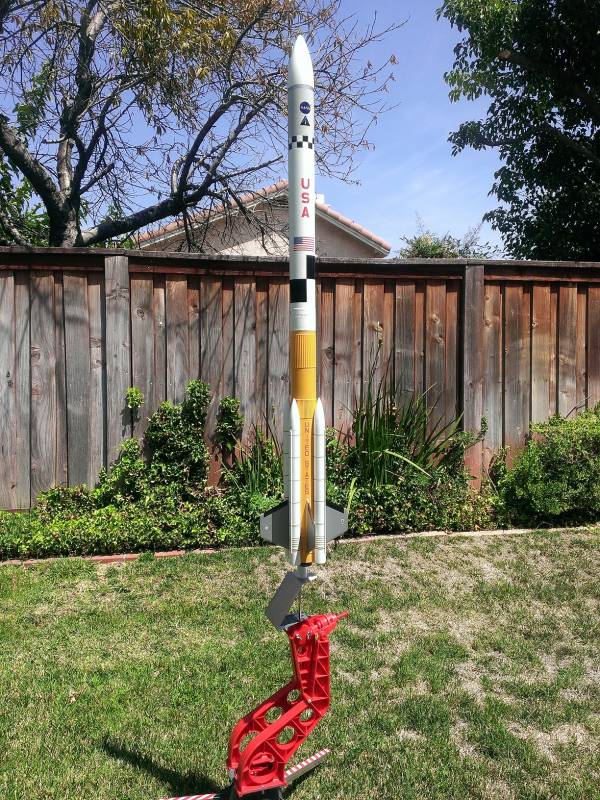
And here is the completed rocket, ready for launch (sans motors). The decals used were from the replacement Saturn V Decal sheet from Apogee, with the exception of the NASA emblem that I made. The large black tracking marks just below the American flag were made using black MonoKote trim sheets.
I elected to paint the payload pay light gray to add a bit more color to the overall look. The black/white checked stripe at the base of the payload bay was also MonoKote.
Overall, the kit was a blast to build. It took about two months of weekends, from beginning to end to complete. My final weight without motors is 452g (or just at one pound). My empty CG is located right in the middle of the plastic body wrap that runs behind the SRB nose cones. And my CP is just in front of the tailfins. So I would imagine that I’ll need to add a little nose weight once I add the engines, especially if I decide to “CHaD” launch this thing.
The only bummer for this build? I won’t get to find out how or if it flies until October when we take the scouts back out for a rocket trip. More to follow then…
Sponsored Ads

 |
 |