| Construction Rating: | starstarstarstarstar_border |
| Flight Rating: | starstarstarstarstar |
| Overall Rating: | starstarstarstarstar |
| Manufacturer: | Fat Cat Rockets |
Brief:
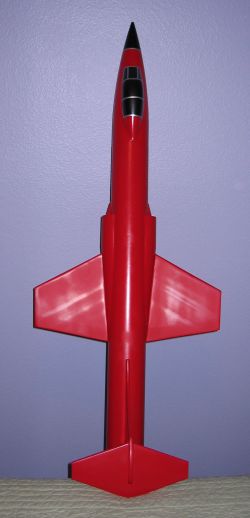
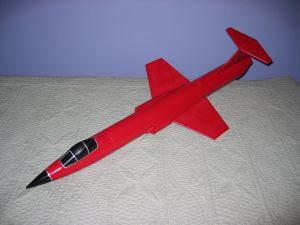
The Fat Cat Rockets F104 Starfighter is a unique and robust mid power rocket
that has fighter jet-like styling. This is a builder's kit as there are a
number of advanced techniques used for creating many of the rocket's features.
The reward of this kit isn't just a challenging build--it turns in some of the
coolest flights I have ever seen! Unfortunately it is now (like all of the Fat
Cat Rockets designs) out of production.
Construction:
The kit came very well packaged in a cardboard box filled with foam peanuts.
There are so many parts as well, as parts nested inside of larger parts, that
it took me a while to locate them in the box and account for all parts. The
parts list:
- 1 3" x 30" LOC paper body tube
- 1 3" LOC nose cone (with the base cut off to allow access to the inside of the nose cone)
- 1 2.6" x 1" LOC body tube
- 1 2" x 12" LOC body tube
- 2 2" x 2" LOC body tubes
- 1 29mm x 17" LOC motor tube
- 2 2.6" x 29mm centering rings
- 2 3" x 29mm centering rings
- Metal cable with clips
- Elastic shock cord
- 30" nylon parachute
- 24" nylon parachute
- 1 bulkhead assembly
- 1/4" balsa fin set
- 2 hardwood strips
- Various plywood accent pieces
- 1 adhesive decal
- Instruction manual with templates
The instructions come on several sheets of 8.5" x 11" paper. The pages were not numbered but essentially all of the text instructions are on the back of the sheet that has the parts list. The other pages are full of diagrams grouped into subassemblies. There are 2 pages used as templates for marking the fin slots and launch lug as well as a guide for trimming the aft end of the body tube.
I started with the motor mount. I sanded the entire outside of the tube with 320 grit sandpaper. The solid centering ring was glued and filleted with yellow wood glue onto the tube 1" from the end. The wire was looped through the 2 holes on the other centering ring and crimped to hold it in place. A small loop was made in the other end of the wire and was crimped into place to attach the shock cord later on. The forward centering ring was glued and filleted into place 1/4" from the other end of the 29mm motor tube. I set this assembly aside to dry.
The smaller centering rings were glued flush onto the ends of the 2.6" diameter ring. This will later be glued onto the end of the motor tube (flush with the aft centering ring) to look like a turbine nozzle. The instructions have a big notice along with the diagram that while the manufacturer prefers to use friction fit motor retention, any mechanical retention should be installed when building this subassembly. I appreciated the notice but chose to follow in the footsteps of the manufacturer by using friction fit motor retention. This was set aside for the time being as well.
I moved on to the main body tube. I cut out the wraparound template and taped it around the body tube so it was flush with one end. There are 4 pairs of lines that need to be marked: 1 pair for the rudder, 1 pair for each wing, and the last pair for the launch lug finlet. I also traced the template for the scoop that will be cut out on the aft end of the body tube. The template was removed and I used a piece of aluminum angle to extend all 8 lines the length of the body tube. Before doing any cutting of the aft scoop, the fin and rudder locations need to be marked to cut out the slots. With all of the marks in the appropriate places, I used a razor utility knife to cut out the fin slots and the aft scoop by making multiple passes to get nice, clean lines.
The fins come pre-cut and are made from some of the most dense balsa I've ever handled. A full page of the instructions are dedicated to diagrams of where and how to cut and glue the hardwood strips (suffice to say that it's pretty much all of the leading and tip chord edges). My razor utility knife was called into service to cut the wood strips and I used the "double glue" method with yellow wood glue to attach the strips onto the fins. I tried to make the strips the right length and angle best I could but left a little "wiggle" room since the wood strips were later sanded down to form a rounded edge anyway.
As far as sanding the hardwood strips goes, I used a sanding drum on my Dremel and an orbital sander to do the rough shaping followed by some hand sanding with 320 grit sandpaper. The rudder fins also have a bevel sanded into the trailing edges. I used the same process to get them in the instructed shape.
One step that I skipped over at the very start was the nose cone. There are 2 plastic bags full of BBs that are to be epoxied inside the tip of the nose cone, a clear plastic R/C cockpit (still in its original packaging which is helpful in case I need a replacement if I totally botched trimming it to the correct shape or it is damaged during flight), and a pre-assembled bulkhead assembly. While the recommended motors are only G40W and G80T, I prefer using reloads and would really like to have the option of flying this on a H128W too. Thankfully the instructions give me a specific CG location so I know the balance point to acquire with heavier motors.
Before adding the canopy and nose weight, I needed to rough up the nose cone on the inside and outside. 150 grit sandpaper gave a great surface to attach the canopy onto. 60 grit sandpaper allowed for plenty of bit for epoxy to hold the bulkhead plate in place.
Next, I trimmed the canopy to fit on the nose cone. I was surprised that there wasn't a template--in fact, there was little more than a small diagram showing you rough measurements where to cut the canopy. In other words, the builder is just going to have to make a best guess as to how they think it should fit. I used a pair of scissors to initially trim the canopy and frankly I feel that I got real lucky. It matched up well on my first test fit. I wasted no time in using CA to tack it to the nose cone. To give it a permanent attachment, I whipped up some 15 minute epoxy along with a little milled fiber (for thickness more than strength). I smoothed out the epoxy as it cured with some rubbing alcohol to make for a smooth transition all the way around the canopy.
It required several batches of epoxy to mix with the large amount of BBs. I created a slurry of epoxy and BBs which were poured into the nose cone and allowed to cure. By doing this in several layers, it allowed the epoxy to cure without generating too much heat and warping the nose cone.
The last step on the nose cone was to epoxy the bulkhead into place. 15 minute epoxy was used for this. I mixed in some milled fiber to thicken it up if not for good measure.
The following steps I did only after painting the entire rocket: I tied one end of the thick elastic shock cord onto the steel cable loop and tied a small quick link to the other end to make for easy attachment/removal of the chute. Another quick link was tied onto the 30" chute to attach to the base of the nose cone.
Finishing:
I really took my time finishing this rocket. First was several applications of
Elmer's Fill 'n' Finish, sanding it down with 220 grit sandpaper. Next I went
through several iterations of spraying Krylon white primer, touching up any
spots with Fill 'n' Finish, and sanding the entire rocket down. With each time
through that cycle, I would use a finer and finer grade of sandpaper until the
last one was with a scrub pad equivalent to superfine steel wool.
Part of the reason for my patience with the finishing process is that I didn't feel very inspired to come up with a paint scheme. Then someone started a discussion thread on The Rocketry Forum about just this topic! Eventually someone posted a URL to an awesome website that had a dizzying array of real honest-to-goodness painted F104s! I wasn't up to taking the time for some of them but I certain gained some inspiration that I had been desperately lacking up to that point...
I finally settled on a red and black scheme. I kept it simple in the sense that I could start by painting the entire rocket with Krylon Banner Red and then mask off the rocket for all of the black accents. All of the accents were taped off using a combination of clear tape and automotive pinstriping (which is particularly helpful for any curves and/or curved surfaces).
With all of the spray paint work complete, I broke out the old T-shirts and 3M Rubbing Compound to polish the rocket to a glossy shine. The final step of the finish was using a Sharpie Metallic silver marker pen to draw details like the framework of the canopy.
Construction Rating: 4 out of 5
Flight:
The only recommended motors were the single use G40 and G80. I opted instead to
load up my 29/40-120 casing with a G64-7W for the first flight. The motor
casing was friction fit with some masking tape.
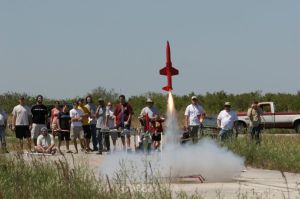
It was a busy day at the April 2006 Spaceport Rocketry monthly club launch so I had to wait a couple of racks before I could get the F104 out on a pad. To say that it was an attention getter was quite an understatement--I even had someone ask me if they could take my picture with it!
Once it was on the pad though, I had to use a nearly foot long standoff to keep the rocket from resting against the pad. There is several inches of rocket hanging aft of the motor mount and I had invested too much time and effort into building this rocket to have it marred by blast exhaust being reflected off the blast deflector!
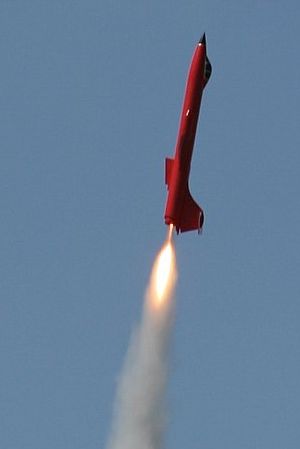
With the countdown initiated--and a lot of interested people watching--the motor came to life and sent the F104 skyward with a gentle roll during the thrust phase. It was definitely one of the coolest rocket launches I have ever seen. The crowd applauded with the increasing altitude of the flight. It peaked at about 1000 feet. That's temptingly low enough to have me try a larger motor like a H128W. If I just had an easy way to ensure the F104 Starfighter's stability...
Recovery:
The F104 Starfighter separates at the nose cone/canopy and recovers under a
pair of nylon chutes. The nose cone weighs more than even the loaded airframe
so I chose to hook the 30" chute to it. The booster had a 24" nylon
chute attached to the end of the shock cord. In lieu of wadding, I clipped a
heat shield onto the loop in the steel cable to absorb the heat of the ejection
charge. The parachutes were installed so that the nose cone would pull both
chutes out upon deployment.
The seven second delay was a little on the long side. The F104 had enough time to be past apogee and have its heavy nose cone clearly pointed downward. Ejection freed the nose cone and afforded a comfortable distance between the heavy nose cone and tender (comparatively speaking) balsa fins. The booster came down a little faster than I thought it would but still at a respectable descent rate. On the other hand, the nose cone hung up in the sky longer than I thought with the larger chute. It was a rather windy afternoon so both parts drifted into a soft, grassy path of field a couple hundred yards from the flight line and landed about 100 feet apart.
Flight Rating: 5 out of 5
Summary:
The Fat Cat Rockets F104 Starfighter is definitely one of the most challenging
and time consuming rockets (regardless of motor impulse class) I have ever
built. It truly is a flyable model. My effort was extremely well rewarded by a
flight that I consider to be coolest looking flight of any rocket in my fleet!
What a shame that they are no longer available...
Overall Rating: 5 out of 5
Other Reviews
- Fat Cat Rockets F104 Starfighter By Andy Hobbs (January 17, 2007)
( Contributed - by Andy Hobbs - 01/17/07) Brief: Lance covered the components and construction of the rocket very well in his excellent review. I also built the model exactly to the plans the kit is rated skill level 5. I agree with this, although it maybe is not as detailed as a Saturn V, but it's probably not recommended for the impatient type builder. Construction: The ...
 |
 |
Flights
|
|