Fat Cat Rockets Galactic Marauder
Fat Cat Rockets - Galactic Marauder {Kit}
Contributed by Nick Esselman
| Manufacturer: | Fat Cat Rockets |
![[Picture]](/images/archive/images/ratings/rating_fat_cat_marauder.gif) (07/10/03) I've had the Fat Cat's
Galactic Marauder sitting around for a while and decided to get it out and
build it. You need a rocket like this every now and then to keep you excited
about the "building" part of the hobby. This kit takes skill and has
the looks (variation) to make it exciting. It even has a futuristic theme:
"Loaded with excessive firepower, the Galactic Marauder is the
preferred warship of privateers.".
(07/10/03) I've had the Fat Cat's
Galactic Marauder sitting around for a while and decided to get it out and
build it. You need a rocket like this every now and then to keep you excited
about the "building" part of the hobby. This kit takes skill and has
the looks (variation) to make it exciting. It even has a futuristic theme:
"Loaded with excessive firepower, the Galactic Marauder is the
preferred warship of privateers.".
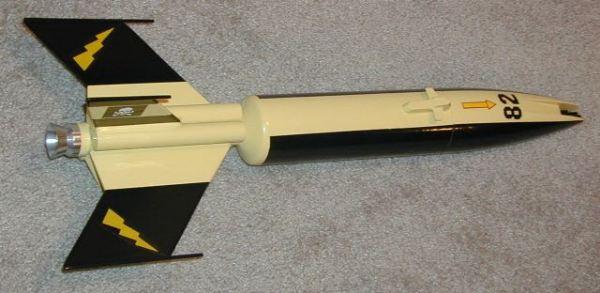
You will see that even though the kit is somewhat expensive ($44 as of June 2003), you get quality stuff, including the pre-cut nose cone and transition cone. The recovery system includes a 24" rip-stop nylon parachute, 1/4" flat black elastic, and steel cable to attach to the plywood centering rings.

The rest of this kit is made up of an 8" long by 2.6" diameter body tube, a 29mm motor/body tube, three (3) 5½" long Pod Tubes and end-caps, pre-cut 1/8" balsa wings and fins, a large plastic sheet (in case you make mistakes on the nose cone), dowels, plastic tube, launch lug, special balsa Con Tower (the station of the person who steers the ship), and decals. As I said, quality stuff.
CONSTRUCTION:
The instructions are printed on 10 pages of 8½ x 11" paper. The original instructions that came with my kit, that sat in a closet for > 1 year, were okay, but, I did have a couple problems. If you are an experienced builder you will work these out quickly. One of my main issues was that the interior plastic panels of the nose cone (which you cut from templates) weren't sized to match the pictures of the finished rocket. I made the adjustments. Fat Cat Rockets sent me a set of instructions that are currently shipping with the kits and there is a big, big difference. This difference primarily comes from the addition of color that really help differentiate the various pieces. The newest plastic sheet patterns seem correct (note they are little longer than what I ended up with, but my original template was way too long anyway. I sized up the new one and it looks like the picture).

Assembling the Galactic Marauder is not an over-night job. Plan on spending a few days on it. Make it a project. Even though assembly is straight-forward, as you follow the instructions, it has some challenges that you may have never encountered with other rocket builds. I will highlight those challenges.
You will need various types of glue for assembly including epoxy and CA which are both recommended by Fat Cat. I would also suggest you have a wood glue, medium and thin CA. In addition, you will need your normal hobby tools: pencil, hobby knife, scissors, etc.
The rocket is assembled in two sections. First, you build the "business" end. This is done by attaching the Pod tubes onto the 24mm motor/body tube. Caps are glued onto the Pod tubes which make them more authentic than just open ended tubes.
The fins are prepared and glued onto the 24mm motor/body tube using the provided Tail Assembly Marking Guide. The main wing is made up of two pieces of balsa and therefore you need to assemble it. I also coated all the balsa fins with 15-minute epoxy, covered with tracing paper, and pressed between wax paper under a heavy book to strengthen them (and eliminate the grain). I also used wood glue to attach the fins and then epoxy for the fillets.
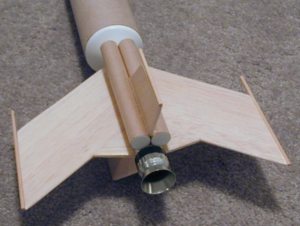 The transition cone and the two centering rings are
then attached to the 24mm motor/body tube. The upper centering ring has two
pre-drilled holes that are used to attach the steel leader cable to it.
The transition cone and the two centering rings are
then attached to the 24mm motor/body tube. The upper centering ring has two
pre-drilled holes that are used to attach the steel leader cable to it.
There is no positive motor retention provided with the kit. It relies on friction fitting into the 24mm motor mount. If you'd like to address this, there are a couple of ways that I can think of. The first would be to mount a piece of spring steel as a clip; centered and under the set of two pods. The second way would be to attach some sort of retention ring system. This is what I did.
I used a Rowes Retainer 24mm base and cone. I believe this really made this rocket stand out for looks. This required pre-planning because to attach the 24mm retainer base, there needs to be 1/4" of motor tube exposed. On the Galactic Marauder, the fins and pods are mounted flush with the end of the 24mm motor/body tube, so I had to move everything up 1/4". This shortened the final depth that the tail end would be inserted in to the main body tube. It will also require nose weight to compensate for the extra tail weight.
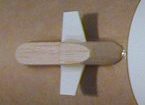 Next the main body
tube is assembled. Not much to this task except building the Con Tower. This is
done by cutting two canards from the plastic sheet and gluing them to the balsa
Con Tower body. I would suggest that you seal and sand the balsa prior to
adding the canards since it is a tough job after they are attached, especially
if also attached to the body tube. The canards are attached with CA. I would
also suggest adding a very small fillet with epoxy. Do this before attaching to
the body tube. Once the Con Tower is attached to the body tube, the 1/4"
launch lug is a attached to complete this section.
Next the main body
tube is assembled. Not much to this task except building the Con Tower. This is
done by cutting two canards from the plastic sheet and gluing them to the balsa
Con Tower body. I would suggest that you seal and sand the balsa prior to
adding the canards since it is a tough job after they are attached, especially
if also attached to the body tube. The canards are attached with CA. I would
also suggest adding a very small fillet with epoxy. Do this before attaching to
the body tube. Once the Con Tower is attached to the body tube, the 1/4"
launch lug is a attached to complete this section.
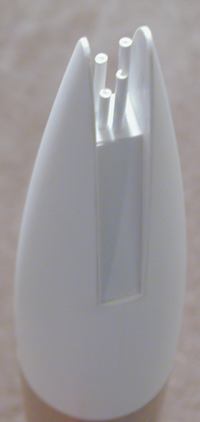 The most difficult
and most unique building challenge is the nose cone. Fat Cat Rockets takes away
what would have been a very difficult and critical step . . . the cutting of
the nose cone. Thank you, Fat Cat, for pre-cutting the nose cone! The nose cone
is assembled by cutting out pieces from the plastic sheet and using CA to glue
them into the nose cone. To do this right, you need to take your time and
carefully cut your straight edges on the various pieces to avoid gaps.
Essentially what you are doing is building a small TeePee inside the slot made
in the nose cone. I relied heavily on the finished pictures on the front of the
instructions and the picture (fact) card provided with the kit.
The most difficult
and most unique building challenge is the nose cone. Fat Cat Rockets takes away
what would have been a very difficult and critical step . . . the cutting of
the nose cone. Thank you, Fat Cat, for pre-cutting the nose cone! The nose cone
is assembled by cutting out pieces from the plastic sheet and using CA to glue
them into the nose cone. To do this right, you need to take your time and
carefully cut your straight edges on the various pieces to avoid gaps.
Essentially what you are doing is building a small TeePee inside the slot made
in the nose cone. I relied heavily on the finished pictures on the front of the
instructions and the picture (fact) card provided with the kit.
As I had said before, the old-instruction templates seemed to make very long side plates, so I sized mine to match the look in the pictures. It also appears that I brought my side plates out to the edge of the nose cone, whereas, they look inset 3/16" on the drawings. I'm not sure that this matters because I believe mine looks great!
I used medium CA to attach the parts and then a thin CA to go over all the seams.
The last assembly step for the nose cone is filling the inside with epoxy up to where the plastic sheets are added. This strengthens and supports this section as well as adding the necessary nose weight. I didn't finish my filling activity until the rocket was finished so that I could get the CG where Fat Cat Rockets indicated in their newer instructions.
The instructions say to finish the rocket then cut, paint and install the nose cone gun tubes. I missed that somehow and attached mine during the initial build. It will make painting a little more difficult, but I don't think this is a big problem.
 The final assembly step is to slide the tail end into
the main body tube and ensure everything is aligned properly. Notice the
picture on the right is an example of the newer instructions and the
color-coded illustrations.
The final assembly step is to slide the tail end into
the main body tube and ensure everything is aligned properly. Notice the
picture on the right is an example of the newer instructions and the
color-coded illustrations.
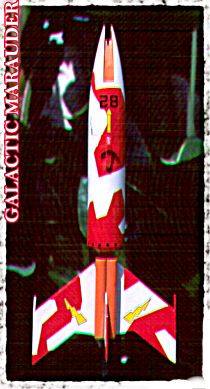
Preparing for finishing was a lot of work. I think I have about 4 coats of Plasti-Kote primer on it and various spot work with Bondo Glazing. All this to try to have a nice finish. I decided to go with Fat Cat Rockets alternate paint scheme (which is the same as their Mega Galactic Marauder). It's not exact to their scheme, but very close. I used Krylon paint for the Yellow, Black and Clear Coat.
Overall, for CONSTRUCTION I would rate this kit 4 ½ points. Fat Cat Rockets have really put effort into upgrading their kit instructions and it makes a difference. Especially when comparing them with the original set that came with my kit. The color-coding makes things very clear. The number of and quality of the parts provided with this kit are outstanding. A pre-cut nose cone and transition save a lot of headache. However, there are plenty of challenges with the build. Fat Cat also added enough "detail" to make the kit interesting including the pod caps, Con Tower and the forward gun tubes. The recovery system is solid, too. The lack of positive motor retention is the only negative comment I could add.
 FLIGHT/RECOVERY:
Fat Cat Rockets indicate the Galactic Marauder should weight 9 ounces. My finished kit weighs 9.7 ounces, but remember I added the Rowes Retainer and additional nose weight to compensate.
Fat Cat recommends the D12-5, E15-7, and E30-7. Since I was able to create a RockSIM file, thanks to the new RockSIM 7.0 version, I think the D12-3 might be a better fit. It also sims very nice with the new Aerotech F21-8 and the Estes E9-4. I even added a thrust ring sized for these two motors.
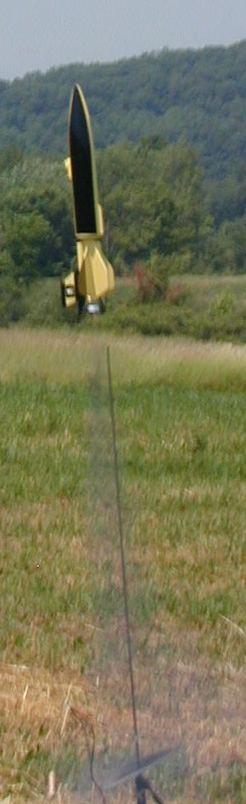
The day finally came for me to put this rocket in the air and I chose to start with an Aerotech RMS D15-4. The launch was successful and it flew straight as an arrow. I was impressed. As it arched over and started heading down, I said out loud, "open...OPEN!" and it did! The parachute did not come out initially. I could see the red parachute sitting just inside the body tube. After a few seconds the nose cone pulled it out and the rocketed descended to be recovered. Descent was a bit slower than I like, especially with the full 24" parachute.
After cutting out a 7" spill-hole from the parachute, I loaded it up with an Aerotech E28-7. Zoom! Off the pad and straight up. It was a flawless flight and the parachute opened right away. I love the looks of a large spill-hole. But even with that large spill-hole it started drifting and it crossed our field and landed very high up in a bunch of trees!
Very, very disturbing. Yes, I know, "if you don't want to loose it, don't fly it"! I agree, but with a $44 rocket, $32 for the Rowes Cone Retainer and base, and $34 for the 24mm RMS Casing, there sits $110! I'm sure I'll recover all but the rocket, in time, as the weather eats through the elastic shock cord. But, with the way it flew I'd love to have it all back!
For FLIGHT/RECOVERY, I would rate this rocket 5 points. This rocket, despite its complexity and details, flies as straight as a 3FNC rocket. It is a solid design for flight and has the looks too! The recovery system is where I have some concern. The steel shock tether gives protection against the ejection heat. The 1/4" elastic shock cord is about 65" long, so that is good. So what's the problem? Well, to me, the problem is the 24" parachute. I think it should be smaller to increase the descent rate. An 18" would probably be better, but this is probably nothing more that preference. Add a piece of Nomex® (like I did) to the kit and the recovery system is perfect.

I give the rocket an OVERALL rating of 4 ½ points. If you want a challenge to build, a unique design, a futuristic look, a stable flier and an overall "looker", then the Galactic Marauder is for you. The other nice thing about this kit is the weight and size makes it good for all level of fliers. Fly it on Estes D12's and E9's. Crank it up with an Aerotech F21. And really, if this isn't big enough for you, build Fat Cat Rockets' Mega Galactic Marauder which flies on a 54mm motor.
![[NAR]](/images/archive/images/link_nartitle.gif)
The following excerpt is from "Sport Rocketry". The intention is to allow guests to get a basic feeling about a kit. We strongly suggest that you get a copy of the referenced Sport Rocketry and read the entire article. Inside you will find many helpful hints in construction as well as other useful information. For more information, use the two links above.
(Sport Rocketry - January/February 2002 - page 39 - by Greg Elder)
 "...purchased their
Galactic Marauder kit over a year ago (when they company was named Starship
Enterprises)."
"...purchased their
Galactic Marauder kit over a year ago (when they company was named Starship
Enterprises)."
"Its interesting design reminds me of a futuristic space fighter. The
front of the rocket is based around a BT-80 sized body tube that transitions to
a BT-50 tube at the rear."
"The kit comes with quality parts....the kit includes pre-cut balsa fins,
plastic nose cone and transition, balsa con tower, 1/4" launch lug,
plywood centering rings, dowels, 24" nylon parachute, heavy-duty shock
cord mount, and stick-on decals."
"The instructions are easy to read and follow."
"The Galactic Marauder assembles like most typcial model rockets."
"The nose cone has optional assembly instructions...This alteration of the
nose cone adds tot he rocket's unique appearance."
"For the initial flight...chose a D12....the rocket went unstable."
"I sent an e-mail to Fat Cat Rockets explaining about the unstable
lauch...the next day, I received a phone call from Chuck Sackett, the owner of
Fat Cat Rockets....since I bought my kit, he had revised the instructions to
include indicating the correct Center of Gravity (CG) for the finished
rocket...the rocket now comes with the nose cone already modified."
"I added clay to the nose of my Galactic Marauder in order to move the CG
to the locationb shown in the new instructions. I flew the rocket again on a
D12 motor. This time I had a straight, stable launch."
Overall, the article suggests that if you are looking for something with a futuristic appearance this kit may be a good purchase.
 |
 |