| Construction Rating: | starstarstarstarstar_border |
| Flight Rating: | starstarstarstarstar |
| Overall Rating: | starstarstarstarstar |
| Diameter: | 0.74 inches |
| Length: | 12.00 inches |
| Manufacturer: | FlisKits  |
| Skill Level: | 3 |
| Style: | Contest |

 Brief:
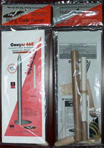
The Cougar 660 from FlisKits is a 13mm Streamer Duration Competition Model designed to fly on 1/4A through full A motors. The kit is advertised as a competitive model with several contest wins under it's belt and appears to incorporate many of the tricks used over the years to optimize the models performance. I was not really interested much in competition, but wanted to try one of these kits just to see how well it performed; besides, it looked like a lot of fun to build.
Construction:
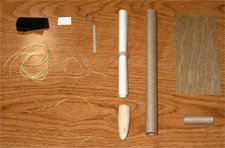
The Cougar 660, like many from other manufacturers, came in a very colorful plastic bag. However, this is where the similarity ends. I was shocked to actually find inside the bag what a kit like this needed most, detailed instructions! But wait, there was more. Separate instructions included the Front Insert Card with Checklist on the back, Model Construction instructions, Finishing and Flying instructions, Streamer Construction instructions, Pop-Lug Construction instructions and a warranty card; I would swear there was $10 worth of printed paper alone in the kit; unbelievable and unheard of in this day and age. To go one step further, all the documents were well written and illustrated; nice job FlisKits! As far as actual components are concerned, the kit included a seamless body tube (well at least it seems that way), Balsa Nosecone, 1/64" Ply sheet for the fins with enough to make many sets of fins, cardstock tail cone and templates, TWO streamer kits, one for competition and one for sport, a Pop-Lug kit , tons of Kevlar for recovery of the model, a 13mm Motor Mount Tube and a Centering Ring.
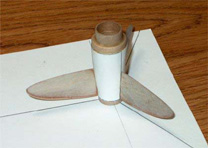
Construction began with the Motor Mount/Tailcone assembly. FlisKits provides printed cardstock for bodytube marking guides on the tailcone and I wanted to make a note here. I have built many kits in the past and several FlisKits lately and have noticed that their cardstock in particular is always perfect in size, shape and form! After dealing with many a bodytube wrap that was slightly off or cardstock that didn't roll correctly, it was a pleasure to work with the stuff from FlisKits; enough said.
The Tailcone was built and ready for fin installation. FlisKits gives you three types of fin patterns to choose from, all printed on their cardstock templates and all noted to perform equally. I like having the choice and this was a nice touch. In addition, there is more than enough Ply to build your set of fins, another nice feature as they didn't skimp on materials. I chose a pattern, cut the fins and glued them to the MMT. With what appeared as a completed fin can, it was time to work on the body tube.
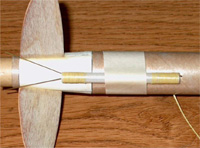
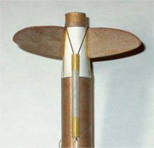
I was impressed with the detail given when preparing the motor tube for installation on the fin can. They have you actually balance the tube with fin can temporarily installed, then install the Kevlar shock cord at the balance point. The shock cord comes out the side of the body tube and up to the nose cone mouth of the body tube; this is done so the model will descend horizontally, giving more resistance to air and longer duration; a nice feature. I was impressed the detail that went into designing this model. Once the thread is installed, you glue the body tube to the fin can. Note that you should install the Kevlara bit rear of balance point for exact balance, as the glue for the cord/fin can will add some weight rearward. For this reason, mine is a bit tail heavy but still horizontally balanced well enough. During the final step of gluing the bodytube to the fin can, make sure the can is square to the body tube. I installed mine vertically on a table and used a square to check all three sides of the model between the fins. There are well done, detailed photos throughout all their instructions that help you during the construction process.
Also included in the kit are two streamers, one for competition and one for sport flying. A separate set of instructions was used for the competition streamer and I had it built in no time. Use a yardstick and a 1" wide ruler when fan folding the streamer to keep it aligned and the correct thickness. The instructions tell you to use 12lb Kevlar to build the streamer, but two piece of 35lb were included. I emailed FlisKits about this and received a response an hour later; they switched to the 35lb for both the streamer and shock cord and will update their instructions to reflect this change. In addition, they noted that instructions on where to attach the streamer to the Shockcord were not included and it should be attached 1" from the nosecone. I really liked their quick response as I could now continue with my build. Once the streamer was finished, I built the sport streamer just for fun. It is a bright red 2" wide crepe streamer, which I am sure aids in finding the model during recovery.
The final step for construction was the Pop-Lug. This should be an item that those in competition would recognize, however, it was new to me. I understood the theory and liked the idea, but had to build it to see how well it would work. A separate instruction sheet was included for the lug, with a piece of brass wire taped to it so you wouldn't loose it. The instructions are exact size for wire bends, so you simply cut it and make it fit the drawing; pretty easy. To mount the wires, they are tac-glued to the 1/8" launch lug, then wrapped with 8 lb Kevlarthread. This was a bit tedious, but I really enjoyed wrapping the wire.
I finished by adding a couple drops of thin CA to coat the ends. One note was the fact that they give you twelve inches of thread, but I used a good nine inches on my first wrap; I am not sure if I went a bit overboard on the wrap, but luckily I had just purchased some extra Kevlarthread from the FlisKits parts section of their website and had enough extra to finish the wrap. The kit could include an eighteen inch piece of Kevlar to insure there was enough to complete the wrap. I did test the pop lug and it really works sweet! The lug hooks under the fins well and comes right out of the model when it hits the top of the rod.
Finishing:
Finishing the model is straight forward. If you plan on using this model in competition, they recommend you use a few light coats of sealer on the rocket and that is all. If it is to be flown just for sport, you can have at it and finish it any way you wish. I opted to go for the competition mode and actually used thin CA to 'paint' the nosecone and tailcone/fins. Streamer and Pop-Lug were attached and it was time to go play.
Construction Rating: 4 out of 5
Flight:
For my first launch I chose the Estes 1/2A3-4 motor, not super large but enough to see how well the model performs. Some tissue was installed, followed by the competition streamer, wrapped per the instructions. Note that this streamer is six inches wide and took up the bulk of the space inside the bodytube. The rocket was placed on the pad and a piece of masking tape was added to the top of the rod to retain the Pop-Lug. When the button was pushed, the model came off the rod like a bullet, the lug remained and it swiftly climbed out of sight. Man, I was surprised how high a 1/2A put the model.
Recovery:
Ejection was right at apogee and the competition streamer opened up. This is where the big test would begin as recovery is probably 70% of the required performance on a duration model. The landing took quite some time, however, not being there for a competition, I forgot to bring a stop watch to clock it. I will have to re-do the launch and will post the results on a follow up. The model landed without a scratch and I was very pleased with the flight. Winds picked up a bit, so I did not launch another time, but will try again soon. Everything worked as planned and I was pleased with the results of my first competition model.
Flight Rating: 5 out of 5
Summary:
FlisKits has done something to competition flying that I am sure has been difficult to achieve in the past. They have created a Streamer Duration Kit worthy of purchase for even the most competitive of fliers, one that should swiftly become popular at meets across the country. Moreover, it's a great entry/starter model for rocketeers new to competition and many of the features/building techniques make for good teaching material regarding competitive construction methods. The only problems that were encountered during construction were very minor, to include simple things like Kevlar thickness change and tie point, two items they are correcting in future kits. I highly recommend this rocket to anyone who wants a quick sport flier or competitive streamer model. The features, performance and sheer ease of construction alone are worth the modest price for the kit, not to exclude what seems like pounds of paper used for very well documented instructions. For these reasons, I have to give the kit a 5 of 5 for total score. I am very happy with my FlisKits Cougar 660, a fun and hopefully quite competitive Streamer Duration Model!
Overall Rating: 5 out of 5
 |
 |
Flights
|
|